Showing posts with label wireless. Show all posts

Friday, August 21, 2015

Nissin Air Di700a (radio wireless TTL) now available for Sony

,


The Nissin Air Di700a, a radio-based wireless TTL system which I wrote about here, is apparently now available for Sony cameras. According to another ebay listing, it uses the new Multi-Interface Shoe.(used in the a6000, a7 series, etc.), not the Minolta hotshoe.

The seller describes it as a "pre-sale" (pre-order) although the seller's specified release date has already passed, so it appears to be readily available.  You should probably contact the seller to confirm.  Also please note the price of this combination is significantly higher than the price of a similar kit for Nikon or Canon, which is around $300.  Hopefully, it becomes available at a lower price for Sony as well.

Wednesday, March 4, 2015

Radio-based wireless TTL for Sony, Nikon and Canon

image by Nissin Group
​
 
Nissin is producing an affordable radio-based wireless TTL flash and trigger for Canon, Nikon and, starting this summer, for Sony as well.  There are already several radio-based TTL systems for Canon and Nikon.  However, for Sony, this is a welcome addition because the only such system available thus far is the Phottix Odin, and Nissin's system appears to have a lower total cost.

Friday, April 13, 2012

YN-560II Syncs with Nikon CLS Without Limits

We previously posted an article showing that it is possible to sync the original YN-560 with a popup flash as commander and a Nikon SB-800.  However, there were limits to the shutter speed that could be used.

BFP reader XiaoLi Zhang tested the Yongnuo YN-560 II's ability to sync with Nikon's wireless flash and found that the YN-560II can sync with virtually no limits!  Hit the jump to see the remarkable results of XiaoLi's tests.

Wednesday, November 23, 2011

Lastolite Brolly Grip Review: Soft Directional Light Anywhere


This is a preliminary review of the Lastolite Brolly Grip.  This unique lighting accessory allows you or an assistant to hold an umbrella, making it possible to get soft, directional light almost anywhere, without setting up.

In this review, I wanted to focus on using it by myself, without an assistant or light stand.  I also wanted to have a lot of sample shots to show the real-world potential of the Brolly Grip.

Sunday, September 26, 2010

Preview of Yongnuo's radio commander and speedlight: YN460-TX and YN460-RX

LightingRumours.com posted Yongnuo's official announcement of its radio commander and speedlight, the YN460-TX and YN460-RX.  I downloaded the demo videos from Yongnuo's website, which weren't exactly crystal clear, and tried to figure out how the commander and flash work.

First of all, the system seems independent from the camera's wireless flash system (such as Nikon's Advanced Wireless Lighting).  Briefly, the system appears to allow radio TTL and manual capability with remote adjustment.

COMPONENTS:

There is a commander unit called the YN460-TX (which looks like the Nikon SU-800).  The TX commander is designed to be attached to the camera hotshoe and apparently can emit an AF assist light.  However, it also appears that the TX can be used off-camera (query whether the TTL capabilities would remain). According to Yongnuo, the TX commander can control up to 16 dedicated speedlights (YN460-RX), each of which has built-in radio capability. 

HOW IT'S USED:

The TX commander controls 3 groups simultaneously: a TTL group (TTL), Manual group 1 (M1), and Manual group 2 (M2).  To assign an RX flash to a group, you press the RX flash's mode button until the RX selects WT (for the TTL group), M1, or M2.  In addition to the WT, M1, and M2 mode, the RX unit has another wireless mode, WX which allows it to function either on manual or TTL, as explained below.

Wireless Manual:
Group M1: once an RX flash is assigned to M1, its power level can be selected by choosing the M1 group on the TX unit then adjusting the power level.  There are 7 power levels, in full stops from full power to 1/64 power.  There are no power indicators per se -- you have to count the number of LEDs lit.  1 LED = 1/64, 2 LEDs = 1/32 etc. 

Group M2 functions similarly. Its power is selected by choosing the M2 group on the TX and adjusting the power level.

Wireless TTL:  This was not clearly demonstrated in the videos.  It appears that TTL flash exposure can be adjusted from -3 to +3 FEC.  The video demo'd adjustment of FEC directly on the RX flash.  The videos did not demo wireless adjustment of FEC with the TX commander, though it seems the TX commander should have this capability because its LEDs are labeled -3 to +3, which wouldn't make sense except for TTL.


WX mode of the RX flash:  In WX mode, the RX flash will match the CURRENTLY SELECTED mode of the TX commander.  By contrast, if the RX is in WT mode, it will stay assigned to the TTL group, and if it is in M1 or M2 mode, it will stay in M1 group or M2 group respectively.  On the other hand, by using the RX flash in WX mode, it can join group WT, M1 or M2 as needed.  If the user wants the RX (on WX mode) to join the TTL group, then the user simply has to remember to switch the TX to TTL mode when he is ready to shoot.  If the user wants the RX on WX mode to join the M1 or M2 group, the user simply switches the TX to M1 or M2 respectively immediately before shooting.

The WX mode is useful when you only have one RX flash, allowing you to switch from TTL to manual anytime.  It is useful also if you want one of your RX flashes to be flexible and join any of the other groups as needed.

OTHER NOTES:
  • Uses 2.4ghz frequency.  Up to 200m range claimed.
  • 7 available channels.  (By contrast, Nikon's Advanced Wireless Lighting has only 4 channels.)
  • Supports rear curtain sync, flash exposure compensation (FEC) and "FEB" (flash exposure bracketing??)
  • There is a blue LED light to show that a link between the TX and RX has been established.
  • The TX appears to have 2 ports, one of which appears to be a PC sync.
  • The RX flash can also function on non-wireless manual mode.  It is not clear whether it can function as a non-wireless TTL flash.
  • LightingRumours.com, citing De.Rec.Fotografie, states that cost will be 200 euro for a TX and RX kit.  Availability is estimated to be within the next 2 months, direct from Yongnuo's ebay site with a 12-month warranty: http://stores.ebay.com/hkyongnuophotoequipment .

Sunday, September 19, 2010

Meike MK-RC7 Wireless Flash Trigger Review

Update 6/18/11: resolved problem with remote shutter function.
Update 6/8/11: identified problem with remote shutter function -- see below.
Update 5/13/11: Tried using the MK-RC7 to trigger an Alien Bee B1600. It worked 100%.


The Meike MK-RC7 is an inexpensive radio trigger that works both as a flash trigger or a remote shutter release.  It shares many similarities in function and appearance with the Yongnuo RF-602, which has been out for almost a year now (differences are marked with an asterisk):

- 2.4 GHz.  Theoretically less prone to interference.
- Receiver unit can trigger either a flash or a camera's shutter release.
- 16 channels.  *Unlike the RF-602, if the RC7 transmitter is switched to channel 1111, it will trigger all channels.  I personally would prefer not to have this 'feature'.  If someone within the range of the RC7 (100m claimed) uses this channel, your flash will be triggered and there's nothing you can do to stop it.
- *The RC7 transmitter and receiver are both powered by AAA batteries, making it easier to find replacements in the field.
- *The RC7 transmitter includes a locking pin.  To lift the pin, you push a button on the back of the transmitter.
- *When functioning as a shutter release, the RC7 has a bulb mode and a delay mode.

I bought one transmitter, and two receivers, and here's a quick review.  Disclaimer: I'm not an experienced strobist.  My review is based on my experience with other a Cactus V2s triggers and a couple of wireless shutter releases.

PARTS / WHAT'S INCLUDED:
1. Transmitter (marked "TX").  The transmitter has no on/off switch.  For the shutter release function, the transmitter has a shutter release button that can be half pressed, as well as a switch for either a) standard/bulb/continuous shooting or b) delay mode.  There is a 2-stage LED light, which lights up green when the shutter is half pressed, then lights red when the shutter is fully depressed.  There are 4 switches to choose from among the 16 channels. There is a PC sync port.  The hotshoe is made of metal and looks like it has 8 pins in addition to the two lock pins (presumably so it can work with multiple camera brands).  There are two lock pins, which can be lifted when a button behind the hotshoe is pressed.

2. Receiver (marked "RX").  The receiver has a power switch.  It must be held down for about 3 seconds in order to turn the unit on, though can be turned off with a simple button press.  The receiver has a shutter that can be half-pressed just like the transmitter.  As with the transmitter, there are 4 switches to choose from among the 16 channels. The hotshoe has 6 contacts (3 large and 3 small), and two holes for locking pins.  There is a plastic cold shoe with a hole for a 1/4-20 tripod mount.  At the top are two LEDs.  The one on the right indicates whether power is turned on.  The one on the left is a 2-stage LED that indicates whether the receiver is receiving a signal (green then red, just like the transmitter's 2-stage LED).  The receiver has a 3-pin port that looks proprietary.

3. Cable from receiver to camera (to allow the shutter release function).  One end has the 3-hole proprietary connection for the receiver.  The other end is specific to your camera make and model.

4. PC sync cable (push-in type).

5. Cable from proprietary port to phone plug.

6. Adapter from phone plug to miniplug.

I ordered another receiver and they provided an extra set of the phone plug cord and miniplug adapter (but not an extra shutter cable).


BUILD QUALITY:
My initial impression of the build quality was positive.  I had Cactus V2s trigger, and the build quality on this one appears to be a notch above that.  It's not perfect though.  For example, I found the battery cover on one of the receivers to be unusually hard to close.  So much so that I'm concerned that the small clip that keeps the lid closed might break off in the future.

FUNCTIONS TESTED:
I tested the following functions:
  • Reliability as a wired cable release.
  • Reliability as a wireless remote shutter.
  • Reliability for triggering a single flash.
  • Maximum sync speed.
  • Wake-up function.
  • Reliability for triggering two flashes. 
1. Reliability as a cable release.
An RC7 receiver can be attached to a camera to act as a cable shutter release.  Specific cables must be ordered depending on your camera make and model.  The receiver has a shutter release button that can be half-pressed and fully pressed, just like a camera shutter.  This function works even with the receiver turned off or batteries are removed.

I tested this function and did not observe any problems.  Works as advertised.
  • If the RC7 shutter is half-pressed, it will function in the same way as the camera's shutter button being half-pressed.  Fully pressing the RC7 works the same way as fully pressing the camera shutter.
  • If the camera is in continuous shutter mode and the RC7 shutter is held down, the camera will fire continuously.
  • If the camera is in bulb mode, and the RC7 shutter is held down, the camera will fire in bulb mode and keep the shutter open for as long as the RC7 button is held down.
2. Reliability as a wireless remote shutter.
This is similar to the functionality of a cable release except that the shutter is triggered wirelessly.  The receiver has to be turned on of course.  This function works as advertised almost all of the time, but I wouldn't say 100%.  Differences from the cable release mode:
  • If the camera is in bulb mode, and the receiver is also in bulb mode, the shutter will remain open for as long as the RC7 transmitter shutter is held down, except that if the RC7 shutter is held down for about 3 seconds before release, then the shutter will remain open until the RC7 shutter is again fully depressed and released. 
  • Out of several trials, I observed one error in the bulb mode.  I held the RC7 shutter down, which kept the shutter up, and when I pressed the button again to close the shutter, the receiver didn't respond.  When I immediately pressed it again, the receiver worked as normal.

3. Reliability for triggering a single flash.
An RC7 transmitter can be attached to the camera either via the hotshoe, or attached to a camera or flash via a PC sync cord.  In the latter case, my camera's PC sync is disabled when I raise the popup flash.  Also, when the SB-800 is functioning as a CLS slave, the PC sync is also disabled.  The PC sync does work when attached to the SB-800, and the SB-800 is functioning as on-camera flash, CLS master, or SU-4 remote.

An RC7 receiver can be attached to a flash in at least a couple of ways: either through the flash's hotshoe or through the supplied cable for a phone plug or miniplug (like that on a Lumopro LP120 or LP160). I don't have any flash or strobe with a plug like that so I couldn't test that.
  • I tested the RC7 with a Nikon SB-800 and a Yongnuo YN-560.  The RC7 worked fine with both units at ordinary shooting distances.  I did not observe any missed syncs (i.e., each time I fired, the flash sync'd).  I did not test range.  I did test through a glass door and the flash still fired.
  • When a receiver is attached to a YN-560, the YN-560 blocks the receiver's power button (this is also an issue with the Yongnuo RF-602). An SB-800 does not block the power button.
  • When a receiver is triggered, the left LED stays green for several seconds as a visual indicator that the flash was successfully triggered.
4. Maximum sync speed
The highest sync speed I was able to use was 1/250 (transmitter mounted to camera's hotshoe; flash connected to receiver via hotshoe).  The camera allowed me to choose a higher sync speed but at 1/320 the rear curtain was visible in the top fifth or so of the image.


When the transmitter is attached to an SB-800 via PC sync, the highest sync speed I got was 1/200.

5. Wake-up function.
Some flashes go into standby after a period of inactivity.  The RC7 is supposed to be able to 'wake up' the standby flash and I tested this function.  On an SB-800, the receiver was able to wake up the SB-800 which had gone to standby, albeit after one missed shot.  Alternatively, I was able to wake up the SB-800 by pressing the shutter release on the transmitter.

6. Reliability for triggering two flashes.
In this setup, the transmitter was on the camera's hotshoe.  The receivers were attached to an SB-800 (in manual mode) and a YN-560.  When I first got the units, using this setup, I had missed syncs on perhaps a third or so of trials, which gave me a bad impression of the product.  However, I've been testing it now and have found it to be more reliable, with a failure rate of 1/30 for each receiver (a success rate of about 96.67%), i.e., the probability of both receivers working is around 93.44%).  Assuming other receivers have the same failure rate as my samples, then the probability of success for all receivers are:
  • 1 receiver: 96.67%
  • 2 receivers: 93.44%
  • 3 receivers: 90.33%
  • 4 receivers: 87.32%
  • 5 receivers: 84.41%
OTHER NOTES:
The flash was triggered without input on a few occasions.

As I continue using these triggers, I will post an update from time to time.  As long as you don't see anything here, you can assume they're working :)


6/8/11 update:  The flash triggering has been working consistently for triggering both speedlights and an Alien Bee monolight.  On the other hand, I had been having problems using the remote shutter function of the MK-RC7.  When I half-press the transmitter, the camera would focus but when I press the transmitter button all the way, the shutter doesn't release even though the LED on the receiver confirmed that it was receiving the signal.

With some testing, I found out that the problem was with the remote shutter cable.  If the cable is bent a certain way, the shutter does release and works normally.  I've ordered a new cable.

If you are having a problem with the remote shutter function and want to see if the cable is the problem, here's how to test it: connect the receiver to your camera and turn them both on.  Set the transmitter to the bulb/continuous shutter mode, then hold down the transmitter button for a few seconds.  Both LEDs on the receiver should light up red and stay lit.  Switch the camera to continuous shutter mode.  Then move the cable around various positions.  You may find that at certain cable positions, the shutter will be released.  (In my case I found that if the cable was bent almost 180 degrees near the receiver's port, the shutter would fire normally.)  When you're ready to cease testing, press the transmitter button again to deactivate the continuous shutter.

6/18/11 update: I received the new remote shutter cable and I tried it out.  The remote shutter worked as normal again.

Monday, August 23, 2010

Real Estate Photos - Part 1: Strobist Style (Intermediate)


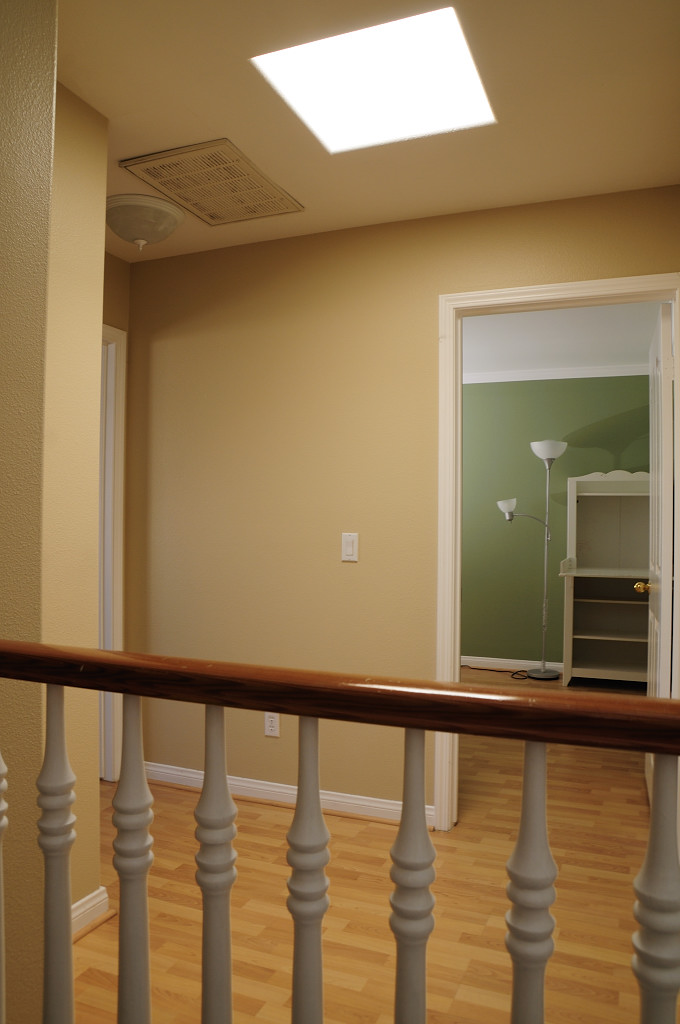
I took some real estate photos today for a friend who's a broker.  When I got to the house, it was midday with the sun almost directly overhead.  I would have preferred to take photos close to the golden hour, but I had a scheduling conflict.  The overhead sun though, was perfect for one of the rooms - a hallway with a skylight.

Here is the first test shot - all ambient (ISO: 200, f/4, 1/60):

The first thing I tried to improve the shot was to add more light in the green room.  I set the YN-560 in the green room on a window sill (so that it would be consistent with the natural light), bouncing to the white ceiling.  I used the YN-560 in optical slave mode and triggered it with the D300's popup flash in manual mode.  The YN-560 triggered successfully even though it was not in the line of sight, and the popup was on 1/128 power.  I kept the exposure value the same but used f/8 for sharpness (ISO: 200, f/8, 1/15), and I used the YN-560 on 1/4 power.


I didn't like how the popup lit the balustrade, so I attached an SG-3IR infrared filter to cover the popup flash.  This time, 1/128 power did not work.  With the SG-3IR, however, I could use the popup flash on full power without affecting the exposure.  So that's what I did:


Next, I wanted to brighten the hallway a bit without destroying the ambience from the ambient :) I tried putting an SB-800 in the room at camera left, aimed at the ceiling.  The SB-800 was on manual, in SU-4 mode, I believe at 1/8 power.  I again kept the exposure the same.


It created a shadow on the ceiling that I found distracting.  I tried bouncing it instead, behind me.

The brightening effect on the room was enough but I felt that the balustrade was illuminated too much.  I reduced the power on the SB-800 by a stop:

A crude lighting diagram (the red flash is the YN-560 and the green flash is the SB-800):
 Comparing the original ambient-only shot with the final shot:


I tried taking a shot of the same hallway from a different angle. This time I tried putting the Sb-800 on the window sill of the room on camera left, bouncing to the ceiling.  A lighting diagram:

I adjusted power so that its shadow would be almost invisible.


(Darn - I forgot to turn on the lights in both shots...)

For my other shots, I tried a different technique (HDR), which I'll post about next.

Friday, July 30, 2010

Nikon CLS Advanced Wireless Lighting Tip: Wireless High Speed Sync (Basic)


(f/2.8, 1/1000, ISO 100, Nikon D80, Tamron 28-75 f/2.8)


One of the strengths of Nikon's system is its advanced wireless lighting (AWL) which allows a commander-capable flash to remotely control and adjust compatible slave flashes.  Other systems have remote flash capability as well to varying degrees.  However, not all flash systems can do wireless high speed sync (HSS) but Nikon's AWL can.

A lot of people (myself included) use the popup flash as a commander, with an external flash such as an SB-600, SB-800, or SB-900 as a slave.  By default, the commander mode menu is set to allow the popup flash to contribute to the exposure (specifically, the default for the popup flash is TTL with 0 FEC).  The problem is that the popup flash does not have high speed sync.  What happens then is that when the popup flash is set to contribute to the exposure, the shutter speed is limited to the sync speed (e.g. 1/250).

In order to use wireless HSS, use the commander menu to deactivate the popup flash (set it to "--"), meaning it will only be used as a commander and will not contribute to the exposure.  If you want to use the commander to contribute to the exposure (e.g., as fill), then use an HSS-capable commander flash (SB-800 or SB-900).

Saturday, July 24, 2010

Nikon CLS Advanced Wireless Lighting Tip: Shortening the Preflashes (Basic)

If you have only one slave flash or are using only one group, it's easy to shorten the preflashes. There are benefits to doing this: extending battery life slightly, preserving the operating life of the popup flash, and most importantly, reducing the likelihood of blinks.

To shorten the preflashes, all you have to do is disable the unused groups (Group B and C if your slave is in Group A). Disabling a group is done by selecting "--". You'll notice the commander preflashes will become shorter than if the unused groups are active.

If you liked this tip, you may be interested in the SG-3IR, which can reduce blinks.

Monday, July 19, 2010

Adding Form to Backlit Photos (Intermediate)


I love backlit photos, even though some people think backlighting is overused. When the backlighting comes from sunlight, one issue is that the face is almost always illuminated by shade, which is a very soft but very flat light source (because it's omnidirectional). Sample:

If on-axis fill light is added (e.g. from a popup flash), the shaded face will be lifted, but the form looks just as flat because of the direction of the fill light. Sample:


A backlit photo can easily be made to appear more three-dimensional by lighting the face at an angle, whether using a reflector or flash.  The light can be bright enough to act as a key light, as in this sample:

(bare SB-800 flash from above and camera right, zoomed to 105mm, triggered via CLS AWL*)
*Nikon Creative Lighting System - Advanced Wireless Lighting 
Note that there is a shadow on the right side of the face (camera left), making the face look more three-dimensional than in the sample photos above.

Alternatively, the light can have a lower intensity, at an angle opposite to the backlight, to simulate the backlight bouncing off from the ground to illuminate the face.  Sample:

(SB-800 with shoot-through on camera right, triggered via AWL)

The sample photo at the top of this post is somewhere in between the two foregoing approaches.  I underexposed the ambient light, then added light from a bare SB-800 camera left and additional fill from the pop-up.  No light modifiers were used, nor did I use any postprocessing (other than conversion from RAW to JPEG) but the light doesn't look harsh due to the controlled contrast.  That's a technique I'll discuss in a future post.

Tuesday, April 20, 2010

Nikon CLS Advanced Wireless Lighting Tip: wireless control without menus

When I use the pop-up flash to control my external flash wirelessly using Nikon's Advanced Wireless Lighting (AWL), I have been using the camera menus to control the flash ratios.  I press menu, go to flash commander mode, then dial in the flash exposure compensation for the popup flash and the external flash.  It works, but sometimes it's not fast enough to capture images of our toddler.  I've sometimes thought how nice it would be not to have to go through the menus to adjust the flash intensity.  Well, I just realized the function has been there all along.  In fact there are two ways to do it.

1. If I'm in Program, Aperture Priority, or Shutter Priority, I can use the flash button on the body to adjust the FEC (hold down the flash button, then rotate the sub-dial).  This function still works in wireless mode.  When more than one flash is contributing to exposure (e.g., pop up and external), then the FEC adjustment is applied to all the flashes cumulatively.  In practical terms, this lets you set up your ratios beforehand, then you just use the external FEC button to adjust overall flash exposure.  For example, my SB-800 is my key light and is assigned to group A, in TTL mode with 0 FEC.  My fill light is my pop-up, in TTL mode with -2.0 FEC.  After I exit the menu, I take a shot. If it looks too bright, I adjust the external FEC button by -3 FEC let's say.  The result will be the popup will have -5 FEC and the SB-800 in Group A will have -3 FEC.  Note: I noticed that the metadata on the image will show up to -5 FEC but in the real world, the actual limit is -3 FEC.

2. If I'm in Manual exposure mode, I can use the same method above OR I can use the exposure compensation button.  In the Nikon system, the exposure compensation affects both the ambient and the flash exposure.  If you're in manual exposure and you change exposure compensation, it will just bias the meter and it won't change the ambient exposure, but it WILL affect the flash exposure compensation.  As with the previous method, this change affects all flash groups and will adjust each group's FEC cumulatively.

Sunday, August 9, 2009

"Stealth" flash eliminates blinks: SG-3IR flash panel product review

UPDATE: 9/6/12 - See Aokatec IR panel under alternatives

Wouldn't it be great to dramatically reduce the number of shots where your subject is blinking?

I rely heavily on wireless TTL flash via Nikon's CLS Advanced Wireless Lighting and really like the ability of the D80 (and higher-end cameras in Nikon's line) to use the pop-up flash as a commander. One drawback to Nikon's wireless system is that there are longer preflashes that occur (for the commander to communicate with remote units) and many times, our son ends up blinking in the shot. The preflashes also create visible specular reflections. Great if you want an extra catchlight in the eyes but otherwise potentially problematic.
Nikon has a dedicated infrared commander (SU-800), which I'm assuming emits invisible preflashes, but it's not cheap. Moreover I sometimes use the pop-up to add a little bit of fill (generally -2 stops flash exposure comp), which the SU-800 can't do.

The SG-3IR (that's "ir" as in infrared, not "1r") flash panel looks like a simple and cheap piece of plastic, but it's an effective and affordable solution to the preflash problem. It's not easy to find but I got one from B&H and it works as expected.

From pictures, I thought the panel was just a piece of solid black plastic with small slits to let some light through. But the panel actually has no holes and is made of a material that blocks visible light but is translucent to infrared (which is what the slave units need to see). The panel is also larger than I expected - about 2/3 the size of a credit card.

The panel attaches to the camera's hot shoe. Its plastic base has a spring-loaded pin that secures the panel into the hot shoe. Removing the panel is kind of tricky because of the pin. The way I remove it is by pulling the unit up to lift it very slightly then sliding it off.

DOES IT WORK?
The panel is very effective in reducing blinking shots. All that the subject will see from the popup flash is a dim red light from the panel (much dimmer than the AF assist light). There is still a preflash from the slave (when in TTL or AA mode) but: 1. If the slave is off on one side, it's less likely to cause the subject to blink, 2. using fv lock fires the preflash, so that in the actual shot there is no preflash. If even that preflash bothers you, you can switch to Manual mode - no preflashes.

In real life, I've used the panel to take about 200 shots in a variety of ambient light conditions - daylight to dim indoor light. I've had literally a handful of pics with blinking subjects. I speculate that those few blinking shots are due to the subjects anticipating the flash even though they can't really see it.

What if you want to use the popup as fill? The panel has a hinge that lets you flip it up and it will stay up. Nice!

EFFECT ON RANGE
In tests I conducted, maximum range was reduced by about 1/3 to almost half, but probably won't make a big difference for family photographers. The farthest distance I was able to trigger an sb800 in near-ideal conditions (dim parking lot lights at night, in direct line of sight, sensor window facing the camera) with the popup covered by the panel is about 75 feet. With the bare popup flash I was able to trigger the sb800 under those conditions at about 110 feet. In daylight, with the panel covering the popup flash and the camera facing toward the sun, I was able to trigger the SB800 at about 45 feet. With the bare popup flash in those conditions, I was able to trigger the SB800 at about 80 feet.

In real life, in some shots in difficult conditions for optical triggers (bright daylight) the paneled popup didn't trigger the sb800 when it was off to the side. However I was able to trigger the sb800 if I moved the sb800 closer to the camera axis.

I wish to emphasize that IMO the reduced range is a small disadvantage compared to the benefit of virtually eliminating blinks.

WHAT ABOUT NON-NIKON CAMERAS?
I haven't tried it but in theory the panel should also work for other cameras. Issues:
1. Is the shoe mount the standard size shoe mount? (For example, Sony cameras use a different shoe mount.) Note: The panel has a pin but it is spring-loaded so I think it will just not drop down if there's no corresponding hole. Please note the panel might not sit securely.
2. Do the slave flashes sense infrared light? If they only sense visible light, they won't be triggered with the panel.
3. Will the popup flash physically fit behind the panel? The panel sits about 2 inches forward from and 2 inches above the shoe mount.
9/6/12 Update: Canon and Sony shooters can try the Aokatec IR panel (see below under alternatives).

ALTERNATIVES
1. Exposed negative film
Get undeveloped 35mm film, overexpose it, have it developed, cut it to size and cover the flash. I haven't tried this myself. I've read that the film may heat up and emit a burnt odor.

2. SG-2
Nikon also produced a similar flash panel called the SG-2. The difference is that the SG-2 panel is made of white plastic. But I don't know if the white plastic completely blocks visible light.

3.  Aokatec IR panel.
There is now a third party product that is similar to the SG-3IR, produced by a company called Aokatec.  The most significant difference for Canon users is that the Aokatec foot has a recessed area so that it won't push down the TTL pins on a Canon hotshoe.  Aokatec also produces a version of the IR panel for Sony/Minolta cameras with the Sony/Minolta hotshoe.  For a more detailed review of the Aokatec panel go here.

CONCLUSION
Pros: blocks the visible light effectively, greatly reducing the chance of subject blinking. Can be flipped up if you need to let the popup contribute light. Reasonable cost for the quality.
Cons: a little hard to remove. When attached, camera may be hard to store in the bag. Triggering range reduced. Not easy to find.
Rating: 4/5. Strongly recommended for anyone who uses CLS Advanced Wireless Lighting, or uses the popup flash as an optical trigger for infrared-sensitive slaves. Would be 5/5 if the panel were easier to remove (e.g. with the same kind of lock as the sb800) and the camera could be stored in a bag with the panel attached and was completely transparent to IR.