Showing posts with label cls. Show all posts

Friday, April 13, 2012

YN-560II Syncs with Nikon CLS Without Limits

We previously posted an article showing that it is possible to sync the original YN-560 with a popup flash as commander and a Nikon SB-800.  However, there were limits to the shutter speed that could be used.

BFP reader XiaoLi Zhang tested the Yongnuo YN-560 II's ability to sync with Nikon's wireless flash and found that the YN-560II can sync with virtually no limits!  Hit the jump to see the remarkable results of XiaoLi's tests.

Wednesday, November 23, 2011

Lastolite Brolly Grip Review: Soft Directional Light Anywhere


This is a preliminary review of the Lastolite Brolly Grip.  This unique lighting accessory allows you or an assistant to hold an umbrella, making it possible to get soft, directional light almost anywhere, without setting up.

In this review, I wanted to focus on using it by myself, without an assistant or light stand.  I also wanted to have a lot of sample shots to show the real-world potential of the Brolly Grip.

Wednesday, October 27, 2010

Pumpkin Patch Day (Basic)


Sit with me, dad!
Originally uploaded by mic_ty
Our toddler had a pumpkin patch day at school. We had less than a minute to take a photo of him as kids took turns on this set.

The ambient light was not bad - it was open shade. I considered taking the photo with just ambient light but opted to use the 25" Creative Light shoot-through umbrella that I brought with me. I used an SB-800 on wireless TTL mode and covered the popup commander flash with an SG-3IR panel to avoid any harsh shadows from the popup flash.  I underexposed the ambient by a stop, and allowed TTL to expose normally.

As for the lens choice, I wanted to use the Sigma 50-150 but there wasn't much space in the small area for this shot, so I used the Tamron 17-50 VC.

Friday, September 10, 2010

Nikon CLS wireless tip: invisible popup

When using the popup flash in commander mode, the popup flash contributes a little bit to the exposure even when disabled ("--"). It is possible to block the popup flash completely by using an SG-3IR infrared panel or infrared filter. Even if you don't have an infrared filter, however, you can make the popup flash invisible by using a shutter speed that is higher than sync speed. That's because the popup flash cannot do high speed sync therefore the popup flash will be blocked by the rear curtain. The popup will still be able to control the CLS slave.

Note: there are third-party flashes such as the Nissin Di866 that can be controlled by CLS but cannot do remote high speed sync. This trick won't work with such units.

Monday, August 30, 2010

Fill Flash: Summer Pool Party! (Basic)


We attended a summer pool party-themed birthday hosted by our friends.  It was sunny but not hot - just absolutely perfect weather to have a dip in the pool.


Chastened by my failure to take good photos at our toddler's birthday, this time I resolved to take a back-to-basics approach.  How basic?  I stuck to on-camera flash, on TTL, bare (no diffusers or anything), in almost all cases direct frontal light.  OK, I can see the tomatoes coming from the strobist crowd... :)  There is a certain logic to the approach I took.  Outdoors, with virtually no suitable bounce surface, using flash for on-axis fill is a logical technique.

A second technique I used was to do my best to avoid direct sunlight on the face of the subject.  Direct sunlight looks boring (to me), is rarely flattering, and de-saturates colors:

Instead, I tried to use the sunlight as backlight or rim light.

Applying just those three simple lighting techniques, I was able to focus on capturing key moments, composition, and even on enjoying myself.  How'd the shots turn out?  Not bad, in my opinion.  In most cases, the Nikon TTL-BL was smart enough to know when the flash was functioning only as fill to lift shadows, so shadows still looked like shadows instead of being blasted by flash.  Compare the shots below.  The top shot is ambient only (the light on our toddler's face is from sunlight bouncing from the white towel), while the bottom shot is with flash.  The flash lifted the shadows without obliterating them, and managed to maintain a similar pattern of highlight and shadow as with the ambient-only shot.  The downside is that the flash did create its own shadow because it wasn't sufficiently on-axis.  (In the future I wish to try David Hobby's on-axis fill flash method or perhaps try a ring flash.)


After I got some safe shots, I tried from time to time switching to ambient only or to off-camera flash.  The ambient usually required some compromise such as leaving the shadowed areas underexposed, or overexposing the background (which would require layers and masks to fix in postprocessing), so I kept going back to using fill-flash.

Ambient only (background overexposed):


Ambient only (subject underexposed):


My off-camera shots weren't good either, in part because I didn't bring a tripod to use as a boom for the light.

Here are a few shots from the party (most are straight out of the camera or with just minor adjustments):


Our toddler didn't want to leave:


After the party, we went around a bit and enjoyed the scenery.


Best of all, we had an awesome time!

Monday, August 23, 2010

Real Estate Photos - Part 1: Strobist Style (Intermediate)


I took some real estate photos today for a friend who's a broker.  When I got to the house, it was midday with the sun almost directly overhead.  I would have preferred to take photos close to the golden hour, but I had a scheduling conflict.  The overhead sun though, was perfect for one of the rooms - a hallway with a skylight.

Here is the first test shot - all ambient (ISO: 200, f/4, 1/60):

The first thing I tried to improve the shot was to add more light in the green room.  I set the YN-560 in the green room on a window sill (so that it would be consistent with the natural light), bouncing to the white ceiling.  I used the YN-560 in optical slave mode and triggered it with the D300's popup flash in manual mode.  The YN-560 triggered successfully even though it was not in the line of sight, and the popup was on 1/128 power.  I kept the exposure value the same but used f/8 for sharpness (ISO: 200, f/8, 1/15), and I used the YN-560 on 1/4 power.


I didn't like how the popup lit the balustrade, so I attached an SG-3IR infrared filter to cover the popup flash.  This time, 1/128 power did not work.  With the SG-3IR, however, I could use the popup flash on full power without affecting the exposure.  So that's what I did:


Next, I wanted to brighten the hallway a bit without destroying the ambience from the ambient :) I tried putting an SB-800 in the room at camera left, aimed at the ceiling.  The SB-800 was on manual, in SU-4 mode, I believe at 1/8 power.  I again kept the exposure the same.


It created a shadow on the ceiling that I found distracting.  I tried bouncing it instead, behind me.

The brightening effect on the room was enough but I felt that the balustrade was illuminated too much.  I reduced the power on the SB-800 by a stop:

A crude lighting diagram (the red flash is the YN-560 and the green flash is the SB-800):
 Comparing the original ambient-only shot with the final shot:


I tried taking a shot of the same hallway from a different angle. This time I tried putting the Sb-800 on the window sill of the room on camera left, bouncing to the ceiling.  A lighting diagram:

I adjusted power so that its shadow would be almost invisible.


(Darn - I forgot to turn on the lights in both shots...)

For my other shots, I tried a different technique (HDR), which I'll post about next.

Friday, July 30, 2010

Nikon CLS Advanced Wireless Lighting Tip: Wireless High Speed Sync (Basic)


(f/2.8, 1/1000, ISO 100, Nikon D80, Tamron 28-75 f/2.8)


One of the strengths of Nikon's system is its advanced wireless lighting (AWL) which allows a commander-capable flash to remotely control and adjust compatible slave flashes.  Other systems have remote flash capability as well to varying degrees.  However, not all flash systems can do wireless high speed sync (HSS) but Nikon's AWL can.

A lot of people (myself included) use the popup flash as a commander, with an external flash such as an SB-600, SB-800, or SB-900 as a slave.  By default, the commander mode menu is set to allow the popup flash to contribute to the exposure (specifically, the default for the popup flash is TTL with 0 FEC).  The problem is that the popup flash does not have high speed sync.  What happens then is that when the popup flash is set to contribute to the exposure, the shutter speed is limited to the sync speed (e.g. 1/250).

In order to use wireless HSS, use the commander menu to deactivate the popup flash (set it to "--"), meaning it will only be used as a commander and will not contribute to the exposure.  If you want to use the commander to contribute to the exposure (e.g., as fill), then use an HSS-capable commander flash (SB-800 or SB-900).

Monday, July 26, 2010

TTL Flash Troubleshooting Checklist (Basic to Intermediate)

Updated: August 18, 2010

Sometimes I take a shot with flash on TTL and the exposure is completely wrong (much too bright or dark), the flash doesn't fire, etc. Here are the settings I double-check to see what may have gone wrong.
  • Flash sync mode. Slow rear sync is automatically selected in program or aperture priority when the sync mode is on rear sync.
  • ISO. If the flash exposure is too high, I check if my ISO is too high. If I'm bouncing the flash and the flash exposure is too low, I check if my ISO is too low.
  • Exposure compensation. With Nikon, exposure compensation does affect flash exposure. If I used exposure compensation with a previous shot, I check if I left it on (With Canon, exposure compensation does not affect flash exposure.)
  • Flash exposure compensation on camera, on flash, on menu. There are three ways to adjust flash exposure compensation in my camera/flash combination (D300 and SB800). First, if the flash is attached to the camera, I can adjust FEC on the flash body (by pressing + or - ). Second, on the camera body, if I hold down the flash button, I can change the FEC using the sub-command dial. Third, I can change the FEC using the flash menu. The three ways to adjust the FEC are *cumulative*.
  • AE-L (auto-exposure lock). If I used AE-L in a previous shot, I check if AE-L has been released.
  • FV lock needed? If the subject is off-center, or there's an object in the foreground, aiming at the subject first then using FV lock before recomposing the picture ensures a more accurate TTL flash exposure.
  • FV Lock - is it active? If I used FV lock in a previous shot, I check if the FV lock has been released.
  • TTL-BL? TTL-BL is a mode where the camera tries to balance the flash exposure with the ambient exposure. The exposure with TTL-BL is often different from that of regular TTL. TTL-BL is the default mode but can be deactivated by pressing the mode button on the on-camera flash, or by switching the metering mode (see below).
  • Metering mode (spot, center, or matrix). Nikon's TTL flash exposure is affected by the metering mode. If the metering mode is spot, TTL-BL is deactivated. If the metering mode is center, TTL can give potentially incorrect flash exposure.
  • Batteries too low? The SB800 unfortunately has no battery meter or even a low-battery indicator. It will do its best to keep firing but when the battery is very low flash exposure sometimes becomes strange before the flash finally quits. If you fire a shot and it takes longer than usual for the flash to recharge for the next shot, that means the batteries are too low.

Additional checklist for wireless mode (CLS AWL):
  • Commander mode activated.
  • Commander mode settings saved. After inputting new settings, press OK, not just menu to go back, otherwise the new settings won't be saved.
  • CLS slave in remote mode (vs. SU-4 mode).
  • CLS slave in the correct group (Group A, Group B or Group C).
  • CLS slave on the same channel as the commander.
  • CLS slave on correct mode (TTL vs. AA vs. Manual). Note: the SB-600 has no AA mode.
  • If flash exposure is still wrong, I try switching to manual control. Once in a very rare while, the flash will still give me the wrong flash exposure notwithstanding the foregoing checklist. On those occasions, I try switching to manual mode.

Saturday, July 24, 2010

Nikon CLS Advanced Wireless Lighting Tip: Shortening the Preflashes (Basic)

If you have only one slave flash or are using only one group, it's easy to shorten the preflashes. There are benefits to doing this: extending battery life slightly, preserving the operating life of the popup flash, and most importantly, reducing the likelihood of blinks.

To shorten the preflashes, all you have to do is disable the unused groups (Group B and C if your slave is in Group A). Disabling a group is done by selecting "--". You'll notice the commander preflashes will become shorter than if the unused groups are active.

If you liked this tip, you may be interested in the SG-3IR, which can reduce blinks.

How to Sync the YN-560 with Nikon CLS Advanced Wireless Lighting

***Update: YN-560II is able to sync with Nikon CLS without limits. See here***


BACKGROUND (you can skip this if you just want to  know how to get the YN-560 to sync :) ): 

I got the YongNuo YN-560 to supplement my Nikon SB800 (controlled by my Nikon D300's popup).  I knew the YN-560 was a manual flash that wasn't controllable by the pop-up flash as commander, but I didn't mind.  I planned to control the SB800 remotely while allowing the YN-560 to function in manual mode for special effects like background light, rim light, etc.  It seems other photographers had the same plan (see here for example).  Finally, someone was able to do it.  I ordered the YN-560 and when I finally received it, that was the very first function I tested.

Unfortunately it didn't work.  I thought it was just unreliable, so I tried a few times.  Nope -- not only did it fail to sync, it didn't fire at all.  I tried various settings, such as changing the popup from inactive to TTL to Manual, and the SB-800 from TTL to AA (auto aperture) to Manual.  I tried reassigning the SB-800 to Group B instead of group A, activating and deactivating Group B, switching between the 4 available channels.  Nothing seemed to work.  Regular slave mode did work of course (where the YN-560 does not ignore preflashes), but that wasn't enough for me.

I was able to contact the photographer who was able to trigger it and he said his popup was on commander mode but inactive (i.e., not contributing to exposure) and he was able to trigger the SB-600.   However, I didn't know the exact settings.

I finally resolved to try some more combinations of settings.  After a couple of hundred test shots I was ready to give up.  Then I tried to figure out what exactly was going on with the YN-560.  Why wasn't it firing at all when the popup was on commander mode?  I then hypothesized that when the YN-560 detects a preflash, it will "hold its breath" for a specific time limit, and within that time limit, the YN-560 will ignore preflashes and watch for the "real" flash.  However, if preflashes last throughout the duration of that time limit, the YN-560 gives up and shuts up, until it can restart the cycle after a pause.  ***That's just a hypothesis.  It's not necessarily correct.***

Based on the hypothesis, I thought the commander preflashes were exceeding the time limit for detecting the real flash.  I can't shorten the preflashes, but I thought about allowing giving the cycle time to reset by using a combination of FV Lock, rear curtain sync, and a slow shutter speed.  Guess what? It worked.  That gave me hope to try out some more settings.

THE RULES FOR SYNCING THE YN-560 WITH CLS AWL:
 Assumptions: the user wants to use a flash in commander mode to adjust a CLS AWL-compatible flash (either TTL, AA or M) while using the YN-560 manually in digital optical sync (S2 mode). Only one CLS group was tested.

Testing conditions: Nikon D300 with popup flash as commander, one SB800 as CLS slave (set to 105mm zoom), one YN-560 (set to 105 mm zoom).  Dark ambient conditions (i.e., optimal triggering conditions).  I aimed the two flashes about 3 feet from a wall.  The YN-560's sensor (in the body) was aimed at the wall.  The SB-800's cls sensor was facing up.  To facilitate differentiation of output, The flashes were at different vertical positions.  In addition, the SB-800's sound was turned off (because in my experience the SB-800 triggers very reliably), while the 560's sound was turned on.

Here are the convoluted conditions for the YN-560 to sync correctly with the Nikon CLS Advanced Wireless Lighting, as far as I can determine.

1. The variables that affect sync are:
a. the flash sync mode
b. shutter speed
c. the flash exposure mode of the popup and the CLS slave
d. whether FV lock is used
e. whether the slave is assigned to Group A or Group B.  Group C not tested.
f. whether Group B is inactive or not.  Group C not tested.
g. the channel being used.


2. The easy stuff:
a.  FLASH SYNC MODE:  The camera has to be set to rear curtain sync.  Front curtain will not work.  Red eye will not work.  Slow sync by itself will not work.  Slow rear sync may work if the resulting shutter speed is 1/10 or faster. Note that if you select rear curtain while in P or A mode, slow rear sync will automatically be selected.
b. CLS SLAVE GROUP: assign the CLS slave to Group A.  The CLS slave can work in Group B but under fewer conditions.  I didn't test all the combinations.
c. CLS CHANNEL: use Channel 1.  Channel 2 and others work, but under fewer conditions.  I didn't test all the combinations.

3. The weird stuff:
a. In all cases, shutter speed has to be 1/10 or faster.  Any slower and it won't sync.
b. The fastest shutter speed depends on the flash exposure mode of the popup and the CLS slave.  General rule: the fastest shutter speed is 1/125. I haven't been able to sync at 1/160 or faster.  Exceptions to the general rule:
i. if the popup is on TTL, then FV lock is needed to sync at 1/125.  Otherwise, the fastest shutter speed is 1/100.
ii. if the CLS slave is on M and the popup is on either inactive ("--") or M, then the fastest shutter speed is 1/60.
See this spreadsheet for a summary: http://spreadsheets.google.com/ccc?key=0AoRnW2_ZeadSdEZPY2VCRHBxaHVnRTJQZXJwX1p5OHc&hl=en&authkey=COmm5uMF

4. The good news: If the rules above indicate that a sync is possible, then on each occasion I've tried, the popup and CLS slave can each be adjusted, and FV Lock will work (where applicable).

ALTERNATIVES
As an alternative to the foregoing, it is of course possible to use the YN-560 in S1 (regular optical slave mode), while the other flashes are in Manual or Non-TTL Auto mode.  Another alternative is to use the YN-560 in S2 mode, the popup on regular TTL, and an SB-800 or SB-900 in SU-4 optical slave mode.

UPDATE
Please check out the update on the YN-560 re sync speed and other interesting info.

Monday, July 19, 2010

Adding Form to Backlit Photos (Intermediate)


I love backlit photos, even though some people think backlighting is overused. When the backlighting comes from sunlight, one issue is that the face is almost always illuminated by shade, which is a very soft but very flat light source (because it's omnidirectional). Sample:

If on-axis fill light is added (e.g. from a popup flash), the shaded face will be lifted, but the form looks just as flat because of the direction of the fill light. Sample:


A backlit photo can easily be made to appear more three-dimensional by lighting the face at an angle, whether using a reflector or flash.  The light can be bright enough to act as a key light, as in this sample:

(bare SB-800 flash from above and camera right, zoomed to 105mm, triggered via CLS AWL*)
*Nikon Creative Lighting System - Advanced Wireless Lighting 
Note that there is a shadow on the right side of the face (camera left), making the face look more three-dimensional than in the sample photos above.

Alternatively, the light can have a lower intensity, at an angle opposite to the backlight, to simulate the backlight bouncing off from the ground to illuminate the face.  Sample:

(SB-800 with shoot-through on camera right, triggered via AWL)

The sample photo at the top of this post is somewhere in between the two foregoing approaches.  I underexposed the ambient light, then added light from a bare SB-800 camera left and additional fill from the pop-up.  No light modifiers were used, nor did I use any postprocessing (other than conversion from RAW to JPEG) but the light doesn't look harsh due to the controlled contrast.  That's a technique I'll discuss in a future post.

Monday, July 12, 2010

Smoke photography (Intermediate)


I finally tried smoke photography.  There are a few ways to do it - here's how I did it to get sharp smoke. Note: It has nothing to do with family photography, but it is a sample of an application of lighting knowledge.

1. What's needed.
a. smoke source. I used incense, although a cigarette can also be used.
b. flash (ideally an external flash for power and versatility). I used an SB-800.
c. a place shielded from wind, ideally one that isn't so bright, with dark walls, and with ventilation so that the smoke doesn't accumulate. I used our bathroom (which doesn't have a smoke detector).
d. optional: remote shutter release, tripod for camera.

2. Position the camera, flash, and incense.
a. Find a spot away from the wall.  The closer the wall is to the flash, the more likely the flash's light will illuminate the wall, making it harder to get a black background.
b. Position the incense reasonably close to the lens.  Smoke looks nicer when close up.  The smoke at the tip of the incense is also more organized - consider that in positioning the incense.
c. Position the flash close to the incense.  The close distance helps to increase the relative power of the flash to minimize ambient.  I positioned mine directly below the incense, and away from the lens to avoid flare.


3. Set focus. Focus is critical to getting a sharp smoke photo.  You need dim light to take smoke photos, and it's hard for cameras to focus a dimly lit subject.  Instead, put your hand or other proxy target over the incense, where the smoke will appear, and focus on the hand/target.  Once focus is set, switch to manual focus and don't change the position of the camera and the incense.

4. Set the camera exposure.
a. Set shutter speed to sync speed.  The idea is to kill ambient light to get a dark background.  1/250 for the D300.
b. Set the ISO to the base ISO. Again, we're trying to kill the ambient.  200 for the D300. 
c. Set the aperture.  A small aperture is needed to increase the probability that the smoke will be in focus.  A small aperture also helps to kill the ambient.  With a dark wall, I could get a black background with f/8.  With a light wall I needed f/16.

5. Set the manual flash exposure.
Because the position of the subject, flash, and camera don't change, I used manual flash instead for consistency, although TTL worked too when I tried it.  Using trial and error, I set the power to 1/4 for an aperture of f/16, ISO 200, or 1/8 for an aperture on f/8, with a distance of about 1 foot between the smoke and the flash.


6. Experiment with moving the smoke.
Try holding the incense and moving it, keeping it on the same distance to the camera to maintain focus.  When you get the hang of it, you can even take the shots handheld to get variety.

7. In postprocessing, consider cropping, using negatives (to get black smoke on a white background), and/or altering the color of the smoke and background.

UPDATE: Check out this related post on a secret tool for smoke photography

Sample shots:


Thursday, June 10, 2010

Creative Light Translucent (Shoot-Through) Umbrella - 25 inch

To improve the softening effect of the Propet handheld umbrella, I looked for a slightly larger umbrella.  I looked for a shoot-through because it can be placed closer to the subject.  With the increased size and the closer distance, the light would be much softer than the 19" reflective umbrella that came with the Propet bracket.  I also suspected that at my usual shooting distance, a shoot-through umbrella would probably be more efficient than a reflective umbrella (see test shots here).

I wanted to get the 60cm / 24 inch Gadget Infinity convertible umbrella for versatility but when shipping cost is added ($11), I found it just a bit too expensive for what it is.  Amazon offered the Creative Light shoot-through umbrella (25 inches) at a discount, so I got that one instead.  I'll put up a more rigorous review later.  For now here are my initial impressions:

Size
Folded length: 18 inches / 46 cm.
Diameter when opened (measured as a straight line from tip to tip): 24.5 inches / 62 cm.
Shaft diameter: 1/4 inch.  Fits the propet umbrella bracket very well (whew...!)

Build QualityCompared to my other umbrellas, build quality is fairly good.  The shaft is like the Propet umbrella, with a tapered and rounded tip, and will not crush easily (unlike the hollow steel shafts of some umbrellas, such as the Westcott convertible).  The tips of the ribs are rounded as well.  The ferrule is short and flat-tipped, which allows closer positioning to the subject.  The umbrella fabric is silk... Ha! Just testing if you're reading :) It's actually nylon.

When opened, the ribs stretch the fabric very tautly.  As a result, it was a slightly harder than my other umbrellas to open and when closed, it's a bit louder than usual (prompting my wife to think some device popped when she heard it).
Softness

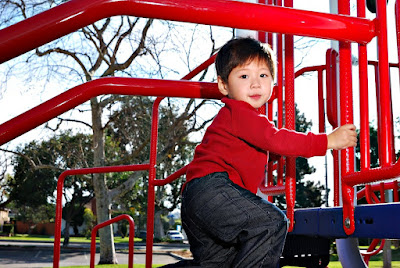
As expected, the light appears to be much softer than the 19" reflective because it's larger and because it can be moved closer to the subject.


(third image edited to remove the reflection of the umbrella against the window)

I'll update this post when I test the efficiency and optimal flash zoom. I will also post comparison shots with the 19" reflective umbrella.