This video shows the effect of the firmware update v. 1.10 on the Samsung NX500's low light autofocus speed, backlight autofocus accuracy, and the raw buffer depth.
Hit the jump for details.
Showing posts with label backlight. Show all posts
Showing posts with label backlight. Show all posts
Tuesday, June 30, 2015
Saturday, September 1, 2012
A Lighting Opportunity You Shouldn't Miss

Monday, July 19, 2010
Adding Form to Backlit Photos (Intermediate)

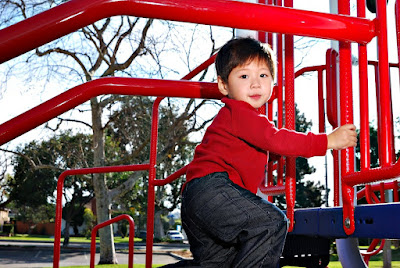
I love backlit photos, even though some people think backlighting is overused. When the backlighting comes from sunlight, one issue is that the face is almost always illuminated by shade, which is a very soft but very flat light source (because it's omnidirectional). Sample:

If on-axis fill light is added (e.g. from a popup flash), the shaded face will be lifted, but the form looks just as flat because of the direction of the fill light. Sample:

A backlit photo can easily be made to appear more three-dimensional by lighting the face at an angle, whether using a reflector or flash. The light can be bright enough to act as a key light, as in this sample:
(bare SB-800 flash from above and camera right, zoomed to 105mm, triggered via CLS AWL*)
*Nikon Creative Lighting System - Advanced Wireless Lighting
Note that there is a shadow on the right side of the face (camera left), making the face look more three-dimensional than in the sample photos above.
Alternatively, the light can have a lower intensity, at an angle opposite to the backlight, to simulate the backlight bouncing off from the ground to illuminate the face. Sample:

(SB-800 with shoot-through on camera right, triggered via AWL)
The sample photo at the top of this post is somewhere in between the two foregoing approaches. I underexposed the ambient light, then added light from a bare SB-800 camera left and additional fill from the pop-up. No light modifiers were used, nor did I use any postprocessing (other than conversion from RAW to JPEG) but the light doesn't look harsh due to the controlled contrast. That's a technique I'll discuss in a future post.
Wednesday, September 23, 2009
Portable short light, rim light, or hair light
Using a short light and/or rim light is a very effective way to add drama, three-dimensionality, and subject-background separation to your image. Here's how to add a short or rim light (or if you wish, a hair light) to your candid family photos.
BACKLIGHT vs. SHORT LIGHT vs. RIM LIGHT vs. HAIR LIGHT
Many people use these terms interchangeably. To be clear, I'm using those terms in these ways:

Samples of rim light and hair light.
THE CHALLENGE: HOW CAN YOU ADD A SHORT LIGHT OR RIM LIGHT TO YOUR CANDID FAMILY PHOTOS?
Because of the direction they come from, adding a backlight, short light, rim light or hair light to a photo is not easy without setting up the shot using a lightstand or an assistant.
SOLUTION 1: AMBIENT LIGHT
Sometimes, ambient light is all you need. The subject can sometimes be positioned with the sun or other ambient light source as the rim light, as in this shot, where the sun was above and behind our toddler:

Note that in the shot above, I had problems with lens flare because I didn't shield the lens adequately from the sunlight. I may also have had a cheapo UV filter which makes lens flare worse. I tried to increase contrast in postprocessing to counteract the effect but didn't eliminate the lens flare completely. I hope you learn from my mistake :)
SOLUTION 2: USING A FLASH
When it's not possible to use the ambient light as a rim light, you can use a flash. I've been able to add a rim light and short light to my pictures without a set up by using a combination of off-camera flash (here, an SB-800) attached to a cheap tripod as a boom. Here are cheap shots (ha ha) of the device:

This tripod was $10 from a street vendor in Thailand. You can buy similar ones at Amazon and elsewhere. I attached the SB-800 to the AS-19 coldshoe, and in turn attached that to the tripod. Because I'm using CLS to trigger the SB-800, I positioned the SB-800 so that the CLS sensor (the little circular glass window on the right side of the SB-800) is facing forward, which allows it to sort of face the camera when angled as a short or rim light. This required turning the flash head to the side. To avoid blocking the CLS sensor, I also decided to remove the extra battery pack (which allows faster recycling times). In actual use, the tripod is completely folded (not spread out), and I raise the center column.
The key to making this boom work is to attach the flash to the tripod in a way that would allow the flash to be angled downward about 120 degrees from perpendicular. Angling the flash downward allows you to place the flash in the correct rim light position from your shooting position. As a bonus, you also gain the ability to use a short (as opposed to broad) light, which also looks dramatic and cinematic.
It is also possible to attach an umbrella with an umbrella bracket, in which case the required angle for the flash would be the direct opposite. Using an umbrella would be appropriate for short light or a side light, but not very effective for a rim light, which is usually hard not soft light.
Note: if you strictly want a rim light as opposed to a short light, you should zoom the flash to its maximum, or better yet, add a snoot or grid. Adding a flag is also possible but less convenient if you want to switch angles from time to time as I do. Rim lights are also traditionally set for a stronger flash exposure than the rest of the subject (e.g. + 1 stop).
An alternative to using a tripod is a monopod, or variations thereof such as the quikpod. Note: a traditional monopod is widest and strongest at the part where it connects to the camera, so may not be ideal as a boom. Lastolite also sells an extending handle but it's around $50. I also prefer to use a tripod for its sturdiness and because it can serve a dual purpose as a - what else - tripod.
IN PRACTICE
Here are some shots where I used the device to add a short light or a rim light. In this shot, I used the tripod-boom to add a short light. I held the boom with my right hand and raised the flash to the camera right, above, slightly behind, and to the side of the subject, while holding the camera with my left hand and pressing the shutter with my middle finger (whew!).

In this shot, my wife stood behind the concrete structure and patiently held the tripod-boom. Remarkably, CLS still triggered the flash successfully. I think it worked because the light from the pop-up flash bounced off the interior of the structure. Shows that you don't always need line of sight to trigger CLS, even in daylight.


For strobists and lighting fanatics, here's a shot for your amusement:

BACKLIGHT vs. SHORT LIGHT vs. RIM LIGHT vs. HAIR LIGHT
Many people use these terms interchangeably. To be clear, I'm using those terms in these ways:
- Backlight - a general term to describe any number of situations where there is light behind the subject.
- Short light - in portraiture, a short light is a main or key light that highlights the portion of the subject's face that is farther from the camera. (If the main light is illuminating primarily the portion of the subject closer to the camera, that's broad light.) If that sounds confusing, just look at the subject's ear closest to the camera. If that ear is lit, it's broad. If unlit, it's short.
- Rim light (aka "kicker") - A rim light is a highlight at the edge of the contours of the subject. Rim lights come from behind PLUS either above, to the side, or both above and to the side of the subject. Trying to add a rim light by adding a light just directly behind the subject is not effective. Rim lights are usually gridded, snooted, or flagged to limit its light to just the contour of the subject and to avoid lens flare. Rim lights are also generally exposed higher (1 stop or sometimes more) than the rest of the subject.
- Hair light - a light that puts a specular (shiny) highlight on the subject's hair. Usually come from above the subject. As with rim lights, usually gridded or flagged.

Samples of rim light and hair light.
THE CHALLENGE: HOW CAN YOU ADD A SHORT LIGHT OR RIM LIGHT TO YOUR CANDID FAMILY PHOTOS?
Because of the direction they come from, adding a backlight, short light, rim light or hair light to a photo is not easy without setting up the shot using a lightstand or an assistant.
SOLUTION 1: AMBIENT LIGHT
Sometimes, ambient light is all you need. The subject can sometimes be positioned with the sun or other ambient light source as the rim light, as in this shot, where the sun was above and behind our toddler:
Note that in the shot above, I had problems with lens flare because I didn't shield the lens adequately from the sunlight. I may also have had a cheapo UV filter which makes lens flare worse. I tried to increase contrast in postprocessing to counteract the effect but didn't eliminate the lens flare completely. I hope you learn from my mistake :)
SOLUTION 2: USING A FLASH
When it's not possible to use the ambient light as a rim light, you can use a flash. I've been able to add a rim light and short light to my pictures without a set up by using a combination of off-camera flash (here, an SB-800) attached to a cheap tripod as a boom. Here are cheap shots (ha ha) of the device:

This tripod was $10 from a street vendor in Thailand. You can buy similar ones at Amazon and elsewhere. I attached the SB-800 to the AS-19 coldshoe, and in turn attached that to the tripod. Because I'm using CLS to trigger the SB-800, I positioned the SB-800 so that the CLS sensor (the little circular glass window on the right side of the SB-800) is facing forward, which allows it to sort of face the camera when angled as a short or rim light. This required turning the flash head to the side. To avoid blocking the CLS sensor, I also decided to remove the extra battery pack (which allows faster recycling times). In actual use, the tripod is completely folded (not spread out), and I raise the center column.
The key to making this boom work is to attach the flash to the tripod in a way that would allow the flash to be angled downward about 120 degrees from perpendicular. Angling the flash downward allows you to place the flash in the correct rim light position from your shooting position. As a bonus, you also gain the ability to use a short (as opposed to broad) light, which also looks dramatic and cinematic.
It is also possible to attach an umbrella with an umbrella bracket, in which case the required angle for the flash would be the direct opposite. Using an umbrella would be appropriate for short light or a side light, but not very effective for a rim light, which is usually hard not soft light.
Note: if you strictly want a rim light as opposed to a short light, you should zoom the flash to its maximum, or better yet, add a snoot or grid. Adding a flag is also possible but less convenient if you want to switch angles from time to time as I do. Rim lights are also traditionally set for a stronger flash exposure than the rest of the subject (e.g. + 1 stop).
An alternative to using a tripod is a monopod, or variations thereof such as the quikpod. Note: a traditional monopod is widest and strongest at the part where it connects to the camera, so may not be ideal as a boom. Lastolite also sells an extending handle but it's around $50. I also prefer to use a tripod for its sturdiness and because it can serve a dual purpose as a - what else - tripod.
IN PRACTICE
Here are some shots where I used the device to add a short light or a rim light. In this shot, I used the tripod-boom to add a short light. I held the boom with my right hand and raised the flash to the camera right, above, slightly behind, and to the side of the subject, while holding the camera with my left hand and pressing the shutter with my middle finger (whew!).

In this shot, my wife stood behind the concrete structure and patiently held the tripod-boom. Remarkably, CLS still triggered the flash successfully. I think it worked because the light from the pop-up flash bounced off the interior of the structure. Shows that you don't always need line of sight to trigger CLS, even in daylight.

What the shot looks like without the flash:

As you can see, the rim light in the previous shot looks like it's from the sun but is actually all from the flash. The setup shot gives an idea of where the flash was. In the actual shot, the flash was completely behind the concrete (though I cropped the shot so heavily that the flash would not be visible in the frame anyway).
For strobists and lighting fanatics, here's a shot for your amusement:

It's a short light from the 'sun' behind, above and to the side of the subject. ;) Just kidding (a lighting pun... if you need to know...). The shot was actually taken in the shade. The short light was all from the tripod boom.
Subscribe to:
Posts (Atom)