Showing posts with label zoom. Show all posts

Wednesday, December 24, 2014

Sony 18-105 f4 G OSS review


This is a user review of the Sony 18-105 f/4 (E PZ 18-105mm F4 G OSS Power Zoom Lens).  I will first discuss the rationale for getting this lens, then I will describe its physical characteristics.  I will then discuss its usage for photography, going over its optical characteristics and performance. Finally, I will briefly discuss its usage for video.

Unless otherwise stated, the photos here are from the Sony a6000 in raw, converted in Lightroom with the Huelight a6000 color profile, with no sharpening.

Thursday, May 10, 2012

Do It All at f/2.8: the Tamron 28-105 2.8


The fast standard zoom with a 35mm equivalent of around 24-70mm is generally considered one of the most versatile lenses.  There are photographers who say that they can shoot a whole wedding with that one lens.  You may want to know that there's one lens that can cover an even wider range of shots: the Tamron 28-105 f/2.8, the only lens of its kind to cover the entire range of 28mm to 105mm at a constant 2.8 aperture.

Monday, April 30, 2012

Best Alternative to Nikon 24-70 2.8G: the Nikon 28-70 2.8D

Every Nikon shooter knows that the Nikkor 24-70 2.8G is the best standard zoom for Nikon's full frame cameras.  However, at around $1900, it's not easily affordable.  There are of course third-party standard zooms that cost far less, such as from Sigma, Tamron and Tokina, but their performance is not quite as good as that of the Nikkor 24-70.

One alternative that some newer Nikon shooters might not know about is the predecessor to the 24-70, the Nikkor 28-70 2.8D.  It is no longer being sold new, but used prices are about half the price of the 24-70.

But is the 28-70 as good as the 24-70?  In this post, I compare the 28-70 to the 24-70 and let you judge for yourself.


Monday, March 14, 2011

Tip: Using a Zoom Lens as a Compositional Aid


I am quite busy this week and behind the schedule for my next article, so until then, here's an extremely useful tip for everyone that I found a while ago on Digital Photography School. I hope you enjoy this article as much as I did.

NOTE: The illustration shown above is taken from Canon's EF Lens Work III, they have very useful material for everyone regardless of the camera/lens brand. I would really suggest you read it, and here is a direct link to the PDF with the illustration shown above.

Sunday, January 23, 2011

Canon Lenses Chat - Part 2: Telephoto Zoom Lenses


Hello again, this post will be a sequel to my previous post where I chatted about the Canon standard zoom lenses. Today I will chat a little about some of Canon's telephoto lenses.

Well, if you have read the previous installment you should know that I don't really fancy the super zooms like the Canon EF-S 18-135mm f/3.5-5.6 IS (7.5x) , Canon EF-S 18-200mm f/3.5-5.6 IS (11x) or the Tamron AF18-270mm f/3.5-6.3 Di II VC PZD (15x), they usually say that if a lens has more than 5x zoom then there will be some compromises, I am not saying that these lenses are useless but you have to give up some quality to get this amazing zoom range, they are very useful as walk around lenses given how small and light they are but that sort of defeats the purpose why I would want a DSLR. I have bought the Canon EF-S 15-85mm lens to replace my default kit lens because I didn't like the kit lens' performance regarding sharpness, focusing speed, chromatic aberration and range.

Anyway, back to our topic, I made my lens choice when I bought the camera, it was my first DSLR and I had no idea how things would go with the lenses and stuff (maybe if I knew then how much I will end up paying I wouldn't have done the switch), but after lurking around the dpreview forums for a while I found about the ultimate cheap kit for beginners which was the Canon EF-S 18-55mm f/3.5-5.6 IS kit lens ($170 or $0 for me since I would get it with the camera anyway) + Canon EF-S 55-250mm f/4-5.6 IS ($250) + Canon EF 50mm f/1.8 II ($100). So by just spending $250 for a lens I would get an excellent range and the reviews were very happy with how this lens performed given its price, so that was it for me, I didn't want to pay a lot of money on the lenses and I would have the range from 18mm to 250mm all covered so I bought it, what else would I ever want? Little did I know then.

UPDATE: This post is updated with samples of the "close focusing distance" capability of the 55-250 kit lens.

Saturday, September 25, 2010

What's the point of having different lenses? Controlling composition with different focal lengths (Basic)

1.  What's the point of having different lenses?  Can't you just move closer or further away?
At first glance, it may seem that having more than one lens is unnecessary.  Shouldn't lenses give us the same appearance as what we see with our eyes? Then we could just walk closer to the subject if we want a close-up view, and walk farther back if we want a wider view. 
However, it's not that simple.  Lenses with different focal lengths have different magnification, field of view, potential perspective, and depth of field.  See below.

2. MAGNIFICATION.
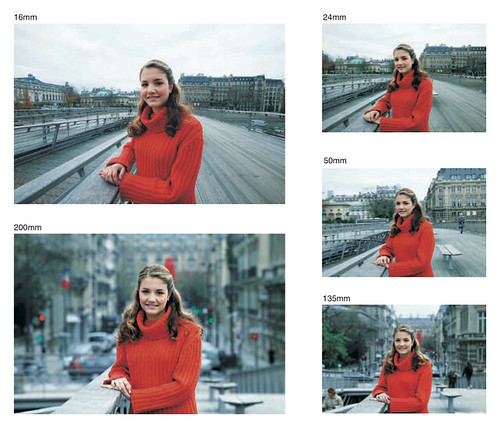
Perhaps the most obvious difference between lenses of different focal lengths is the difference in magnification.  All things being equal (including a constant distance between the camera and the subject), with a wide lens, the subject will look smaller, and with a telephoto lens, the subject will look larger.

On the other hand, if we move closer to the subject, the subject will also look larger than if we were further away, so wouldn't walking closer be the same thing as using telephoto lens?  With respect to the magnification of a single subject with a blank background, it may seem that way.  However, walking closer to the subject doesn't magnify everything uniformly. Closer objects get larger faster than further objects.

Experiment 1: "Magnification" from moving closer.
1. Find two objects of the same length.  Place them apart from each other. 

2. Step back, at least 3 feet away from the near object.  Hold your hand across your face and compare the length of the near object relative to the length of your index finger.  Compare the far object's length to your finger as well.
The near pen looks about 16% of the length from my thumb to the tip of my index finger.  The far pen looks about 13% of the length from my thumb to the tip of my index finger.

3. Without moving your hand, walk forward so that the near pen appears about as long as your finger.  Compare the far pen's length to the length of your finger.
The near pen is about 80% of the length from my thumb to the tip of my finger.  The far pen looks about 16% of the same length.

Result:  At the point when the near pen looked about as long as your finger, the far pen did not look nearly as long as your finger.  Moving closer did magnify both the near pen and far pen but the near pen got magnified much faster. 

Experiment 2: Magnification from using a longer focal length.
To illustrate the difference that a longer focal length makes in terms of magnification, we can setup the same experiment above, this time using a simulated longer focal length.
1. Find two pens of the same length.  Place them around 2 feet apart from each other.


2. Step back, at least 3 feet away from the near pen.  Form a circle with your thumb and index finger.  Place this circle around your eye.  This simulates the view of a camera with a 'normal' (not wide, nor telephoto) lens.  Compare the length of the near pen relative to your circle.  Compare the length of the far pen relative to your circle.

3. Without moving closer, move your circle closer to the two pens.  This simulates the view of a camera with a telephoto lens.  Compare the length of the near pen relative to your circle.  Compare the length of the far pen relative to your circle.

Result: the magnification from a longer lens is uniform.
Conclusion:  moving closer to the subject doesn't "magnify" everything uniformly. Closer objects appear larger faster than further objects. On the other hand, the magnification from a longer lens is uniform.  Therefore, in terms of magnification, moving closer is not a substitute for a longer lens.  Similarly, moving further back is not a substitute for a wider lens.

Compare these shots:
50mm
150mm
In both shots, the subjects stayed at about the same position.  I took the first shot at 50mm.  For the second shot, I moved backward several feet then used 150mm.  The subjects look about the same size in the relation to the frame.  However, the background looks very different -- the statue appears "larger" in the shot with the longer focal length.


See also this related post by mshafik: http://betterfamilyphotos.blogspot.com/2011/03/tip-using-zoom-lens-as-compositional.html


3. FIELD OF VIEW
Another obvious difference between lenses of different focal lengths is the difference in field of view.  Suppose you line up 180 bottles, side-by-side, around you in a semi-circle.  (Don't worry -- this is just a thought experiment... I won't ask you to find 180 bottles :D ) With a telephoto lens (let's say 210mm), you would see only 10 bottles.  With a wide lens (let's say 28mm), you can see around 66 bottles total.  In terms of field of view, a long lens is like looking through a narrow tube.
The question is, if you had a tele lens, could you move back far enough that you would see 66 bottles?  Yes you could.  But your field of view would not change.  Suppose in the semi-circle, when we were still using the wide lens, the leftmost bottle had behind it several feet away in the background a flagpole or something.  That flagpole would be visible in the wide lens shot.  However, if we move back with our tele lens far enough to see 66 bottles, that flagpole would not be visible.
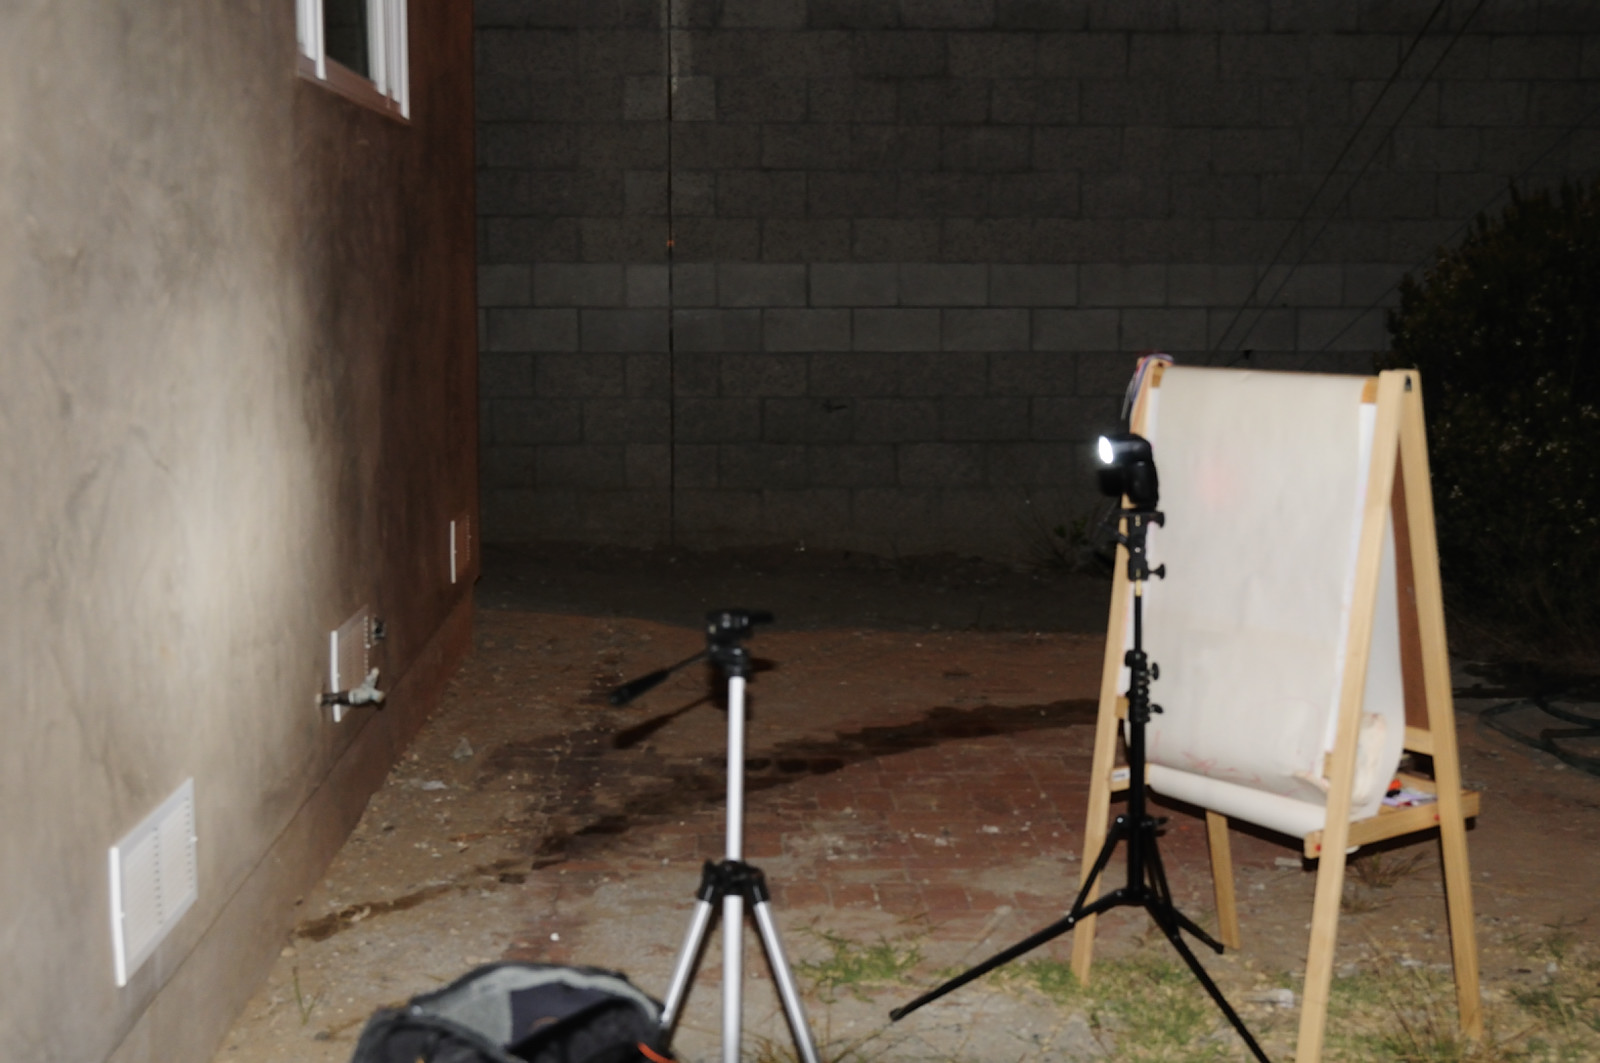
Demo shots:
17mm - 2 pens visible, touching the edge of the image.  Note the chairs visible in the background.
50mm without stepping back - 2 pens not visible:

50mm with step back - 2 pens visible, touching the edge of the image.  Note, however, that the chairs are not visible in the background.

4.  PERSPECTIVE and COMPRESSION.
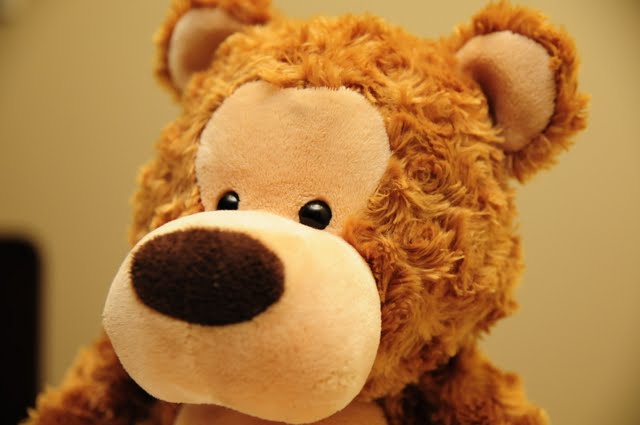
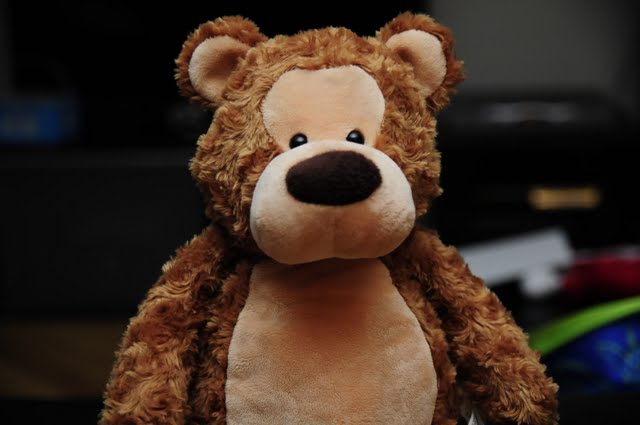
We saw a bit of perspective in the magnification experiment, where we noted that far objects appear disproportionately smaller than near objects.  The same principle applies within a single object -- the part that is farther appears disproportionately smaller, while the part that is near appears disproportionately larger.  When the subject is near the relative differences between the near parts and far parts are large, thus there is greater distortion.  When the subject is far, the relative differences are small, thus there is less distortion (and the subject appears 'flatter').

17mm:


50mm:


150mm:

How perspective relates to focal length:  actually, focal length itself does not affect perspective.  However, wider lenses generally allow us to be nearer to a subject (which in turn leads to greater perspective distortion), while telephoto lenses allow us to be further from the subject (leading to less perspective distortion).
5. DEPTH OF FIELD
Depth of field is the range of distances that looks sharp.  A narrow depth of field is useful for keeping only a specific range in focus and everything else blurred.  A deep depth of field is useful for making everything appear to be in focus (even though actually, there is only one exact distance that is exactly in focus).  Depth of field is based on the distance from camera to the subject, the aperture used, and the focal length of the lens.  (We'll talk about sensor size later.)
A lens with a longer focal length has a shallower depth of field.  On the other hand, depth of field is also shallower when the camera to subject distance is short, so wouldn't moving closer also give a shallower depth of field?  I tested this. Take a look at these shots:

Shot 1 (tele lens): 150mm, f/2.8.

Shot 2 (normal lens but closer): 50mm, f/2.8.  At a closer distance, the subject looks about the same size as with the tele lens.  The depth of field also appears somewhat similar based on the blurriness of the objects in the background.

With respect to depth of field it appears you may get away with moving back and forth.

6. NORMAL VS. WIDE VS. TELEPHOTO
A normal lens is a lens that has a perspective of about the same as the human eye (taking into account sensor size).  On a full-frame camera, this is about 50mm.  A lens that is wider than field of view of a normal lens is a wide lens.  Longer than that is a telephoto lens.
  
7. WHAT ABOUT CROPPING?
Is there any difference between cropping a wide shot and using a telephoto lens (ignoring the effects of the decreased resolution).  If we crop an image from the middle, then there is no difference in magnification, field of view, and perspective.  With depth of field, there seems to be a difference.  Compare these shots:

50mm:

17mm (from the same distance) cropped:
  
8. WHAT ABOUT SENSOR SIZE?
Caveat: this is a somewhat controversial topic with many points of view from 'experts.'  My rationale is below which I hope helps you to evaluate whether it is right or wrong.

Full-frame DSLRs have the same sensor size as 35mm film.  APS-C sensor DSLRs have a sensor size that is about 2/3 as small as that of a full frame DSLR.  Four-thirds and Micro-Four-Thirds cameras have a sensor half as small as that of a full frame DSLR.  A full-frame lens would focus the same size image on the sensor no matter what the size of the sensor.  However, because a small-sensor camera has a smaller recording surface, then only the middle part of the focused image is being used.  The effect of using a small-sensor camera is the same as if you cropped a photo from a full-frame camera.  This is essentially the same as #7.

If you have a full-frame camera with a 50mm lens, and then you crop the middle part so that it's like the field of view of a 75mm lens on the full-frame camera, the cropped image will look like the image from the same 50mm lens on a 1.5x crop camera in terms of magnification, field of view, and perspective.  As for depth of field, there are some who say that if a full-frame camera is cropped to the same field of view, then the depth of field will be the same as well (see, e.g. statement #3 here http://photo.net/learn/optics/dofdigital/ ).  I thought so too but after the cropping test in #7, I'm not sure that is true.

9.  CHOOSING FOCAL LENGTHS FOR COMPOSITION.
Because of the different characteristics of different focal lengths, they have unique uses for composition. 

Wide lenses are often used to establish a sense of place.  If you buy a ticket to go to Disneyland, you generally want to show in the photo that it was at Disneyland, and not just any random place.  A wide lens captures more of the background and gives the viewer an idea of the location.
Telephoto lenses are useful for de-emphasizing the location or for focusing the attention solely on the subject.  If you are someplace not so special, and there are many objects around that would detract from the photo, using a telephoto lens can help simplify the background.

Because of the differences between lenses of different focal lengths, ideally you should pick the right focal length first then position yourself for the right composition. 

Monday, August 16, 2010

Yongnuo YN-560 Zoom Repair

CAUTION: a flash can contain dangerous amounts of electricity.  You can die.  Do this at your own risk.

Feeling suicidal (ahem) "terribly disappointed" about our toddler's birthday photos, I attempted the dangerous task of repairing my Yongnuo YN-560 flash.  After all, my life insurance premiums were current... (no pun intended).

In all seriousness, I dropped my YN-560 by accident.  Although the flash still worked, the zoom ceased to function.  I attempted these repairs after being encouraged by a commenter (or two) who also provided a helpful link to instructions for repairing the zoom on a Nikon SB-600.  I'm not a handy person at all and I don't even know for sure how the repair below worked, but it worked.  Here's what I did.

Link to photos: http://picasaweb.google.com/creadvty/YongnuoYN560Repair#

Step 0: try to discharge the electricity in the capacitor.  I set the flash to full power, pressed the test button, then immediately opened the battery cover.  Then I waited several hours.

Step 1: remove the rubber covers on the sides of the flash head.  I used a small flathead screwdriver to pry the cover off, which was glued to the flash head.


Step 2: remove the metal clips near the hinge.  There are two metal clips on each side of the flash head.  I removed them by prying them off with a small flathead screwdriver.


Step 3: remove the screws on the bottom of the flash head.


Step 4: pull the flash head apart.  Mine seemed to have some sort of rubber glue holding it together.


When you pull the flash head apart, you'll find a piece of plastic that seems to be for holding the wires together and maybe protecting them from external elements (?).


Step 5: remove the 2 screws holding the flash head body to the top of the flash head cover (circled in red in the picture).


Step 6: you'll see that the top of the flash head body has a screw drive.  I did not find any damage on the screw drive on my flash, so I was at a loss as to what to do to fix it.  Not having anything better to do with it, I rolled the screw drive with my fingers (warning: it's oily) until the flash moved to the most zoomed position (with the flash bulb furthest away from the edge of the flash head) so that I could have the benefit of the high GN at a cost of decreased coverage.


When I put the flash back together, I noticed that the sound was a bit different, and I tested the zoom.  I was shocked that the zoom worked.
24mm:


105mm:

News flash! YN-560 zoom FIXED

Incredibly, I fixed the flash on my YN-560 at the suggestion of a helpful commenter. :-O  (Kindly stand up and be recognized, sir... :) ).  It wasn't as easy as I thought it might be but was not hard either.  I will post shots.  Caution: I don't know if the fix I did will work for other YN-560 units with zoom issues.

UPDATE: Link to repair here: http://betterfamilyphotos.blogspot.com/2010/08/yongnuo-yn-560-zoom-repair.html

Saturday, August 7, 2010

Bouncing Tip: Zooming the Flash (Basic)

(Sorry for the infrequent posting this week -- my limited time allocated for photography was spent debating on a photo-related forum.)

If you bounce your flash, you know that it requires a lot of power.  First, most bouncing surfaces aren't perfect reflectors.  Second, the light has to travel from the flash to the bouncing surface and then back to the subject.

To squeeze the most light out of our little speedlight, we can zoom the flash.  Zooming the flash doesn't increase the total amount of power that the speedlight produces.  However, it concentrates the light beam into a smaller coverage area.  Light that would otherwise be spread out into a wider area now occupies a smaller area, thus increasing light intensity.  The drawback is that with a smaller coverage area, the light becomes harder, but it should still be quite soft.

To illustrate the difference that zooming makes (both in terms of intensity as well as quality of light, i.e., softness) check out these test shots.  I set up a flash (SB-800) on a light stand to bounce against a wall (note: our wall is a brownish color but is a smooth surface). Immediately behind the flash is an easel with white paper, which acts as the subject.  I placed a camera (Nikon D300) on a tripod to take a photo of the white paper.  The D300's popup flash triggered the SB-800 with Nikon CLS AWL (Advanced Wireless Lighting), and the flash was set on manual mode (1/4 power).  The light from the flash bounces from the wall and illuminates the paper.  We can therefore determine how much light falls on the subject based on the brightness of the paper.  From the shadow cast by the flash, we can also observe any change in the quality of the light (softness).  Here is a picture of the set up shot:

To avoid skewing the results, the popup flash was set to inactive ("--") and covered with an SG-3IR infrared panel.  I also minimized the effect of ambient by shooting at night, at the sync speed (1/250) and using the base ISO (200 for the D300). I shot on manual exposure with active d-lighting off, auto ISO set to off, etc.

Here is a baseline shot with the flash set to 24mm.  Exposure: ISO 200, 1/250, f/5.6.  Quite soft -- despite the flash being only a few inches from the paper, the shadow is barely noticeable.


Here is a comparison shot with the flash set to 105mm. Exposure: ISO 200, 1/250, f/5.6.  Note that the paper appears brighter compared to the shot at 24mm.  At the same time, the shadow is more defined, which means the light is harder, but it's still quite soft.


I don't have a flashmeter to measure the difference in intensity, but it's about 1/3 stop.  Here is a shot with the flash at 105mm at ISO 200, 1/250, f/6.3 (note that the paper is almost the same brightness as the 24mm flash shot at f/5.6).

Not a huge difference, but then again, neither has the light become that much harder.  If I need the extra power, I wouldn't hesitate to trade the extra hardness for the extra light by zooming the flash.