Showing posts with label bounce. Show all posts

Monday, July 27, 2015

DIY Passport Photos part 3


It was time again for us to renew passports for my daughter and myself (note that children's passports expire after only five years).  As before, I wanted to do it myself so that I could have photos I would at least be satisfied with for ten years (the passport duration for adults).

For the passport photos in this post, I used the following:

To process the photos and prepare them for printing, I used Lightroom 6.  Here's how I took the photos.

Tuesday, August 7, 2012

The Big Picture

We recently had a birthday party for our son. It was at a playhouse with large bounce houses and a play structure, with tall black ceilings (maybe about 30 feet high or so) and multicolored walls.
Inline image 1

What lighting technique would you use in these circumstances? Hit the jump to see what approach I used.

Sunday, July 8, 2012

Testing the DIY Spinlight


Recently, we posted about a DIY alternative to the Black Foamie Thing and Spinlight 360 using a Flashright Pro.  What you see above is yet another such DIY alternative.  This one was posted on the Strobist Flickr forum by photographer David Huy.

Hit the jump to see how I assembled mine, and how it performs against the modified Flashright.

Saturday, December 17, 2011

Lighting A Geomag, The Lazy Way


So how do you light a Geomag in an interesting way while keeping all these lightstands and modifiers tucked away in their bags? Click through to know how.

Friday, May 6, 2011

Will It Bounce? Part 3: School Concert

Ever had to shoot in a small auditorium and wondered whether you could bounce flash?

Our toddler had a school concert last week.  The auditorium had ceilings that were navy-blue and about 20 to 25 feet high.  The room had fluorescent lights overhead, but a significant part of the ambient light was coming from a door on camera left.  The ambient exposure was around f/4.5, 1/80, ISO 1600.  I had with me only an old zoom lens Nikkor 28-105 f/3.5-4.5 AF-D, a D70 (tops out at ISO 1600), and an SB-800.

Navy blue ceilings

Ambient was from a door and from fluorescent lights overhead.
At first I tried ambient only but the shots looked a little blurry.  My effective focal length was around 157.5 mm and my shutter speed was only 1/80.
Ambient only.  Straight out of the camera.
It was also underexposed.  But my ISO was already at its maximum and my aperture at its widest.  If I had used a slower shutter speed, the shots would have been even more blurry.  I opted to keep my exposure as is and adjust the exposure in post-processing (effectively pushing the ISO).

Meanwhile I started to wonder whether I could bounce the flash.  They were kind of high and quite dark (almost black).  But I thought it was worth a shot.  I bounced the flash straight up (in some cases slightly tilted forward or slightly tilted camera left).  And here's what I got:

No flash vs. With flash.  Straight out of the camera.
Definite improvement.  Later, during post-processing, I adjusted the ambient-only shot.  Not as clean as the shot with the flash:

RELATED POSTS:
Will it Bounce? Part 1: Pergola
Will it Bounce? Part 2: Very Blue Fabric
Extreme Bounce Flash
12 Alternatives to Bouncing from Ceilings and Walls

Anyway, here are some more shots, all with bounce flash:


Monday, November 1, 2010

The most efficient setting for bounce flash

Suppose you have a super camera that had no ISO limit - it could give you a noiseless image even at 1 billion ISO.  With such a camera, would you be able to use bounce flash anywhere? 

Not necessarily. When using bounce flash, the aperture and ISO combination must indeed allow enough light from the flash to reach the sensor, and of course unlimited ISO would help. However, the other limit is that the flash must be at least as bright as 1/8 of the ambient exposure (i.e. 3 stops below ambient). Otherwise, the flash exposure would not be noticeable.

In the hypothetical example of our super camera, even having infinite ISO does not mean you can bounce anywhere you want. If for example it's mid-afternoon on a bright sunny-16 day, you cannot bounce a flash from a wall that's 20 feet away no matter what ISO (or aperture) you choose because the flash would then be negligible compared to the ambient light.

What's the relevance of this to everyday shooting? What this means is that when we're bouncing while there is ample ambient light, we should start by selecting the sync speed to minimize the ratio of ambient light relative to the flash. We then choose a reasonably "bright" ISO and aperture combination to allow the bounce flash to show up in the image, *so long as the shutter doesn't go above sync speed*. If we choose an aperture so wide and/or an ISO so high that shutter is higher than sync speed, then our flash will be forced to use high speed sync, which causes the loss of around 2 stops of power.  This is why we shouldn't automatically choose a wide aperture and high ISO when bouncing (unless ambient is dim).

What if ambient is so bright that even at sync speed, the aperture is narrow and/or ISO is low? That means it's quite possibly beyond the power of our flash to bounce under the circumstances. Increasing ISO or widening the aperture under such circumstances does not help the image - it only leads to overexposure of ambient. The aperture and ISO combo at sync speed for ambient (with at least slight underexposure) is a non-negotiable limit. If my flash can't bounce at those settings, then no amount of adjusting the aperture and ISO can fix the problem. 

That's the mistake I made with the shot below. I selected ISO 800 as a typical minimum ISO for bouncing, and selected a wide aperture (f/2.8). Although I selected sync speed, the point I missed at that time, is that having a high ISO and wide aperture were not helping in those circumstances.


When I saw the overexposure on the LCD screen, I switched to aperture priority as a quick way of getting a ballpark exposure (I knew the kids wouldn't stay put).  What I didn't notice was that because I was using f/2.8 and ISO 200, the camera was giving me a shutter speed of 1/2000, well into high speed sync territory.  With high speed sync plus bounce flash, I couldn't hope to get enough light on the kids:

The best I could do was to try to salvage the image in post, which is never as good as getting it right in the first place.

Post-processing is not a panacea.  For example, this one was had unrecoverable details from completely blown highlights (even though I was using raw).

I should have just realized I was asking too much from the flash and either used an umbrella instead or doubled up with the YN-560 plus SB-800 (which would let me gain only 1 stop more light).  Fortunately some shots did turn out OK:


For future reference, I tried to test what was the "darkest" aperture and ISO combo setting I could use with an 8 foot white ceiling, sb800 on full zoom 105mm aimed straight up, and at full power. I got around f/14 @ ISO 200 (i.e., equivalent to f/10 @ ISO 100) with the flash bright enough to act as key light, with the subject around 8 feet away.

Friday, October 29, 2010

Will It Bounce? Part 1: Pergola

Bouncing is a very useful technique for getting soft directional light, but it has its limits: it requires a lot of power, causes the flash to pick up a color cast from the bouncing surface, and creates lots of spill.  In this series we'll try to make bouncing work in extreme circumstances.  My hope is to make bouncing more useful in situations where previously I've assumed it wasn't possible.

PART 1: PERGOLA
We were dining outdoors on a patio at Ariel's Grotto (at Disney's California Adventure).  There was a white pergola overhead about 10 feet high, and a lot of yellowish fluorescent light:
With all those holes, would it be possible to bounce from that pergola?

I used 1600 ISO and f/2.8, then adjusted shutter to get an exposure that I liked for the lights in the background.  With just ambient light, it looked like this:
(ISO 1600, f/2.8, 1/40)

This time, with an on-camera SB-800, I bounced the flash above and to the left in TTL-BL mode:
(ISO 1600, f/2.8, 1/50)

Conclusion: it bounces!  I didn't test how bright the flash would have been at full power, though it seemed like there was a lot of juice left in the flash.  I suspect this will also work at late afternoon, as long as the area is shaded from the sun, and as long as aperture is at f/2.8.  Beyond that, I don't know yet.

Related posts:
Extreme Bounce Flash
12 Alternatives to Bouncing from Ceilings and Walls

Monday, September 6, 2010

12 Alternatives to Bouncing From Ceilings and Walls (Basic to Intermediate)

Bouncing is a great technique to get soft, directional light from your flash.  Sometimes though, bouncing appears impossible, as in the case of a very large room where the ceilings and walls are too far.  (You may want to at least try though - sometimes bouncing can be useful even in extreme situations.) Another difficult bouncing scenario is when the ceilings and walls have a strong color, especially if that color is inconsistent with the color of the ambient light.

Here are 12 alternatives for softish light when bouncing from ceilings and walls is not an option.  Few are as good as bouncing but they may be better than nothing:

1. Handheld umbrella.  I personally think this is the best alternative for family photographers.  A handheld umbrella can provide soft directional light, with or without an assistant.
Example (with a ~40 inch softbrella):

Sometimes a normal sized umbrella is not practical.  However, even a small umbrella is reasonably useful.  I have a 19.5 inch umbrella, which is tiny compared to other umbrellas, but has a surface area of around 298.6 square inches, the same as the surface area of a 17.3 x 17.3 softbox.  I also have a 25-inch umbrella (surface area of 490.9 square inches, the same as the surface area of a 22.16 x 22.16 softbox).

Example (19.5 inch reflective umbrella):
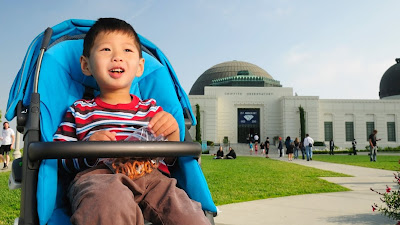

Example (25 inch shoot-through umbrella):


Related articles:
DIY handheld umbrella
Purpose-built handheld umbrella

2. Use a softbox or umbrella on a stand.  Many pros use large umbrellas or softboxes such as the Lastolite EZybox to provide a soft directional light in the field.  In terms of light quality, this may be the best option but you're likely to need an assistant for this though.  Note: if you're using a large umbrella, be careful - even a slight breeze can topple the light stand over.

3. Bounce from a reflector.  It is possible to bounce off a reflector, even without an assistant.
Example:

Related article: Bouncing Flash Outdoors in Daylight

4. Use a diffuser.  In daylight shooting, you can use a diffuser to block direct sunlight from hitting your subject.  The large surface area of the diffuser makes it act as a soft light source.  Alternatively, you can block direct sunlight with a shade.  The subject would then be illuminated by open shade.  A potential disadvantage is that the background will appear much brighter than the subject.


Lastolite 33" Tri Grip 1 Stop Triangular Shaped Translucent Diffuser

5. Use a bracket with umbrella or softbox attachment.  Here's a flash bracket that can be paired with a softbox or an umbrella.
ALZO Flip Flash ® Bracket Softbox Kit - Achieve studio quality images with your Portable Flash Speedlight - for all DSLR - Requires Shoe Mount Adaptor for NIKON SB-900* - by alzodigital.com ALZO Flip Flash ® Bracket Umbrella Kit w/H-Bar - Achieve studio quality images with your Portable Flash Speedlight - for all DSLR - Requires Shoe Mount Adaptor for NIKON SB-900* - by alzodigital.com

6. Bounce off random stuff.  Sometimes it may seem as if there are no walls or ceilings to bounce from but there are actually usable bounce surfaces.  Neil van Niekerk has used this technique successfully:  http://www.planetneil.com/tangents/2008/11/14/workshop-views-miami-st-petersburg-fl/ (bouncing from random architectural features).  Occasionally, I've bounced off other people's clothes (while making sure they're not looking :) ).

7. Bounce off your shirt (if it's white).  If you're wearing a white or light colored shirt, you can try bouncing off your shirt.  Because there's no directionality from this method, this is best suited for using flash as fill.

8. Bounce off the ground.  Normally, upside-down light leads to a horror-movie look.  However, if the shadows are not too dark, and the upside-down light is soft, then it may look ok.  Sometimes, strong sunlight does bounce from the floor to illuminate a subject softly, and this technique can resemble that look.
Example:

Related article: Bouncing Light Off the Ground

9. Use a flash modifier that enlarges the surface area of your flash, such as the Lumiquest Softbox III.  I hesitate to suggest this because the majority of flash modifiers offer little improvement.  However, even a modifier that is smaller than the subject can reduce the harshness of bare flash.  Just remember that the key to softer light is a larger apparent size.  Also remember that diffusion by itself does not soften light.  You should also lower your expectations for the softening effect.

Related articles:
Do small modifiers offer any benefit?
Diffusion Doesn't Soften Light

Moving on to solutions that don't actually use soft light:

10. Use flash as fill.  If the ambient light is bright, the flash can be used merely to lift shadows, which is less artificial-looking than direct on-camera flash as key.  Some cameras are better at automatically throttling down the flash to do precisely that.  In any case, use flash exposure compensation to make sure the flash isn't too bright.   Using flash would still be an improvement over ambient-only by making shadow detail more visible, and reducing the highlight-shadow contrast.
Example:


Related article: Summer Pool Party

11. Use one or more hard light sources to control the highlight-shadow ratio.

Example 1 (one hard light source + ambient):


Example 2 (two hard light sources + ambient):


Related articles:
Three Dimensional Lighting
Quality vs. Contrast


12. Postprocessing.  Sometimes, postprocessing can be used to simulate a softer light source.
Related article: Dodging and Burning

Any other ideas? Please post them in the comments.

Sunday, September 5, 2010

Extreme Bounce Flash


I've always assumed that it's impossible to get any useful light by bouncing from black ceilings or walls.  I found out today that it is difficult but is actually feasible.

We had lunch at a restaurant with somewhat high ceilings (I estimate around 15 ft at its lowest and 30 ft. at its highest) that were painted black, lit by yellow-greenish fluorescent light of some sort, with black-brown tables and chairs.  


The ambient light was fairly dim.  With an all-ambient exposure, I got f/2.8, 1/25, ISO 1600 (i.e., EV of 3.7), which I pushed an additional 1/3 stop or so in post-processing.

Just for kicks, I tried bouncing.  Surprisingly I got some light into the image, even though I used my hand as a flag (I didn't have the BFT attached).  The shot at the top of this post was f/2.8, 1/50, ISO 1600, TTL Flash with 0 FEC bounced above and camera left.  Not a lot of light, but just enough to improve over the ambient-only shot.  Here is a more-or-less direct comparison - these shots were only adjusted for white balance (you'll have to excuse the poor composition - just took these as test shots).

Ambient only (ISO 1600, f/2.8, 1/40):


Ambient with flash (ISO 1600 f/2.8, 1/50, flash bounced above and to camera right):


I used ISO 1600 and 3200, then used Neat Image to reduce the noise during postprocessing.

(ISO 1600, f/2.8, 1/20, TTL flash 0 FEC, flash bounced above and to camera right)
 
(ISO 3200, f/2.8, 1/15, TTL flash 0 FEC, flash bounced above and camera left).

(ISO 3200, f/2.8, 1/40, EC -0.7; TTL flash + 0.7 FEC.  Flash bounced to rear. Pushed an additional 1 stop [approximately] in post-processing.)

This gives me more confidence in bouncing in situations where I thought bouncing couldn't be used.