Showing posts with label outdoors. Show all posts

Monday, September 6, 2010

12 Alternatives to Bouncing From Ceilings and Walls (Basic to Intermediate)

Bouncing is a great technique to get soft, directional light from your flash.  Sometimes though, bouncing appears impossible, as in the case of a very large room where the ceilings and walls are too far.  (You may want to at least try though - sometimes bouncing can be useful even in extreme situations.) Another difficult bouncing scenario is when the ceilings and walls have a strong color, especially if that color is inconsistent with the color of the ambient light.

Here are 12 alternatives for softish light when bouncing from ceilings and walls is not an option.  Few are as good as bouncing but they may be better than nothing:

1. Handheld umbrella.  I personally think this is the best alternative for family photographers.  A handheld umbrella can provide soft directional light, with or without an assistant.
Example (with a ~40 inch softbrella):

Sometimes a normal sized umbrella is not practical.  However, even a small umbrella is reasonably useful.  I have a 19.5 inch umbrella, which is tiny compared to other umbrellas, but has a surface area of around 298.6 square inches, the same as the surface area of a 17.3 x 17.3 softbox.  I also have a 25-inch umbrella (surface area of 490.9 square inches, the same as the surface area of a 22.16 x 22.16 softbox).

Example (19.5 inch reflective umbrella):


Example (25 inch shoot-through umbrella):


Related articles:
DIY handheld umbrella
Purpose-built handheld umbrella

2. Use a softbox or umbrella on a stand.  Many pros use large umbrellas or softboxes such as the Lastolite EZybox to provide a soft directional light in the field.  In terms of light quality, this may be the best option but you're likely to need an assistant for this though.  Note: if you're using a large umbrella, be careful - even a slight breeze can topple the light stand over.

3. Bounce from a reflector.  It is possible to bounce off a reflector, even without an assistant.
Example:

Related article: Bouncing Flash Outdoors in Daylight

4. Use a diffuser.  In daylight shooting, you can use a diffuser to block direct sunlight from hitting your subject.  The large surface area of the diffuser makes it act as a soft light source.  Alternatively, you can block direct sunlight with a shade.  The subject would then be illuminated by open shade.  A potential disadvantage is that the background will appear much brighter than the subject.


Lastolite 33" Tri Grip 1 Stop Triangular Shaped Translucent Diffuser

5. Use a bracket with umbrella or softbox attachment.  Here's a flash bracket that can be paired with a softbox or an umbrella.
ALZO Flip Flash ® Bracket Softbox Kit - Achieve studio quality images with your Portable Flash Speedlight - for all DSLR - Requires Shoe Mount Adaptor for NIKON SB-900* - by alzodigital.com ALZO Flip Flash ® Bracket Umbrella Kit w/H-Bar - Achieve studio quality images with your Portable Flash Speedlight - for all DSLR - Requires Shoe Mount Adaptor for NIKON SB-900* - by alzodigital.com

6. Bounce off random stuff.  Sometimes it may seem as if there are no walls or ceilings to bounce from but there are actually usable bounce surfaces.  Neil van Niekerk has used this technique successfully:  http://www.planetneil.com/tangents/2008/11/14/workshop-views-miami-st-petersburg-fl/ (bouncing from random architectural features).  Occasionally, I've bounced off other people's clothes (while making sure they're not looking :) ).

7. Bounce off your shirt (if it's white).  If you're wearing a white or light colored shirt, you can try bouncing off your shirt.  Because there's no directionality from this method, this is best suited for using flash as fill.

8. Bounce off the ground.  Normally, upside-down light leads to a horror-movie look.  However, if the shadows are not too dark, and the upside-down light is soft, then it may look ok.  Sometimes, strong sunlight does bounce from the floor to illuminate a subject softly, and this technique can resemble that look.
Example:

Related article: Bouncing Light Off the Ground

9. Use a flash modifier that enlarges the surface area of your flash, such as the Lumiquest Softbox III.  I hesitate to suggest this because the majority of flash modifiers offer little improvement.  However, even a modifier that is smaller than the subject can reduce the harshness of bare flash.  Just remember that the key to softer light is a larger apparent size.  Also remember that diffusion by itself does not soften light.  You should also lower your expectations for the softening effect.

Related articles:
Do small modifiers offer any benefit?
Diffusion Doesn't Soften Light

Moving on to solutions that don't actually use soft light:

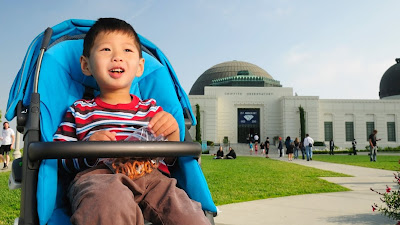
10. Use flash as fill.  If the ambient light is bright, the flash can be used merely to lift shadows, which is less artificial-looking than direct on-camera flash as key.  Some cameras are better at automatically throttling down the flash to do precisely that.  In any case, use flash exposure compensation to make sure the flash isn't too bright.   Using flash would still be an improvement over ambient-only by making shadow detail more visible, and reducing the highlight-shadow contrast.
Example:


Related article: Summer Pool Party

11. Use one or more hard light sources to control the highlight-shadow ratio.

Example 1 (one hard light source + ambient):


Example 2 (two hard light sources + ambient):


Related articles:
Three Dimensional Lighting
Quality vs. Contrast


12. Postprocessing.  Sometimes, postprocessing can be used to simulate a softer light source.
Related article: Dodging and Burning

Any other ideas? Please post them in the comments.

Tuesday, May 18, 2010

Balancing Flash and Ambient Light - Part 2: Sunny Outdoors (Easy Way)

When taking shots outdoors while it's very sunny, you will likely have to deal with harsh shadows, which are not always flattering.  One solution in such a situation is to use flash.  The technical challenge though is that in order for your flash to act as a key light, it must be brighter than the sunlight, which is not easy for small flashes, and even harder when using a light modifier.  The easy way to balance flash and ambient in such a situation is to find a shaded area for your subject.  This will then be similar to the easiest scenario for mixing flash and ambient.


In the shot above, we were visiting the Griffith Observatory and it was quite sunny.  Fortunately there was a shaded spot from the monument in front of the observatory.  In the shade, it was possible for my little SB-800 with a propet handheld umbrella to act as key light.  Steps:
1. Position subject in the shade.
2. With the flash off, set exposure for the sunlit background (or allow slight underexposure if you want to emphasize the subject -- but this will require more power from your flash).
- I used manual exposure for maximum control.
- Metering mode was matrix. This allows the flash to function in i-TTL BL mode (which tries to balance the flash exposure with the ambient exposure)
- I set the ISO to the base ISO of 200 for the D300.
- I set shutter speed to the sync speed 1/250.
- I set aperture so that the light meter was at 0.  With a circular polarizer attached (for a bluer sky), aperture was at f/7.1.
- I took a test shot. Background looked ok.

3. I took a shot with the flash, aiming the flash in the same direction as the ambient light.
- I raised the popup flash to get ready to use it as a commander.
- I switched the flash to commander mode using the camera's menus.
- Because the subject is in shadow, the ambient light within the shaded area acts as natural fill, so I set the popup flash to inactive (it will only act as commander - it will not contribute light).
- I set the remote flash on TTL.
- My SB800 was mounted on a propet umbrella as a modifier.  I aimed it in the same direction as the ambient light.
- I took a shot.  If it looks ok then you're done. 

4. Adjust TTL as necessary.
- I felt the flash exposure was too high. I adjusted to -0.7 FEC. This became the final shot. (In post processing, I reduced contrast slightly, cropped slightly, and straightened the picture).


From Maty 33+ Months

Sunday, October 18, 2009

Bouncing light off the ground

 
The idea of lighting a subject from below sounds unnatural and impractical except to make the subject look scary.  However, in some cases, it works under circumstances where other techniques don't.

This past weekend I experimented with upside down lighting by bouncing light from the ground. Upside down light is not the first lighting scheme I think of unless I want to do a "scary" photo.  But it just so happened that while our toddler was getting a haircut this weekend, he would look downward from time to time to avoid the scissors. I then remembered Joe McNally use upward light as fill in one of the bridal portraits in the Nikon video "A Hands-On Guide to Creative Lighting."

So I tried bouncing the light from the floor and got the shot at the top of this blog entry.  For comparison, here is a shot at a similar angle but with ambient light only:

In my view, the upside down light bounced from the floor was not off-putting in this case and was a reasonable choice for lighting.  Bouncing light from the floor is a technique to consider when there are no walls or ceilings to bounce from - all it takes is a reasonably light colored floor like sand or cement - like this shot at a playground, where I bounced the light from the sand.


Surprisingly, the bounced light showed up even though the shot was at ISO100 (shot was at f/2.8, 1/200, ISO 100, TTL flash triggered via CLS at 0 FEC). In fact in some shots, the bounced light was too prominent and I reduced it by as much as -0.7 FEC.

These are my observations for making floor-bounced light work:
1. Upside down light looks much better on the subject when it's soft (not hard).  In the real world, light rarely comes from below except in specific circumstances like a campfire.  However, upside down light does occur from time to time when there is a strong light from above that reflects from the ground.  When that happens, the upside down light is pretty soft because the floor is acting as the light source for the upside down light.
2. Bounce the light in front of the subject, not directly below the subject.  When the light is bounced directly below the subject, the shadows will be cast upward.  If the light is bounced in front of the subject, the shadows from the upside down light are less noticeable.
3. Floor-bounced light looks best when the subject's face is slightly lowered. This diminishes the upside down shadows.
4. To maximize your flash's power and efficiency, shoot at sync speed (if ambient is bright), and use the longest zoom for your flash.

Saturday, September 12, 2009

Bouncing Flash Outdoors in Daylight

It's not easy to get soft directional light outdoors in daylight, and arguably it's even harder for candid shots without setup. One solution is to bounce an on-camera flash into a reflector.


In the shot above, I got soft directional light in daylight by bouncing an on-camera flash (gelled with 1/4 CTO) into a handheld Lastolite 5-in-1 Mini 18" Trigrip reflector (using the white-surfaced reflector). The area was shaded, so it would have been possible to take a shot using just existing light, but not without blowing out the background (i.e. in the shot above, the flash brightened the subject and thus reduced the contrast between the bright background and the subject):


The soft directional light also makes the subject look more three-dimensional than in the image shot purely in existing light. Finally, with the flash, it was possible to use a faster shutter speed and/or lower ISO than with the existing light only.

COMPARED TO HANDHELD UMBRELLA
I think it's much easier to use a handheld umbrella because the reflector solution requires positioning the flash properly (a pain when switching between landscape and portrait shots) and requires more careful aiming of the flash and the reflector. IMHO, the umbrella is also less conspicuous and thus more spouse-friendly. On the other hand, sometimes all you want is a reflector (e.g. when you're shooting a video), which the umbrella can't be used for. The reflector solution also allows you to switch to using the flash on-camera.

CAUTION
A cautionary note when using reflectors: sometimes, a subject can look fatter with a reflector, when the reflector is aimed upward (e.g. to brighten the eyes) but fills in too much of the shadow under the subject's jaw. Not good. Gather a sample pic of this at your own risk!

Monday, August 31, 2009

Event photography outdoors at night (sort of)

Our toddler celebrated his birthday at the Rainforest Cafe. It was daytime and indoors but may as well have been outdoors at night for photography purposes. If you haven't been there, it looks like a scene from Raiders of the Lost Ark: rock-like walls, tropical plants and vines, rainforest creatures climbing all over walls and ceilings, shafts of light here and there like sun streaming through the thick canopy of a rainforest, complete with thunder and lightning.
From a family photography point of view, there are many opportunities in this setting - dramatic and colorful lighting, interesting backgrounds everywhere you turn. The challenges were equally diverse: high contrast inconsistent and often dim ambient light, not many surfaces to bounce from.
My objectives were: highlight the ambience of the place (given that the location was an important element of this party), emphasize the fun we had at the party, and as much as possible to make people look good.
In this kind of setting I would never trust my camera in the 'auto' mode. Otherwise, people will have the deer-in-the-headlights look and the background would probably look black.
This is how I chose my controls / settings:
1. Because it was too dark for an ambient-only exposure, I used flash. I took the flash off-camera to control the direction and make the subjects look more three-dimensional. I also gelled the flash with 1/4 CTO because: the light from a flash is usually a bit bluish, people look better in warmer light, and it matches the warm-looking ambient light better. After thinking a while, I chose to use the direct flash instead of a handheld umbrella because it would be too tight to move around with the handheld umbrella. Because light conditions were inconsistent and were changing rapidly, I set the flash on TTL (as opposed to manual).
2. To preserve the ambience, the exposure had to be sufficient to show the ambient light. However, if the exposure is set exactly for the ambient light, and the subject has just as much ambient light as the background, then there might be flash blur like this (sometimes ok for action shots, but usually not ok for static shots). I thus underexposed ambient light by -0.7 stops through exposure compensation. The underexposed background also creates subject-background separation.
3. I chose matrix metering because the light conditions, though inconsistent, were evenly distributed. "Consistently inconsistent." I didn't think there was anything present that would fool the matrix metering.
4. I wanted to use the fastest shutter speed possible (reminder - I'm using TTL) to further minimize flash blur. I thus chose the widest aperture on my lens (Tamron 28-75 2.8) by using aperture priority, and choosing 2.8. I also set the ISO to the highest decent-looking ISO for my camera, which was 800 ISO. Note: noise shows up much more easily in shadows (of which there were plenty at the location). If there's enough light, even 1600 ISO looks acceptable.
5. In aperture priority mode, the slowest shutter speed that the camera will choose is determined by the flash shutter speed setting (I don't know the Canon equivalent, but IIRC there is one for Canon as well). By default for Nikon, it's 1/60, which was too fast for the ambient to register at f/2.8 and 800 ISO, so I decreased it to 1/15, based on test shots.
6. I took test shots for the flash as well. The flash was too strong for my taste, so I adjusted TTL by -0.7 stops. I also used the wide angle adapter for a couple of reasons - first, I knew I would take some pictures of groups of people, and they would be more evenly lit when the flash beam is wider. Second, the decrease in flash power from using the wide angle was not a problem (because ambient was dim). In fact, the issue is the opposite -- at f/2.8 and 800 ISO and flash directly aimed at subjects, I was close to requiring less than the minimum flash power, risking flash overexposure. Using the wide angle adapter effectively 'decreases' the flash power, making flash overexposure less likely.
7. Because it was dark and I didn't want people to blink from the preflashes, I used the SG-3IR.
Based on these settings, these are the results I got.

Although I was using slow shutter speeds (1/30 or slower), most shots came out reasonably sharp because the subjects were being lit only by flash (I underexposed ambient by -0.7 stops). In effect, I was taking shots at the shutter speed of the flash duration (around 1/10,000). In a few shots, the ambient light was bright enough that there was flash blur (like this). I didn't notice the flash blur when I was looking at the LCD. If I had, I would have reduced exposure comp further for those shots. As for the background, the slow shutter speed wasn't a problem because it was disguised by the shallow DOF of the wide aperture anyway.
I think the results are ok. A bit underexposed. If I had to do it over again, I may have gone with -0.3 stops for the TTL instead. To reduce contrast, perhaps I should have used the pop-up flash as fill (though I would risk more blinking shots). In that regard, I'm wondering how much better a ring flash would work as fill (a la Strobist David Hobby). I also would have liked to take some shots with the handheld umbrella for variety, or clamped it somewhere (which I've never tried before).