
P.S. If you don't know what's a Geomag, check their product page or have a look at some insane contraptions over google images.
I have a few lightstands and modifiers that I use every now and then, but I hate taking them out of their bags and setting them up unless I specifically need them in something important, but for a casual image I use a much more efficient method, bounce flash.
I recieved a small Geomag kit as a gift in an innovation workshop, it consists of little magnetized metal bars, and small metal balls (bearings?) which you can use to create all sorts of shapes. My wife made that shape you see at the top and I decided to take a few photos. The room lights were overhead and weren't very interesting, so I decided to bring out my flashes and bounce them around the room using the walls and the ceiling as large light sources.
I have three speedlites that I can trigger wirelessly from my camera using the pop-up flash, I put the Geomag at the middle of the bed, then I put one speedlite to the right of the Geomag bouncing it towards the ceiling just above and a little behind me, the flash head was zoomed to 50mm to get a large soft light, the flash was on TTL, here's the shot I got:

It looked pretty ugly just the way direct flash photos look, and the bed sheets behind the Geomag were dark, remember that this shot was completely lit with flash, I have increased the shutter speed to the max sync speed and decreased the ISO until the room lights didn't register.
So what I did next was add (and by add, I mean throw it on the bed, no stands or tripods or anything) another TTL speedlite, but this one was bounced to the right and behind the Geomag, it hit the ceiling and wall and bounced back, then I took the following test shot:

Looks better this time but not good enough, I know I could raise the exposure of the whole photo to have the bright look I was looking for, but there's something still missing, the inside of the Geomag pyramid is in shadows and needs more light.
The back side of this bed is directly to the left of the Geomag, and is made from reddish-brown wood, and from experience, I knew that bouncing flash from this wood would create a reddish color cast, I thought that would add an interesting dimension to the final shot, so I added the third and the final TTL speedlite and bounced it directly to the left of the Geomag, here's what I got:

A much better looking result, don't you agree? After being satisfied with my lighting I decided to start taking actual shots from different view points, I also used a shallow DoF to make the Geomag stand out a little more.


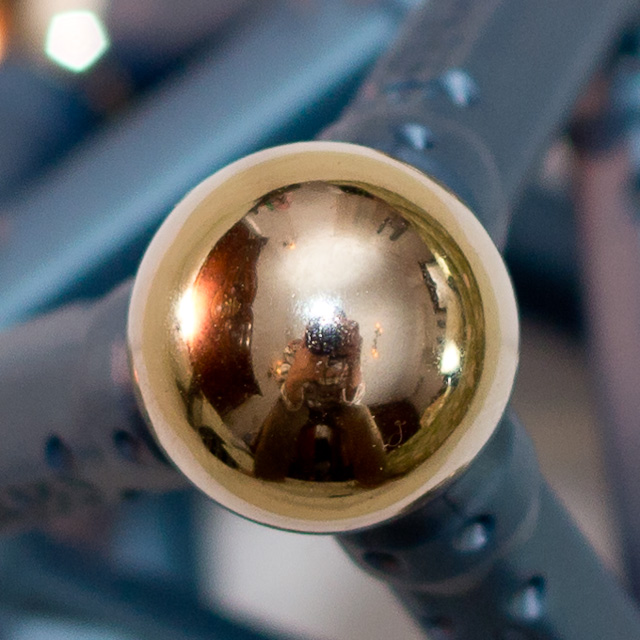
And finally here's a crop from the metal ball in the above shot acting as a 360 degree mirror, it will show you the directions from which the lights were falling, the light you see from the camera is the pop-up flash trigerring the speedlites, it is very weak and does not contribute to the final exposure.
No comments:
Post a Comment
Thanks for your comment. It will be published as soon as we get a chance to review it, sorry for that, but we get lots of spam with malicious links.