
Hello again,
Today we are going to talk about making a very simple and cheap light box to get some good and quick product shots, I am going to go through the lighting steps I took to reach the final photo you see above. I used the same setup to make the photos for my Canon Lenses Chat series of articles.
There are lots of good tutorials about creating a cheap light box from a large cartoon box, so I am going to refer to a couple of tutorials which covers the idea well enough, it is pretty self explanatory once you see the final setup. After that I will talk about the lighting procedure.
Strobist: http://strobist.blogspot.com/2006/07/how-to-diy-10-macro-photo-studio.html
Digital Photography School: http://www.digital-photography-school.com/how-to-make-a-inexpensive-light-tent
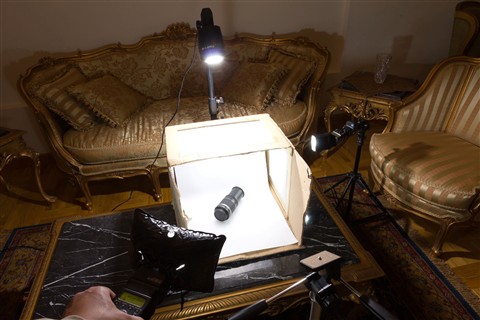
First of all here is the setup shot, you can click on the picture to see a larger version (by the way this picture is taken at 1/10th of a second hand held):
 |
| Light Box Setup - Click to see larger version |
As you can see there are three lights, the one on the right is a Canon 580EX and the one at the top is a cheap $26 Chinese 100 WS strobe, the last light source is a Canon 430EX fired through an inflatable diffuser hand held. The tripod indicates the camera position, I removed it to take this wide angle shot. Here is a picture for the inflatable diffuser in case you were wondering, it is very useful for macro shots and small objects in general.
 |
| Inflatable Flash Diffuser |
So, now that we have seen the setup and the light sources, lets discuss the steps to reach the final photo, as I said before and will always say, the final f-stop number or power ratios are of no significance without the thought process that led to these numbers!
First things first, it is obvious that I placed the box with the product inside then I positioned the tripod and the camera to get the desired look. For this shot I used the fantastic Canon EF-S 60mm f/2.8 Macro lens, the aperture was f/11 to get enough depth of field without getting diffraction. The 1/80 sec shutter speed is for a unique reason, I won't go into more details now but suffice to say that I took a test shot at that shutter speed without any flashes firing and the resulting picture was pitch black, so as long as you are below your camera's sync speed the actual exposure will be determined by the flash duration. Both of the Canon flashes were triggered wirelessly and the Chinese flash is triggered by it's built-in optical slave.
When I started shooting I didn't decide that I will use three lights, I know that the box has three diffused openings (right, top and left) but that doesn't mean I have to light through them all. I started by one flash on the right side of the camera to get a base exposure and took it from there. If you look at the setup picture above you will find that the flash head on the right is rotated 90 degrees to the flash body itself, this was a later modification but in the next picture the flash head was in-line with the flash body (and parallel to the lens inside the box).
 |
| One flash at the right side, flash head parallel to the lens |
I started with the flash at 1/16th power, I had the ISO at 200 and since the distance was close I knew I wouldn't need much power, the histogram told me that I was correct. As you can see above there is a light line along the length of the lens because the flash head was parallel to the lens and the flash produces a rectangular shaped light, I didn't like it so I rotated the flash head 90 degrees to see what happens, here is the result:
 |
| One flash at the right side, flash head rotated 90 degrees to the lens |
This one looked better, satisfied with how the right side of the lens looked like I left that light alone and turned on the top light, I started at medium power to see how things worked:
 |
| One flash at the right, one flash at the top |
The top light lifted most of the shadows, and now the buttons on the lens and the lens cap are well lit, but I decreased the power of the top flash a tiny bit since I found it a little bright, the following one looks better:
 |
| One flash at the right, one flash at the top with reduced power |
This picture is partially satisfying but it is not there yet, and the hot reflections from the right side flash are distracting. Now adding a third light on the left side of the box wouldn't be of value since that side of the lens is completely hidden from the camera.
What I did was turn on the 430EX in the inflatable diffuser and hold it with my left hand to the top left side of the camera (you can see the position in the setup picture above), this served several purposes:
- It provided a needed fill which lessened the hot spots caused by the light on the right.
- It softened the shadows below the lens cap.
- And it gave a third dimension to the Canon logo on the lens cap.
 |
| Final Picture - Click to see a larger version |
I don't remember the exact power setting on the 430EX but I think it was almost one stop less than the 580EX on the right.
You can achieve the same results using incandescent bulbs instead of the flashes if you are on a budget, your power control would be the distance between the light and the box. Just make sure that you have a stable tripod and don't forget to change the camera white balance to tungsten or shoot in RAW.
I hope you enjoyed this tutorial, and remember that there is no definite setup to get a certain result immediately, you have to try and see what works for you.
Clicking on the image for larger version doesn't work, btw detailed information for someone getting into close photography
ReplyDeleteI am really sorry for that mistake, I will fix them in 5 minutes, thanks for the notice.
ReplyDelete