
We recently did a family portrait. In this post, I'll go through the process of how I took the shot.
We usually send out a Christmas card with a family portrait. However, this year we were so busy we never got around to doing it. But finally we decided that since we were going to dress up for New Year's Eve anyway, we might as well take a portrait that day as well. Better late than never, although this one was so late that I wondered about the wisdom of that cliche.
I found a location with lush vegetation and red leaves scattered, giving a temporal context for the photo. However, there was no public parking nearby. Instead, we just parked at a nearby apartment complex's parking, hoping that we wouldn't get towed. I tried to work as fast as I could before residents would complain. We also had to take the shot quickly because it was very windy and chilling. It's cold enough for me, but even colder for my wife and daughter who were wearing skirts.
CAMERA AND LENS
Originally, I wanted to do a shot with a fisheye lens, which would give the portrait a look that was distinctively different from the many pictures people send during the holidays, but my wife didn't like the idea. So I went the traditional route by using a short telephoto. In my case, I chose the Sony 50 1.8 OSS with my Sony a6000. The 50 1.8 is a little short for a portrait lens, but it's close enough. The other alternative among my equipment could have been an Olympus Stylus 1, but the image quality would be lower (in terms of lower bit depth and color depth, etc.).
One advantage of the Sony a6000 is that I don't need a separate trigger for it. Instead, I rely upon the Smile Shutter, which takes a shot when the subjects' smiles have reached the threshold you've set. It's almost as good as a wireless shutter and is definitely more convenient.
I set the autofocus area to Zone setting, and set the quality to Raw + JPEG.
LIGHTING
I wasn't sure what the ambient light would look like before we got there (it could be overcast, or it could have sunlight through leaves (not flattering). If the ambient was not favorable, then I wanted to be prepared with flash. It turned out that the ambient was uneven (with some sunlit patches) therefore the flash was helpful. We shot in a shaded area, which had more even lighting, and the flash as key light helped us "pop" out of the background.
For triggering the flash, I could have used my Sony HVL-F60M with the F20M as commander. However, I wasn't sure yet about how effective Sony's optical wireless lighting is, especially when I'm using a flash modifier. I therefore opted instead for a Yongnuo YN-560III with RF603NII as trigger. I had recently gotten them based on Mohammad's review and from experiments at home, I was sure that I would be able to trigger the flash without problems.
With respect to a flash modifier, I chose the octagon softbox umbrella (which I reviewed here). To support the softbox, I used a generic boom arm and a Linco lightstand. The flash and softbox were attached to the boom arm with an umbrella bracket and a Frio cold shoe.

If I had more time, I would have used sandbags to stabilize the light stand and balance the boom arm but I was in too much of a hurry. The wind knocked down the light stand a couple of times but the equipment survived.
1/6/15 Edit: Just wanted to add some more info on the position of the light. You may be wondering what is the difference between using a boom arm and lightstand compared to simply using a lightstand in this case. Using just a lightstand would indeed have been simpler and faster to setup, and easier to carry. However, a boom arm is ideal for this kind of octagon softbox because it allows me to have greater flexibility in positioning it. More importantly, using a boom arm allows me to position the light closer to the subjects while still having the lightstand outside of the camera's field of view (another reason to use a telephoto lens instead of a wide lens in this case). Having the light closer makes it appear larger to the subjects and therefore softer. It also reduces the spill on the background due to the inverse square law.
On the other hand, something to consider when putting the light close to the subjects is that the falloff (highlight to shadow transition) will be faster (again due to the inverse square law). When the falloff is fast, it could make a subject look dramatic, but that wasn't my intention. In this case, the rapid falloff is mitigated by the ambient light acting as a fill, to decrease the fill ratio (ratio of highlight to shadow) and make the image look less dramatic.
A drawback to consider in putting the light close to the subjects is that I was lighting a group. Putting the light farther away would light the group more evenly from left to right and front to back. One way to address that would be to use multiple lights. In this case, however, I addressed this issue through the position of the light, putting it in the middle of the subjects (neither to camera left nor camera right). I also made sure the light wasn't too close. Rather, I tried to make it equidistant to the subjects' faces. If the light were too close, then the distance of the flash to the subjects would be more variable, with some subjects being significantly closer to the light than others, and therefore more brightly lit.
I also used the diffuser to spread out the light and make it more even. Inside the softbox, I also used the flash's built-in diffuser to light the face of the softbox more evenly. If I used the octagon softbox without its front diffuser, the light would be more directional and collimated (light rays more parallel, due to the parabolic shape of the softbox - notice the deeper shape compared to a normal umbrella), which would give less light to the subjects at the left and right edges. Without a diffuser, the silver interior of the octagon softbox would also have more of a hotspot and can make the light more specular - which would make skin look more oily and shiny. Yes a diffuser would increase spill, but in this case, I already had addressed that aspect by putting the light close to the subjects, so the spill was controlled through the inverse square law.
EXPOSURE
I wanted the flash to be my key light (the dominant light) but I didn't want to totally eliminate the ambient light (besides, that would have required a lot of flash power or a camera with unlimited sync). I set the flash at 1/4 power, which was a guesstimate of how much power I would need, factoring in the flash modifier. It would have helped to have a Yongnuo 560TX to adjust the power remotely but I hadn't gotten one yet.
To set my ambient exposure, I chose manual exposure mode with Auto ISO. This means I can set the aperture I want, the shutter speed I want, and allow the camera to choose the ISO. I still have control of the exposure through exposure compensation.
In this case, I took a test shot, and selected a -1.3EV exposure compensation to underexpose the ambient, and allow the flash to act as key. At -1.3EV under the key, the soft ambient light from the shade would act as fill.
I set the shutter speed to 1/250, which is the flash sync speed for the a6000. Setting the shutter speed at the sync speed is the most efficient setting for your flash.
I set the aperture at a narrow enough aperture that would allow sufficient depth of field for all of us to be in focus. At the same time, I'm also watching my aperture so that it's not so wide that the camera cannot underexpose the ambient sufficiently given the 1/250 shutter speed. It can't be narrower than necessary either, because that would unnecessarily raise the ISO and diminish the image quality. I set the aperture at f/4.0. (Later on, either I or my wife accidentally nudged the dial, which changed the aperture to f/4.5. In retrospect, I should have locked the controls by holding down the Fn button).
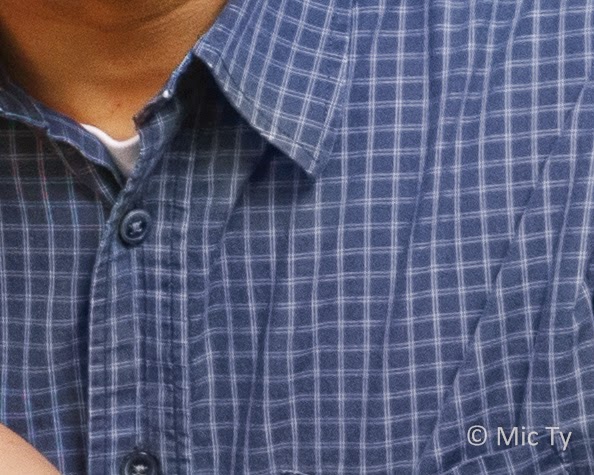
The aperture of f/4 was enough to keep us all in focus, at a shooting distance of around 8 feet, with the 50mm lens. My daughter was the frontmost subject (these are 100% crops):

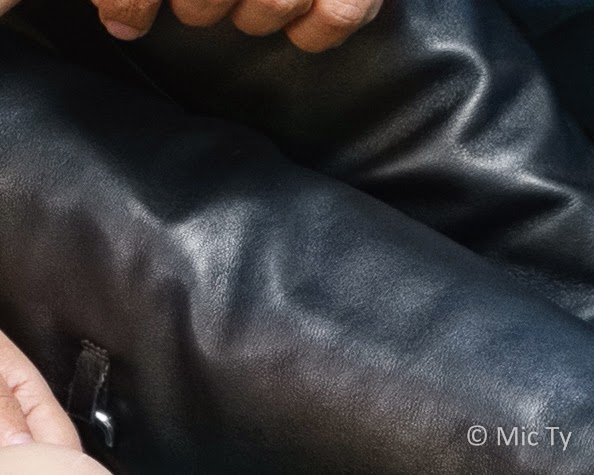
And I was the rearmost subject (100% crop):

At f/4, the ISO was right at 100 at the beginning of the session (around 4:30pm). By the end of the session, around 20 minutes later, the ISO had climbed to 250. I didn't notice that while we were shooting. If I had, and if I had also seen the ISO at f/4.5, I would have tried a slightly wider aperture.
POST-PROCESSING
I imported the shots into Lightroom and compared the Adobe camera profile, the available Lightroom profiles to emulate the camera's picture settings, and the Huelight camera profile. In the end, I chose Camera Light.
I used Spot Removal to remove some zits, and used a Radial Filter with a negative Clarity setting to tame specular highlights on my forehead. I also did some dodging and burning here and there, but overall, the final image was close to the captured image.
One part of processing that surprised me was the apparent presence of moire. There was plenty of what seemed to be moire on the stripes of my shirt, my son's shirt, and even my wife's boots. I think it's partly due to the sharpness of the Sony 50mm 1.8. Fortunately, Lightroom's moire adjustment brush did a pretty good job of neutralizing the moire:

AFTER CORRECTION:
BEFORE CORRECTION (note the magenta on the specular highlights).

Here again is the final result:
And for your amusement, here are a couple of outtakes:


Nice:)
ReplyDeleteI'm thinking I should also do one of these again with my family one of these days.
Thanks Ricardo.
DeleteI'm sure your family would appreciate that.
Best regards,
Mic