 |
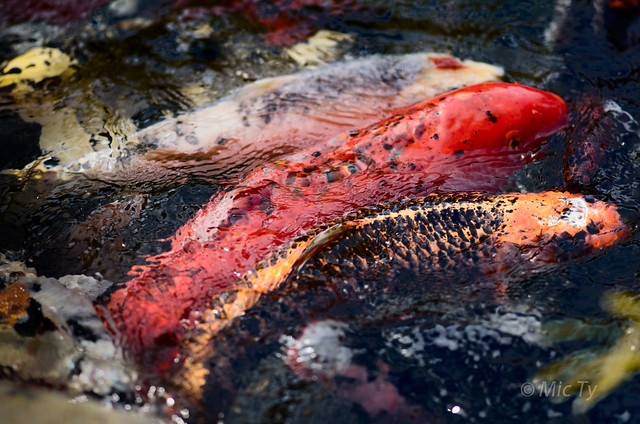
| Three Koi |
Today, I'm going to discuss a Lab experiment on three koi. Don't worry, no animals were harmed in the making of this post :)
Here is how the shot above looked originally:
My son and I were watching some koi in a pond. I let my son take some pictures with my camera while I fed the fish. He used the Nikon D7000 and the Nikon 85 1.8G. The shot above stood out to me because of the symmetry. I also found it interesting because the three koi looked like the Chinese character for the number three ("san").
The shot would have looked much better if I had a circular polarizer so that the sky's reflection on the water could be minimized. I worked on trying to reduce the reflection in postprocessing.
The obvious way to reduce the reflection would be to change the black point and/or increase the contrast. Here is how the shot would have looked:
Here, in Lightroom 4, I raised the contrast +66 and decreased the black to -50. Indeed, the reflections have been drastically reduced. However, the side effect of altering the contrast and black point is that the koi's colors are now unnaturally intense. Fortunately, there is a way to change the contrast without changing the color.
INTRODUCING LAB
One of the helpful folks on the Flickr D7100 Group told me about Lab. Lab is a colorspace similar to like CMYK, RGB (including sRGB and Adobe RGB). It is one of the modes available in Photoshop. Unlike the more familiar RGB and CMYK, Lab's channels are very different: Lightness, Channel a and Channel b. Lightness is luminosity, i.e. how bright a pixel is. Channel a is the magenta/green continuum. Channel b is the blue/yellow continuum. I'm still new to Lab, so I don't dare try to explain how the channels work in detail. Suffice to say for purposes of the editing here, the important concept is that in Lab mode, the luminosity information is separate from the color information.
I exported the image into Photoshop CS6. In Photoshop, I changed the mode from RGB to Lab. I first tried changing the black level, making sure to apply the change only to the Lightness channel:
 |
| In RGB mode, changing the black level changes the color, making them more intense |
 |
| In Lab mode, changing the black level in the L channel does not change the color |
| RGB |
| Lab |
Going back to the levels dialog box, I moved the black point to the right to purposely crush the blues into blackness.
The reflection has been significantly reduced, but the colors of the koi are still the same.
To further refine the reflection, I feathered the levels adjustment by 5 pixels, to make the adjustment smoother:
 |
| without feathering |
 |
| feathered by 5 pixels |
I felt the colors were just a little too bold, so I reduced the saturation a tad. Here again is the final image:
Like I said, I'm still very new to Lab. To help me learn more, I got Dan Margulis' book Photoshop LAB Color. I don't think you can find a better book or better expert on the subject. I have to warn you that Lab can be very complicated (that's why I changed the color of the leaf in Lightroom instead of Photoshop through Lab) but it has many applications, such as color substitution, sharpening, noise reduction, and many others. If you are interested in learning to use Lab, please consider supporting our blog by buying it through our Amazon affiliate link below. Thanks!


No comments:
Post a Comment
Thanks for your comment. It will be published as soon as we get a chance to review it, sorry for that, but we get lots of spam with malicious links.