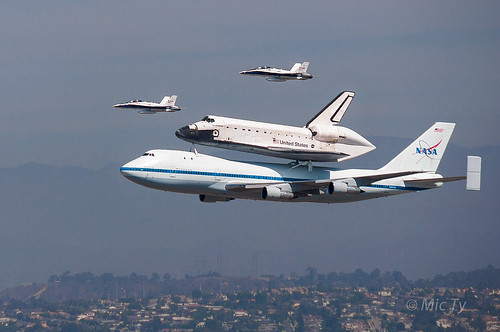
Did you catch the space shuttle Endeavor's victory run over California? I was fortunate to have watched the flyby.
I don't usually take sports or animal photos so I don't have a long lens. My longest is the Sigma 50-150, a DX lens. I had a choice of using the D90 or the D600.
If a DX lens is used on a D600, the resolution becomes about 10mp, which is less than the D90's 12mp. Often, for web viewing sizes or small prints, there's no difference between 10 or 12mp. However, I knew that 150mm (225mm equivalent) was too short and I would need to crop heavily. So I chose the D90.
To make sure the exposure wasn't crazy, I used manual exposure and while watiing for the shuttle I set the exposure to avoid blowing highlights. IIRC, I used a very high shutter speed, 1/2500, for maximum sharpness, and an aperture of f/5.6 for adequate DOF, and the D90's base ISO of 200 for low noise.
I didn't have to do much adjustment in Lightroom - this is close to SOOC. I sharpened in Photoshop CS6 using the process used by Ming Thein in his Photoshop Workflow Tutorial (which I will review soon).
Techniques, Tools, Resources, Real World Gear Reviews and Flash Tutorials for taking better candid and family photos.
Monday, September 24, 2012
Victory Run
Subscribe to:
Post Comments (Atom)

Hi! Great post. I'd love to hear your opinion of Ming Thein's Photoshop workflow tutorial. How detailed does it go? Do you recommend it?
ReplyDeleteHi Brenno. Thanks for your question. It reminded me that I have to work on that long-overdue review. In the meantime here are my thoughts on it:
Delete- Includes techniques in Lightroom and Photoshop. I don't know off the top of my head whether Photoshop Elements has all the tools that he uses in the tutorial but to the extent Elements does not, the more recent versions of Elements have similar tools.
- He goes through some examples of how he postprocesses his photos from start to finish. The examples were chosen because they have different postprocessing issues.
- The tutorials are detailed in the sense that he shows exactly what he does. However, many times he does not say WHY he is doing something (I suppose it is dependent on artistic intent). If you know what you want to achieve and it is the same as what he wanted to do on one of those sample shots then it is useful. If you don't know yet what effects you want to do with your shot, then this DVD is not going to help.
- His sharpening process is something I have not come across before and I believe it is a subtle improvement from the sharpening tools in lightroom. I use his process for shots that I like and want to appear as sharp as possible.
- He has a curve adjustment process that is unusual to me (take note I am not a postprocessing expert). I don't use it because I don't fully understand it and it seems I can get a similar result in far simpler ways, though I am supposing there is a subtle difference that escapes me.
- His dodging and burning is similar to what Mitchell Kanashkevitch does in Mitch's ebook Understanding Post-Processing (reviewed here: http://betterfamilyphotos.blogspot.com/2011/03/understanding-post-processing-by.html )
I think Ming Thein's tutorial and Mitch's ebook are similar in many ways. However some people prefer to watch a video instead of reading a book. The other differences are that Ming Thein's tutorial has a different sharpening process and curves adjustment process. For some, those differences may justify the extra cost.
I will be working on a more detailed review that shows unedited vs. my previous editing vs. what the shot would look like based on what I learned from this tutorial.
Best regards,
Mic