
•Handling
•Menus
•Exposure
•Autofocus
•Manual focus
•Performance/Responsiveness
•Image quality
•Flash/Lighting
•Video
Please note my evaluation is based primarily on the kit lens, and based on having used the NX500 for about 4 weeks. I will post reviews of other lenses separately. Unless otherwise specified, the NX500 samples here are from raw, converted in Samsung DNG Converter or Lightroom 6, with minimal adjustments, so they are representative of what you can readily get from the camera. (Product shots are from the Olympus Stylus 1.)
6/30/15 UPDATE: Firmware v. 1.10 significantly improved the NX500's performance in several important ways. I revised this review to note these changes, highlighted in yellow.
1/12/16 UPDATE: Added info re DMF mode and MF Responsiveness.

WHAT'S IN THE BOX
Here is a video of the unboxing. To recap, the package includes:
- the camera (with body cap but no hot shoe cover)
- the kit lens (with front and rear cap)
- a small external flash with dedicated case
- battery
- neck strap
- Micro USB cable
- USB adapter

The build quality of the NX500 is about average for its class. The top plate is aluminum while the bottom plate is plastic. The body is covered with a synthetic leather that is somewhat slippery. The grip is reasonably chunky for a mirrorless camera -- more substantial than that of the Olympus E-M5 or Olympus Stylus 1, but not as chunky as that of the Sony a6000.

 |
| Samsung NX500 (left) and Sony a6000 (right) |
A small spring-loaded door covers a USB 2.0 port (Micro-B type) and Micro HDMI port. There is no microphone input or headphone output.

The bottom of the NX500 has a battery door that also houses the SD card. The NFC tag is also on the bottom.

The NX500 has a tilting touchscreen LCD with Samsung's Super AMOLED (organic LED). The LCD can tilt down up to 45 degrees, or tilt up 180 degrees for selfies. The display is somewhat bright enough for use in sunny conditions, though not as bright as the LCD on the Sony a6000. In direct sunlight, the display is harder to see and can have rainbow/diffraction effects, although it remains usable. The touchscreen is a capacitive type (as opposed to resistive) that supports multi-touch (it can recognize more than one point being touched).

The NX500 has no viewfinder.
The NX500 does not have a built-in flash but does have a hotshoe and includes a small external flash (the SEF8A), similar in size to the small flash that is included with the Olympus E-M5. The SEF8A has a low profile that makes it easy to carry around. The SEF8A is activated by lifting it up and with no external controls, it is controlled entirely in the camera.


I've never used a Samsung camera before (unless you count smartphones), and my impression of Samsung is that it's an electronics company, not a camera company. I was therefore concerned that the camera would handle more like an electronic appliance than a camera, just like previous-generation Sony NEX cameras. Overall, I would say that I didn't have to worry -- the NX500 handles like a typical camera, with some similarities to Nikon and newer Sonys.
The shutter and other buttons on the top of the camera (including the video record button) are metal.

The other buttons are plastic. The buttons don't have a lot of travel, but they have an unmistakable feeling when pressed, so there is no ambiguity about whether you have pressed a button or not. The labels on the buttons seem like they would not wear off.

Other than the shutter, the primary controls are:
•exposure mode dial: PASM plus custom modes (C), SAS (Samsung Auto Shot), Scene mode (S), and Auto mode. More on these under "Menu" below.
•two command dials: one on top (Dial 1), one at the back (Dial 2).
•4-way directional buttons: Display, ISO, Drive mode, AF mode (single, continuous, active, or manual). The middle of the directional button is for moving the AF point, or pressing OK in menus. These buttons cannot be customized.
•the touchscreen: Unlike in other touchscreen-equipped cameras I've used, the touchscreen is tightly integrated in the control scheme, called Hybrid UI, somewhat like a smartphone. Menus can be navigated by swiping on the screen or by using the d-pad. Pretty much all settings can be adjusted not just by the d-pad but by on-screen buttons and sliders on the touchscreen as well. Indeed, there are some functions that are accessed primarily through the touchscreen. This makes adjusting parameters easier and more intuitive, though it does require having your left hand free, and if you're using gloves, you'll need touchscreen-capable gloves.

Fn Menu
The NX500 has an Fn button that brings up the most commonly-accessed functions (similar to Olympus Super Control Panel, Sony's Fn Menu, or Fuji's Quick menu). The Fn menu allows changing of 12 settings: 4 sliders for exposure (aperture, shutter speed, ISO, exposure compensation), plus 8 buttons for
- white balance
- picture style (called "Picture Wizard")
- drive mode
- metering
- AF mode
- AF Area
- flash mode
- face recognition.
Customizable controls: The functions of the two command dials can be customized for each exposure mode to control aperture, shutter speed, program shift, or exposure compensation. The NX500 also has 3 customizable buttons -- AEL, EV, Custom, with different levels of customization.
EV can be used for:
- any of the 8 buttons that are in the Fn menu except face recognition.
- ISO (also directly accessible through the directional keypad)
- exposure compensation
- touch AF
- dynamic range
- minimum shutter speed
- auto ISO range
- smart filter
- digital zoom ("iZoom")
- MF Assist
- grid line
AEL can be used for:
- any of the functions also available for the EV button.
- various combinations of exposure lock, focus lock, or flash exposure lock,
Custom can be used for
- DOF preview ("Optical Preview"),
- white balance,
- temporarily selecting RAW+JPEG for one shot,
- HDR for one shot, or
- movie standby (like switching to movie mode in other cameras).
Conveniently, it is easy to change the functions of these buttons by pressing the Fn button, then pressing "Key Mapping". This makes it easy to re-customize the controls on-the-fly.
My key mapping settings are: AEL is set to AFL Hold. Custom is set to Movie Standby. I haven’t decided yet what to use for EV. I’ve been changing EV from Dynamic Range to AF Area to Picture Wizard (to switch to black and white).
iFunction: In addition to 3 customizable buttons, there newer Samsung lenses have a customizable iFunction (iFn) button. When the iFn button is pressed, it allows you to use the focus ring as a function ring to change the exposure variables or white balance. Alternatively, the iFn button can change the functions of AEL or EV buttons to either:
- drive mode
- dynamic range
- quality
- minimum shutter speed
- auto ISO range
- focus peaking
- reset the AF point to the center (Note: this is useless because pressing the delete button does the same thing).
- manual focus assist
- link exposure to the AF point
- adjusting the speed of movie playback (fast or slow)
- AF touch
- "Framing Mode" (see Menu options below).

MENUS
The NX500 has menus that use side tabs on the left, with options listed on the right. There are only 4 side tabs: camera (shooting), movie, user preferences, and settings. Not all of the available options for each tab are visible when switching to a tab, so you'll need to keep scrolling to find the option you want. There is a separate menu for playback which has two tabs: playback options and settings (the same settings menu as for the main menu). Fortunately, once you specify your preferences, you can pretty much 'set it and forget it.'
The organization of the options under the tabs, and the names of the options is somewhat confusing. For example, Framing Mode. It sounds like it might change the aspect ratio or something like that but it's actually Samsung's term for specifying whether the LCD shows the exposure value in realtime. Moreover, even when you figure out what it's for, adjusting the settings is another puzzle. For example, in the Movie tab, there is an option for AF Responsiveness, which specifies how readily the AF refocuses when an object passes in front of the camera. The parameters range from -2 to +2. Um... what's that supposed to mean?
On the plus side, I would say that Samsung tried to group the options together whenever they were logically related, instead of creating separate options for them. On the other hand, this also means that some functions are buried deep in the menus. For example, if you want to change the bracketing interval, you need to go to the Camera tab, look for Drive mode, go to AE Bracket, press the right button to bring up a popup window for the intervals available.
The saving grace of the NX500 is that it has a help function, similar to Nikon DSLRs and some Olympus cameras. When activated, all you have to do is wait for a second or so then a popup window appears that explains the option in detail. For example, here's the description for AF Responsiveness: "Set the AF responsiveness during video recording. When the responsiveness is set to low and a new subject is detected, the camera keeps focus on the existing subject for a longer period. After the period, the camera focuses on the new subject." Crystal clear description.
The help function explains even parameters in detail. If you're selecting from the AF Responsiveness parameters and you hover at "-2" it will state: "Set the AF responsiveness to the lowest setting. The camera continues focusing on the existing subject even if a new subject enters the frame."
The help function works not just in the main menu but in the other controls as well. For example, in the Fn menu, if you hover on Picture Wizard, it will state "The user selects the desired effect by adjusting itemized details."
One issue that is not resolved by the help function is the graying out of options. Depending on what options you select, other options become inaccessible and are grayed out. Sometimes, it's obvious why. For example, if you select manual focus, you can't choose face detection. More frequently however, you're left to figure out for yourself why an option is grayed out, which leads to a lot of hunting and scrolling. In the Sony a6000, if you attempt to choose an inaccessible option, it will tell you why the option is inaccessible. It would be nice if the help is improved to include that function by firmware update. In the meantime, here is a guide: Menu Troubleshooting.
Overall, because of the descriptiveness of the help function, I would say the menus of the NX500 are above average for usability, notwithstanding their confusing labels and graying-out of options.
If you'd like to check out the NX500 menu, Samsung has a simulator/tutorial here.

Semi-common options:
Here are some options that are found in several other mid-level cameras, with the NX500's differences noted (if any):


Noteworthy features
- Timer: The timer can be found in Drive mode menu option. The timer can be set anywhere from 2 to 30 seconds. You can choose to take anywhere from 1 to 10 shots, in intervals of 0.5, 1, 1.5 or 2 seconds.
- Extensive custom modes: Like many other cameras, the NX500 can store preferred settings as a custom mode, which allows the user to quickly change to preferred settings for specific shooting scenarios (e.g. shooting at night, or with flash, etc.). The difference is that the NX500 can store up to 40 of these custom modes. Thus, switching the exposure dial to "C" is similar to having 40 of your own scene modes, except it stores far more settings. The settings stored are: exposure mode, aperture, shutter speed, ISO, exposure compensation, metering, dynamic range, white balance, photo style, smart filter, flash mode, AF mode, AF area, JPEG size, and quality. To make it easier to remember which custom mode does what, you can specify the name of the mode and take a representative picture which will show up as an icon for it.
- Bracketing: Bracketing is under the Drive mode menu, but changing the bracket settings requires going in the menus. Bracketing will take only 3 shots. Pressing the shutter will result in the 3 shots being taken in succession. You can bracket the exposure (up to +/- 2EV, varying the shutter speed while keeping aperture and ISO constant), white balance (either along the Blue/Yellow or Magenta/Green axes, but not both), picture style ("Photo Wizard"), or aperture ("Depth Bracket").
- Highlight protection ("SmartRange+"): SmartRange+ is designed to preserve highlight detail in contrasty scenes. SmartRange+ is under the Dynamic Range menu. As with other cameras (e.g. Canon's Highlight Tone Priority or Nikon Active D-Lighting), the NX500 will attempt to preserve highlights by underexposing the shot then use postprocessing to recover the shadows and darker midtones. It appears that the NX500 underexposes by 2/3 stop even if shooting a low dynamic range scene.
- HDR: HDR is also under the Dynamic Range menu option. As with other cameras, it is JPEG only. You can select Low, Medium or High. When you press the shutter, it takes 3 shots in succession.
- Intervalometer / Time lapse ("Interval capture"): This is a separate option in the menu. You can specify the interval time by hour, minute and second (up to 24 hours), the number of shots, the start time, and whether you want the photos saved as a time-lapse video. The time lapse video will have UHD resolution (3840 x 2160).
- Panorama: This is under the Scene exposure mode. It can do vertical or horizontal panning, in either portrait or landscape orientation. It takes the shots quietly. The stitching is seamless enough, although horizons can look curved if you are not using a tripod.
- Multi-exposure: This is also under the Scene exposure mode. It will take 2 shots. Between shots, you can adjust focal length but not exposure. The component images are also saved as separate files.
- Grid lines: Like other cameras, the NX500 can show grid lines. The difference is that the NX500 can show gridlines based on a 4:3 or 2.35:1 movie aspect ratio. It can also show the "Action Safe Area" for video production.
- Portrait Retouch ("Beauty Face"): removes blemishes from detected faces and makes skin appear smoother. Can be adjusted in 5 steps.
- Can save lossless raw, or normal (lossy) raw. I use normal raw.
- Sensor cleaning
- In-camera USB charging. Useful for charging the battery on the go.
Noteworthy features
The NX500 has several features that are not so common:
Focus/release priority: You can specify whether the camera will prioritize accurate focus, or it will take the shot right away even if it might not be in focus. In the real world, the camera still takes some shots that are out-of-focus, so it can't be used for trap focus for example. The practical value of this setting is that it allows you to choose between hybrid autofocus (phase detection + contrast detection), phase detection only, or strictly just release priority.
Electronic first curtain: This allows sharper shots. In normal cameras, the raising of the first curtain can cause a vibration that blurs the photo (shutter shock). To avoid this blur, the first curtain can be raised physically ahead of time, then "raised" electronically when the shutter is activated. The electronic shutter does not work with flash, and Samsung cautions that it can affect bokeh. I leave it on all the time.
Auto Self Shot: when this option is activated, then flipping the LCD to 180 degrees automatically activates selfie-friendly features such as: face detection, 3 second timer, one touch shot (pressing the touch screen focuses the shot and immediately takes the shot after focusing), and Beauty Face. By default, it will automatically take 3 shots but you can change this setting. Because of the NX500's hybrid UI, you can change a lot of settings using the touchscreen while it is flipped forward, without having to turn the camera around to press buttons.
Samsung Auto Shot. For certain scenes, the NX500 can anticipate the peak moment and take the shot. The scenes are Jump Shot (takes the shot at the peak of the jump), Baseball Shot (takes the shot when the batter hits the ball), or Trap Shot (takes the shot when the target reaches the predetermined point). Jump Shot is pretty much automatic once activated. With Baseball Shot and Trap Shot, there is a line on the screen that shows where you want the target to be positioned. After you position the line where you want, you press the shutter and wait. When the target (e.g. ball) reaches the line, the camera takes a shot.
 |
| Jump Shot sample |
I had read of criticisms that the SAS doesn't work, however, I have tried the three modes and it seemed to work pretty well. See a detailed post about Samsung Auto Shot here. It does have certain limits. First, the Baseball and Trap Shot modes work only in landscape orientation, and only for more-or-less horizontal movement. It is not designed to capture a shot when the subject is moving more than 20 degrees diagonal. Second, it needs bright light. In indoor conditions, I got a message that there was insufficient light to use the feature. Overall, however, I believe SAS will be appreciated by parents and family taking casual photos of sports.

Missing Options
With the NX500's extensive options, there's not a lot that's missing from the NX500. Here are some of them:
- Cannot customize the directional pad.
- No built-in flash commander
- No copyright settings for images
- You cannot adjust whether exposure compensation affects flash exposure.
Connectivity Options:
Like many recent cameras, the NX500 offers Wi-Fi b/g/n and NFC. In addition, the NX1 and NX500 are the first cameras to offer Bluetooth. There are several functions that can work with the NX500's wireless modes. There is a dedicated Mobile button to facilitate wireless modes.
1. Some wireless functions don't require an iOS or Android smartphone:
• E-mail. The NX500 can connect to a wireless network. When connected, you can use the NX500 to email pictures, including adding a message. This feature can be used not only for a Wi-Fi network at your home, but can also be used if your phone can act as a personal hotspot.
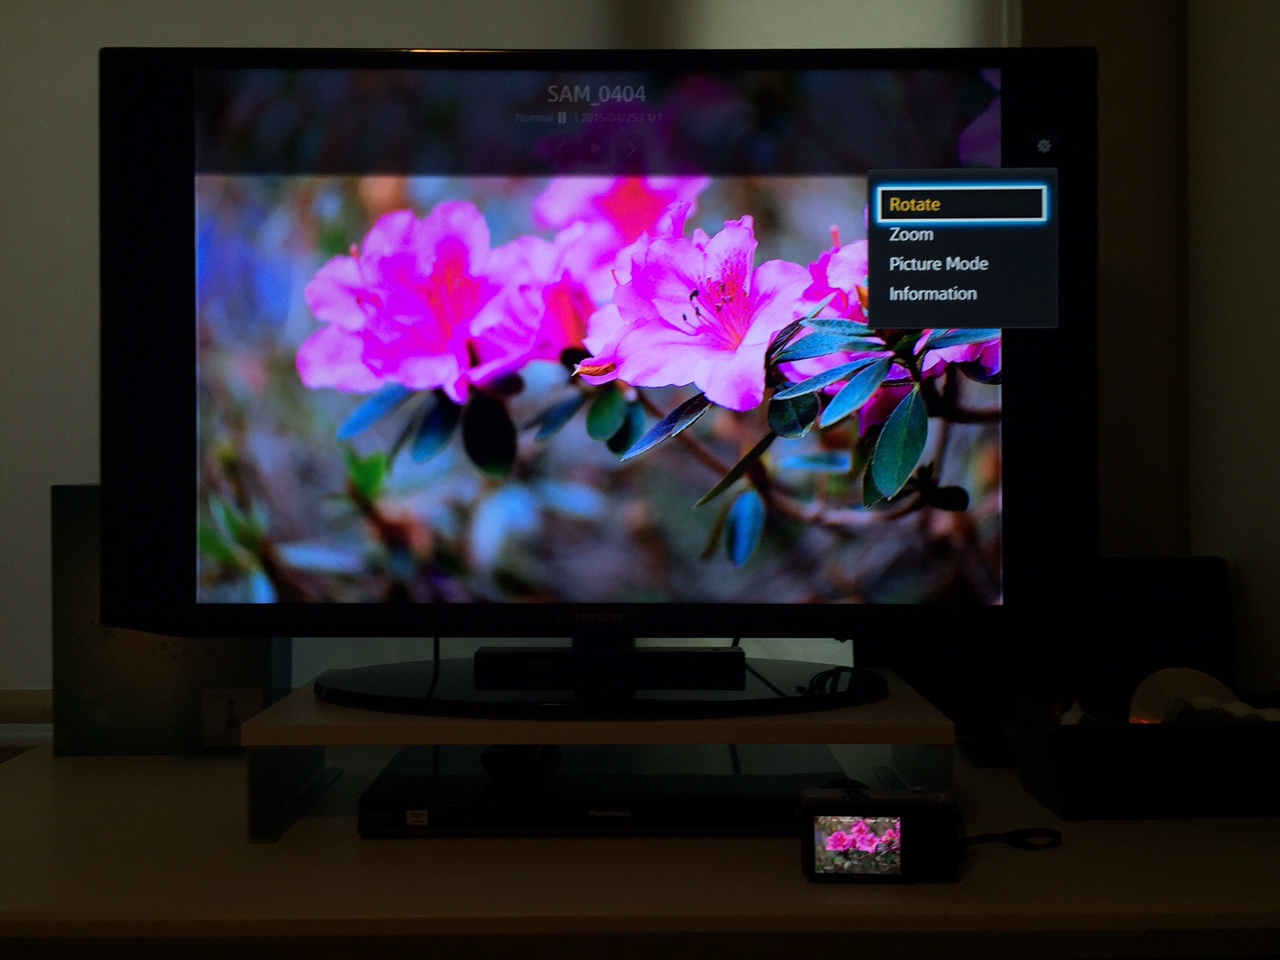
• TV Link. If you have a compatible TV, the NX500 can send images to your TV as long as they are connected to the same wireless network. Images have to be in JPEG or Raw+JPEG (i.e. not Raw only). To use this feature, connect the TV and camera to the same wireless network (if the camera has connected to that network before, it will remember it). Press on the camera icon on the top right in the playback view:

The camera will connect to your network, then you'll see a message on your TV asking if you want to allow the NX500 to connect to your TV. When you press "allow," the image will load on the TV screen. You use the camera to go to the next image.

If I press OK or Enter on my TV remote, a Settings menu will popup that will allow rotating, zooming, changing the TV's display setting, or show minor information about the file (without EXIF data).
Zooming will toggle to 2x or 4x, with the ability to move the magnified section. 2x is shown below:

2. For iOS and Android smartphones, there are additional functions available:
• MobileLink: allows you to view and download photos from the NX500 to your smartphone. There is an option to automatically resize photos to 2MB or less.
• Remote Viewfinder: your Android or iOS smartphone can act as a remote shutter with LiveView.
To use these functions, you need to download a free app to your iOS or Android phone. You then activate the Wi-Fi on your phone. You press the Mobile button on the NX500 to create an ad hoc network (which can be password protected) and select whether you want to use MobileLink or Remote Viewfinder. You then use your phone to connect to the NX500's ad hoc network. Once connected, you launch the Samsung app.
If you use the MobileLink, you'll see a gallery of the images on the NX500 (up to 1000 images). You can only see the JPEG images. That is one reason to shoot with Raw+JPEG rather than Raw only.
In Remote Viewfinder, you'll see a live view on your phone with very little lag. You can use the Remote Viewfinder for both stills and video. The available controls are:
- exposure mode
- aperture, shutter speed, ISO, exposure compensation
- optical zoom
- drive mode (single, continuous, 2sec timer, 10sec timer)
- metering
- white balance
- flash mode
- JPEG quality
- touch AF function
- movie size and movie quality (up to 1080p/60)
Taking shots on the Remote Viewfinder works pretty well, although when you take a picture it does not automatically download the image to the phone. You have to press the icon for MobileLink and select the image for downloading. Another annoyance is that if you switch apps on the iPhone (e.g. to the Photo app), the Samsung app disconnects automatically. The maximum range of the Remote Viewfinder is 23 feet (7 meters).
3. For Android smartphones there are still more wireless functions:
- NFC: allows connecting via Wi-Fi to a smartphone easily, just by tapping the NFC tag.
- Quick Transfer: when connected via Wi-Fi, you can activate Quick Transfer, which will automatically transfer a preview image of captured photos to your smart phone.
- Time synchronization: when connected via Wi-Fi, the NX500 can synchronize its date to match your phone's.
- Pro Suggest Market: an app where you can buy presets for the NX500.
- Bluetooth: the NX1 and NX500 are the first cameras to feature Bluetooth.
- Photo Beam: when connected via Bluetooth, the NX500 automatically transfers the current files to the smartphone while they are close to each other.
- GPS Tagging: when connected via Bluetooth, you can enable GPS on your smartphone in which case the NX500 will save the GPS information to your photos.
- Bluetooth shutter release: when connected via Bluetooth, your smartphone can function as a simple remote shutter for either stills or video.

EXPOSURE
As mentioned above, the NX500 has the usual PASM exposure modes. In Program mode, you can use program shift (changing the aperture/shutter speed combination while maintaining the same exposure value).

Aperture is of course lens-dependent. Shutter speed can be set anywhere from 1/6000 to 30 seconds, although in manual mode, you can also select Bulb (the shutter will remain open until you press the shutter again). Exposure compensation is +/- 5EV. ISO is anywhere from 100 to 25,600, with an option to extend it to 51,200. By default, it uses 1-stop increments, although you can select 1/3 stop increments.
The LCD monitor can either show the real time exposure or not. When the option "Framing Mode" is off, the LCD will show the exposure in realtime, up to +/- 3EV (i.e., an underexposure of 5 stops looks the same on the monitor as an underexposure of 3 stops). If you are shooting with flash and negating the ambient then you can turn on Framing Mode, in which case the LCD live view will show a normal exposure regardless of overexposure or underexposure.

Unfortunately, the depth of field is not shown on the screen in realtime, nor can you see the DOF even if you half-press the shutter. This is one of my gripes about the NX500. One solution is to assign Optical Preview (depth of field preview) to the Custom button. When pressed, the aperture will stop down to show the depth of field. It works ok but fortunately, there is an even better workaround: you can assign Movie Standby to the Custom button. If you press the Movie Standby button, the LCD live view will show the aperture in realtime (whether or not you actually start recording a video), which makes it easier to find the aperture for the depth of field you want. A minor annoyance is that Movie Standby will show letterbox bars based on your chosen movie recording format. As an aside, this means that the NX500 has the built-in capability to show aperture in realtime. Hopefully, Samsung will add an option to enable realtime DOF without having to switch to Movie Standby mode.
Auto ISO: There is an option to use Auto ISO. Auto ISO can be used in manual exposure mode, with exposure compensation. Like Pentax's TAv mode, you select the aperture and shutter speed, then allow the camera to choose the ISO, which you can tweak with exposure compensation.
In addition to Auto ISO, you can also specify a minimum shutter speed up to 1/2000. Specifying a minimum shutter speed is useful for avoiding subject blur. Alternatively, the minimum shutter speed can set to Auto, which will vary based on the focal length (i.e., using the 1/focal length rule -- with focal length based on the effective crop factor focal length). The Auto minimum shutter speed can be further adjusted with an option to use slower or faster shutter speed (+/- 2 stops) than the 1/focal length speed. This feature is very useful for avoiding blur from camera shake, or the opposite problem of the camera using an unnecessarily high shutter speed. For stabilized lenses, I prefer to use the minimum shutter speed option (I generally choose 1/125 for subjects that aren't moving around, or 1/250 or higher for moving subjects, depending on how fast they are moving).
Metering: The NX500 has 3 metering modes: matrix, center-weighted, and spot. In spot metering mode, the metering is measured from the middle of the screen by default. However, there is an option to link the exposure to the AF point (the AF Area first needs to be in Selection AF) and in spot metering mode, this will cause the spot metering to be measured at the AF point. A related option is that in Touch AF mode (where you touch the screen to select the subject), you can separate focus and exposure, similar to some smartphone camera apps.
Manual exposure is pretty typical and doesn't get in your way.
- There is an exposure meter that shows +/- 5EV. A minor criticism is that the indicator is tiny. It could be hard to read if your vision is not very good. Fortunately, the meter reading shows more prominently.
- Realtime histogram: There is an option to display a realtime histogram. The histogram is luminance only and will not alert you if any of RGB channels are blown. From tests, the histogram appears accurate, i.e. it is a close representation of what the histogram will actually look like after the shot is taken.
- Overexposure guide: When activated, you can see blown highlights in realtime, which will show up with zebra stripes. As with the histogram, it will only show areas with overexposed luminance values. The overexposure indicator is reasonably accurate. If I expose as much as 1/3 stop higher than the point when the zebra stripes show up, I will have blown highlights.
- RGB histogram: When reviewing shots, you can see separate histograms for the RGB channels plus luminance. The same screen will show overexposed highlights the same way as the overexposure guide.
- Brightness Adjustment Guide. This unique feature will tell you the luminance value (0-255) of any object in the view in realtime. It has several uses, such as exposing to the right (ETTR). To use this feature, you have to:

Aperture is of course lens-dependent. Shutter speed can be set anywhere from 1/6000 to 30 seconds, although in manual mode, you can also select Bulb (the shutter will remain open until you press the shutter again). Exposure compensation is +/- 5EV. ISO is anywhere from 100 to 25,600, with an option to extend it to 51,200. By default, it uses 1-stop increments, although you can select 1/3 stop increments.
The LCD monitor can either show the real time exposure or not. When the option "Framing Mode" is off, the LCD will show the exposure in realtime, up to +/- 3EV (i.e., an underexposure of 5 stops looks the same on the monitor as an underexposure of 3 stops). If you are shooting with flash and negating the ambient then you can turn on Framing Mode, in which case the LCD live view will show a normal exposure regardless of overexposure or underexposure.
Unfortunately, the depth of field is not shown on the screen in realtime, nor can you see the DOF even if you half-press the shutter. This is one of my gripes about the NX500. One solution is to assign Optical Preview (depth of field preview) to the Custom button. When pressed, the aperture will stop down to show the depth of field. It works ok but fortunately, there is an even better workaround: you can assign Movie Standby to the Custom button. If you press the Movie Standby button, the LCD live view will show the aperture in realtime (whether or not you actually start recording a video), which makes it easier to find the aperture for the depth of field you want. A minor annoyance is that Movie Standby will show letterbox bars based on your chosen movie recording format. As an aside, this means that the NX500 has the built-in capability to show aperture in realtime. Hopefully, Samsung will add an option to enable realtime DOF without having to switch to Movie Standby mode.
Auto ISO: There is an option to use Auto ISO. Auto ISO can be used in manual exposure mode, with exposure compensation. Like Pentax's TAv mode, you select the aperture and shutter speed, then allow the camera to choose the ISO, which you can tweak with exposure compensation.
In addition to Auto ISO, you can also specify a minimum shutter speed up to 1/2000. Specifying a minimum shutter speed is useful for avoiding subject blur. Alternatively, the minimum shutter speed can set to Auto, which will vary based on the focal length (i.e., using the 1/focal length rule -- with focal length based on the effective crop factor focal length). The Auto minimum shutter speed can be further adjusted with an option to use slower or faster shutter speed (+/- 2 stops) than the 1/focal length speed. This feature is very useful for avoiding blur from camera shake, or the opposite problem of the camera using an unnecessarily high shutter speed. For stabilized lenses, I prefer to use the minimum shutter speed option (I generally choose 1/125 for subjects that aren't moving around, or 1/250 or higher for moving subjects, depending on how fast they are moving).
Metering: The NX500 has 3 metering modes: matrix, center-weighted, and spot. In spot metering mode, the metering is measured from the middle of the screen by default. However, there is an option to link the exposure to the AF point (the AF Area first needs to be in Selection AF) and in spot metering mode, this will cause the spot metering to be measured at the AF point. A related option is that in Touch AF mode (where you touch the screen to select the subject), you can separate focus and exposure, similar to some smartphone camera apps.
Manual exposure is pretty typical and doesn't get in your way.
- There is an exposure meter that shows +/- 5EV. A minor criticism is that the indicator is tiny. It could be hard to read if your vision is not very good. Fortunately, the meter reading shows more prominently.
- Realtime histogram: There is an option to display a realtime histogram. The histogram is luminance only and will not alert you if any of RGB channels are blown. From tests, the histogram appears accurate, i.e. it is a close representation of what the histogram will actually look like after the shot is taken.
- Overexposure guide: When activated, you can see blown highlights in realtime, which will show up with zebra stripes. As with the histogram, it will only show areas with overexposed luminance values. The overexposure indicator is reasonably accurate. If I expose as much as 1/3 stop higher than the point when the zebra stripes show up, I will have blown highlights.
- RGB histogram: When reviewing shots, you can see separate histograms for the RGB channels plus luminance. The same screen will show overexposed highlights the same way as the overexposure guide.
- Brightness Adjustment Guide. This unique feature will tell you the luminance value (0-255) of any object in the view in realtime. It has several uses, such as exposing to the right (ETTR). To use this feature, you have to:
- set exposure mode to P, A or S
- disable the overexposure guide
- assign AEL to the AEL button
- turn off HDR
- turn off flash
Real world: I have tried shooting with the NX500 in various lighting conditions. I found the exposure to be reliable and to work pretty much as I would like. The NX500 is seemingly able to distinguish between relevant highlights and highlights that are unimportant, and to select an exposure that just barely avoids blowing relevant highlights, without underexposing to an unnecessary degree. (Please note that in contrasty scenes, this may result in photos that appear underexposed - but are actually properly exposed). In dark conditions, the NX500 intelligently selects an exposure that preserves the low-key atmosphere. I rarely find myself adjusting the exposure compensation as much as, for example, the Fuji X100S. The one weakness of the matrix metering is that it appears to be based only on the luminance channel. Sometimes, the chosen exposure results in a blown RGB channel (especially red).
 |
| highlight details fully preserved |
As I mentioned in my previous post, the NX500's autofocus is one of its headline features. Autofocus performance in mirrorless cameras has received a lot of attention in the past year, with several cameras vying for the claim of having the best AF performance in a mirrorless camera. Camera Store TV conducted an autofocus shootout, where the Panasonic GH4 ultimately emerged the winner. However, because the runner-up Sony a6000 was only slightly behind but at the same time far cheaper, it became a crowd favorite. Now Samsung is trying to take that crown away from the GH4 and the a6000. It's an audacious claim, given that there wasn't even a Samsung camera included in that shootout. It seems like marketing exaggeration, or is it?
The NX500 has the same autofocus system as its big brother the NX1. They both have a hybrid autofocus system with 205 phase detection points, which plaster 90% of the frame. By comparison, the a6000 has 179 AF points, although they cover 92% of the frame. Out of those 205 PDAF points, 153 are cross-type (meaning they can focus on either horizontal or vertical targets), eclipsing the Nikon D4's 15 cross-type sensors, or the 41 cross-type sensors in the Canon 1DX and 5D3, or the 65 cross-type points in the Canon 7DII. So, on paper, the NX500's autofocus specs are simply wild.
The NX500 allows you to select the AF mode, AF area, and to specify the face detection. There are also several options for using the touchscreen to focus.
- AF mode: as with many other cameras in its class, you can select Single AF (SAF), Continuous AF (CAF), Active AF (AAF), meaning it will be single but can switch automatically to continuous if the subject moves), or Manual focus. Another focus mode is DMF (Direct Manual Focus, i.e., manual focus override). To use this mode, you must be in SAF then enable the DMF option in the menus.
- AF area: there are only two AF area options: Selection AF (one AF point), or Multi AF. However, within each AF area, there are several options. In Selection AF, there are four sizes of AF points ranging from a very small square to a square that covers about 1/18th of the screen. In Multi AF mode, you can also select among four sizes of the AF area, from an area only about twice as large as the smallest Selection AF point, to a box that is slightly smaller than the largest Selection AF point, to a larger box that is about 1/6th of the screen, to a box that encompasses all AF points. If CAF is activated an the camera focuses on an object within the Multi AF area, the NX500 tries to track the object as long as you keep the shutter half-pressed, regardless of whether the object is still within the Multi AF area. UPDATE: After firmware v1.10, there are now 5 AF sizes in Selection AF. Multi AF has been split up into Zone AF and Multi AF. Zone AF is for what used to be the second and third size of the Multi AF. Multi AF is now used exclusively for an AF area that encompasses the entire frame.
- Face detection: there is a normal face detection mode, a smile detection mode (Smile Shot), a wink detection mode (Wink Shot), or you can turn off face detection. In normal face detection mode, the NX500 appears to focus on the eyes although not always on the near eye, and is not as consistent as that of Olympus' face detection. It seems to work better when the face is not occupying most of the frame. It also does not seem to work when the camera is upside down in landscape orientation. Smile Shot is similar to face detection except that if you smile, it will trigger the shutter. The Smile Shot is too sensitive in my opinion, and often triggers the shutter even when I'm not smiling. It cannot be adjusted for sensitivity. In a group, a smile from any detected face will trigger the Smile Shot. Wink Shot means that if you wink (and keep your eyes closed) for a couple of seconds, the camera will trigger a 2-second self-timer (even if you have not selected the timer). Turning on any of the face detection options automatically locks you into Multi AF mode.
- Touch AF: you can use the touchscreen to focus in several ways. Touch AF means the camera will focus on whatever point you touch with the AF point size you have selected under Selection AF (even if you're in Multi AF). AF Point means the camera will move the AF point to wherever you touch, but will not autofocus (you instead half-press to focus). Tracking AF as the name suggests means the camera will track whatever subject you touch, even if the shutter is not half-pressed. One Touch Shot is like Touch AF but the camera will take a shot as soon as it acquires focus.

The NX500 does not have an AF-On button or option that can be assigned to a customizable button. However, one of the options for the AEL button is AFL Hold (autofocus lock hold) which means that if pressed, the NX500 will stop adjusting focus until the next time the button is pressed.
Other autofocus-related options:
- As mentioned previously, the NX500 has a Focus Priority option (focus - accuracy, focus - speed, or release). However, even after setting it to Focus - Accuracy, the shutter can still be released even though the subject is not in focus.
- Another autofocus option of the NX500 is the autofocus manual override (Dynamic Manual Focus).
- You can specify whether to save the AF position or to reset it. However, it does not save focal distance, which resets to infinity every time you power off or if the camera goes on standby.

Real world performance.
In the real world, the NX500 autofocus performs pretty well, and in some cases better than the Sony a6000. In particular, its greatest strength is probably its tracking capability. By tracking, I am referring to the camera's ability to automatically have the AF point follow the subject. The NX500 is excellent at locking on to subjects and staying with them, even if the camera or subject moves around quickly. This means there is less of a need to keep moving the AF point to follow the subject. To use the NX500's tracking capabilities, all you have to do is use CAF and Multi AF. When you half-press the shutter, AF points will blanket your target and follow it around as long as you keep the shutter half-pressed. You can also use tracking by selecting "Tracking AF" under the Touch AF menu. With Tracking AF, you tap the screen to select the target. The AF point will then follow the target whether or not you half-press the shutter.

The NX500 is also very good at acquiring focus lock and if CAF is enabled, maintaining autofocus, in normal lighting conditions. If I shoot a continuous burst with CAF, I usually get a higher percentage of shots in focus compared to the Sony a6000. (I will post a more detailed shootout next time.)
However, there are several limits to the NX500's autofocus performance. First, it is highly dependent on the lens. That in itself is not too surprising -- some Sony E-mount lenses focus more slowly as well. However, while even the "slow" E-mount lenses focus quickly, there is a great discrepancy in autofocus speed between a slow-focusing NX lens (e.g. the 30 f/2), and an average or fast-focusing NX lens.
Second, the NX500's autofocus speed is also dependent on the amount of ambient light. In bright ambient conditions, it focuses quickly. In dim lighting, the autofocus speed drops dramatically under ambient conditions that don't slow down the a6000. The decrease in speed seems most prominent when the widest aperture of a lens is narrower. The NX500 can still autofocus in low light, but it can often hunt for a while. It seems to me that the NX500 tends to be able to focus more quickly in low light when I tap on the screen with Tracking AF. UPDATE: With firmware v. 1.10, low light autofocus speed has improved. It's still not as fast as the a6000 in low light, but the firmware allows the NX500 to focus in low light. When using a lens with wider aperture (such as the Samsung 20 f/2.8), the lowlight focus is considerably faster. Here is a video.
Third, the NX500 seem to have a greater difficulty with low contrast and backlit subjects. It is harder for green AF confirmation points to appear on low contrast subjects. With backlit subjects, the NX500 sometimes focuses on the background instead of the subject. In this regard, it seems that I get more consistent results when I change AF priority to Focus - Speed Priority (which uses phase detection only as opposed to Accuracy Priority, which uses both contrast detection and phase detection). UPDATE: With firmware v. 1.10, the NX500 has improved autofocus accuracy in backlit conditions. If you take the time to wait for focus confirmation, it appears that the focus is now generally accurate. Here is a video.

In terms of predictability, the NX500 seems to be more likely to focus on high-contrast objects within the AF point, whether or not they are the closest objects. I usually try to focus on a subject's highlighted area when possible.
 |
| the NX500 focused on the bright background |
MANUAL FOCUS
The NX500's manual focus is similar to its competitors with some exceptions:
1. Distance scale: there is an overlay of the distance scale in feet and meters. However, there is no depth of field indicator. On the other hand, you can press Movie Standby (if assigned to the custom button) to see the depth of field in realtime.
2. Focus peaking: you can change the sensitivity and the color (white, red or green). It is activated only when in manual focus mode, and only when adjusting the manual focus.
3. Manual focus assist: this magnifies the view to make it easier to focus. You can use either 5x or 8x magnification. Unfortunately, the area being magnified is fixed at the center of the frame. You cannot move it around. As with focus peaking, MF assist is activated only when adjusting manual focus.
4. The NX500 allows you to specify the MF Responsiveness -- i.e., how quickly it changes focus distance as you change the focus ring. This is not available for older lenses such as the 30 f/2 and 20 f/2.8.
On the whole, the NX500's manual focusing controls lag behind those of its competitors due to the inability to change the manual focus target area during MF Assist. Hopefully, Samsung can fix this via firmware update.
SHOOTING EXPERIENCE
I use the rear dial for aperture (in aperture priority), shutter speed (in shutter priority), or program shift. I use the top dial for exposure compensation, which allows one-step adjustment of exposure compensation (instead of pressing a button then spinning a dial), and frees up the exposure compensation button for another function. Here are the settings I use:
- AEL - I assigned it to AFL Hold. Similar to back button focus.
- EV - I use it for AF Area (although the Fn button also gives quick access to AF Area). In manual exposure mode with Auto ISO, I use the Fn menu for exposure compensation.
- Custom - I assigned it to Movie Standby. This is useful not just for composing for a movie, but also previewing the depth of field in real time.
- iFn+AEL: Framing Mode. If I am shooting with flash and negating the ambient, I want a quick way to activate Framing Mode so I can see the subject.
- iFn+EV: Quality. Switching to JPEG is necessary when shooting a long burst.
With these settings, I find that the NX500 handles very well, and the controls that I frequently use are easily accessible.
I like the shutter sound. It sounds vaguely like a muffled snapping of your fingers and is unobtrusive.

Selfie usage
I also tried using the NX500 for selfies (let's not debate them at the moment!). The NX500 has several features that facilitate selfies. First, the screen can be flipped 180 degrees, at which point it will show a mirror image (rather than the camera's point of view). Second, when the screen is flipped, you have the option of activating Auto Self Shot, which will enable certain settings that are useful for selfies: it switches to auto exposure, changes the capture mode to JPEG and activates portrait retouch, face detection, one touch shot, and the timer. The portrait retouch level and the type of face detection can be changed but can't be deactivated. The timer can be changed (time, number of shots) or can be deactivated. One touch shot means that if you tap the screen, the camera will focus on that part and will take the shot immediately after focus. One-touch shot cannot be disabled while Auto Self Shot is activated.

If you want to disable Auto Self Shot just temporarily, you can press the Auto Self Shot icon on the screen, which will switch to the regular PASM mode and settings. Here's where the touchscreen comes in handy -- if you want to change the settings, you can do it using the touchscreen, without having to flip back the LCD or using the directional pad. For example, if you're in manual exposure mode and want to change the exposure variables, just tap the onscreen Fn button and slide the onscreen dials for exposure.
Alternatively, Auto Self Shot can be disabled (User Settings: Auto Self Shot: Off), in which case you can use the regular PASM mode.
Taking selfie shots that are in focus is convenient, thanks to the face detection modes available. It solves the dilemma of how to focus correctly and trigger the shutter while holding the camera away or using a selfie stick.

Whether you're using Auto Self Shot or just the regular PASM mode, there will be a new onscreen button for playback to allow reviewing images while the screen is flipped 180 degrees.

Performance / Responsiveness
The NX500 is snappy and responsive. Startup and shutdown is fast enough that I can turn the camera off to save battery without being concerned about not being able to start shooting again quickly enough when the need arises. The menu is also responsive and I have not experienced any pauses or delays in executing commands, except when the touchscreen occasionally fails to register a touch the first time.
The NX500 is also responsive when shooting. The only issue is the very shallow raw buffer of only about 5 or 6 frames on continuous high drive mode (9 fps). After 6 frames, the camera slows down to about 1 frame per second. The buffer appears the same whether I use lossless or normal (compressed) raw, or whether I use raw only or raw+JPEG (even 28mb super fine JPEG), which I find very strange. With the firmware update (v1.10), the raw buffer has improved to 12 frames in lossless raw or 18 frames in normal compression raw, using a Sandisk Extreme Pro (95mbps) at ISO 100. With a Sandisk Extreme Plus (80mbps), I get 9 frames lossless raw or 10 frames with normal compression. At higher ISOs, file sizes increase and not surprisingly the raw buffer decreases. At ISO 6400, using the Sandisk Extreme Pro, I get about 10 shots. In JPEG mode, there is no issue with the buffer depth.
In Continuous Normal drive mode, the camera shoots at about 2 fps. At that setting, it seems I can shoot about 7 frames with Raw only, although the camera starts shooting again after only a brief pause.
There is another mode called Burst, which is JPEG only and is limited to 7mb resolution. In Burst, the camera shoots at 10, 15 or 30 fps for 30 frames. Interestingly, Burst mode is totally silent (it uses a purely electronic shutter).
The NX500 can use continuous autofocus while shooting in Continuous High or Continuous Normal. In Burst mode, the focus locks.

Battery Life is not that great. I get around 350 shots. I suggest getting spare batteries. I got some Wasabi brand batteries (and external charger) and they work pretty well (strangely, on Amazon they are described as a different brand).
PLAYBACK
Reviewing images is similar to most other cameras with a few exceptions:
- "Go West..." By default, to see the next image during playback, you have press the arrow key to the left. It is truly bizarre and I've never seen any other camera do that. Fortunately, there is an option to change the playback direction (Play: Sort By: Oldest).
- Stacking of continuous bursts. By default, if you shoot a burst (continuous shooting or bust mode), the NX500 will stack the burst into a single image. If you wait a little, it will play the shots in sequence, like a mini-slideshow. Fortunately, if you want to look at the burst shots individually, you can easily do so by rotating Dial 2 to "zoom in," which will expand the stack and allow you to review each shot separately. If you prefer that continuous shots are never stacked, you can disable this feature (Play: View Continuous Shots: Unfold).
- Instant zoom. There is an option to instantly zoom to 100% view on the focal point (Settings: Quick View: Hold + Focus Zoom). However, it works only during quick view (the instant review after you take a shot). When reviewing shots during playback, you can do a quick 100% view by double tapping your finger where you want to inspect. However, the AF point does not appear.
- Social media. See the Connectivity Options above. In general, posting to social media is pretty quick and there are many ways to do it. Here's how I do it on my iphone. First, I activate the personal hotspot on my phone (turning on Wi-Fi if necessary). Second, I turn on Wi-Fi on the NX500 by swiping down on the touchscreen to bring up the quick notification panel then tapping the Wi-Fi to turn it on. If the NX500 has connected to a hotspot previously, then it will connect automatically without the need to select the network and enter the password. Once connected, I choose the image(s) I want then tap the "email" icon. An email form comes up. Email addresses that have been used previously are stored, so I just have to tap on them (if you want to post to facebook or twitter, you can use your post-by-email address). You can add a message if you want -- typing on the touchscreen is much easier than using directional keys. Then I just press the send button. The image shows up on my inbox in a few seconds (depending on your phone network). As I said, there are many other ways to do this, and it's even easier if your phone uses Android.
- When reviewing images, you can use pinch-to-zoom, drag, swipe, etc. just like a smartphone.
- You can sort by date (in thumbnail view), but you can't delete by date. If you want to delete more than one photo, you either delete all, or go to thumbnail view and tap each photo to be deleted.

IMAGE QUALITY
The NX500 has a 28mp APS-C size sensor (with 1.54x crop factor) that uses a copper process for less noise, and backside illumination for greater light sensitivity. It is the same sensor as that of the NX1, which DXO recently rated as the best APS-C size sensor for mirrorless at the moment, very narrowly beating the previous titleholder, the Sony a6000 sensor.

Regardless of the DXO or other numbers, I have been impressed with the NX500's image quality. First, I like the tonality of the images, in particular the way the NX500 handles highlights. Highlight roll-off is very smooth. In some cameras, the highlight clips abruptly, which is unlike how negative film behaves and as a result, images look digital. Not so with the NX500, which builds up the highlights gradually until saturation. Check out the highlights on the shot of the Sebastian float below (SOOC, from raw) taken on a very sunny afternoon with cloudless skies, hence the bright specular reflections.
 |
| 30 f/2 pancake |
The NX500 also preserves fine gradations in highlights. Check out this shot of a seagull, in particular the subtle highlight tones of the feathers:

With people, skin looks like it was airbrushed, even if the light source was hard, as in the shot of my daughter in the playground below (SOOC, from raw):

With people, skin looks like it was airbrushed, even if the light source was hard, as in the shot of my daughter in the playground below (SOOC, from raw):
 |
| 20 2.8 pancake |
Here is one from JPEG:
 |
| kit lens |
Second, I also like the colors on its images. The hues are generally accurate, including reds which are faithfully rendered. In terms of saturation, the colors are slightly more saturated than how they look to my eyes in real life, although it isn't saturated to the point of looking garish.
The only issue with colors is that the exposure algorithm seems to expose only for the luminance channel and not the individual color channels, which can result in blowing one or more channels. For example, when an intensely-colored subject is brightly lit, one of the underlying channels might be blown. When that happens, the color becomes inaccurate. As long as I watch for that, the colors are excellent.
 |
| 30 f/2 |
The only issue with colors is that the exposure algorithm seems to expose only for the luminance channel and not the individual color channels, which can result in blowing one or more channels. For example, when an intensely-colored subject is brightly lit, one of the underlying channels might be blown. When that happens, the color becomes inaccurate. As long as I watch for that, the colors are excellent.
Speaking of color, I shoot in raw but it is worth noting that the Auto WB has excellent accuracy. The NX500 is particularly adept with mixed lighting conditions.
Besides having accurate AWB, I also like the fact that when setting a custom white balance, the NX500 takes the sample from only a small area in the middle of the screen instead of the whole screen, which makes it much easier to get a gray sample. In terms of white balance settings, the NX500 has a separate AWB setting to preserve the warmth of incandescent lighting (Auto + Tungsten). You can also fine-tune any of the white balance options (blue/amber and/or green/magenta)
High ISO:
To test the NX500's low light capabilities, I took some shots with the NX500 at Disneyland's Haunted Mansion. If you've never been there, it's very dark inside. The camera took a while to focus (I turned off the AF assist lamp) but as for the image quality, I thought the NX500 did very well:
 |
| ISO 25,600, f/2, 1/30 |
The shot below was at ISO 25,600, pushed an additional 1.5EV in post, i.e., equivalent to ISO 76,800 (BTW, the light was indeed green). It was taken in raw, converted with Samsung DNG Converter, and imported into Lightroom with no luminance noise reduction and the Lightroom default +25 chroma noise reduction:
 |
| ISO 25,600 +1.5EV, f/2, 1/30 |
Here is a 1:1 crop:

Here are less macabre examples from other Disneyland attractions (which were almost as dark inside):
 |
| ISO 25,600 +0.6EV, f/3.5, 1/20 |
 |
| ISO 12,800 +0.4EV, f/3.5, 1/125 |
The NX500 performs admirably at high ISOs, retaining accurate color and good detail even at extremely high ISOs. It has negligible amounts of chroma noise, and its luminance noise does not look obtrusive in my opinion.
One issue is that when using very high ISOs, there is a risk of tints in shadows if the light source is colored or tinted. The shadow tint tends to be the complementary color of the colored light. If the colored light is yellow, the shadow tends to be tinted purple. If the colored light is green, the shadow tends to be tinted magenta. This is not unusual and I have seen this issue in other cameras as well, including the Sony a6000. In any case, these tints in shadows can be corrected in post by adjusting the tone curve for each color channel (I'll do a tutorial next time).
 |
| before correction |
 |
| After correction ISO 25,600, f/3.5, 1/30 |
Here is a 1:1 crop showing the level of detail at this ISO:

Dynamic Range, Latitude and ISO invariance
The NX500 files are very forgiving. In postprocessing, you can push exposure more than 5 stops while still retaining color accuracy and having reasonably controlled amounts of noise. Some may ask if anyone really needs to push exposure that much. I like that capability because it allows me to underexpose the shot intentionally to preserve highlights, then push the exposure in post to recover the shadows. Readers of this blog have already seen this example:
 |
| straight-out-of-the-camera |
 |
| after adjustment |
In this shot, the camera chose an exposure that preserved the highlight detail in the veranda (even the lightly colored tiles, which were under direct sunlight). In post, I pushed the exposure 3 stops, and an additional 3 stops for the flowers (a total of 6 stops for the flowers). Here is a 1:1 crop of the flowers:

I did not apply luminance noise reduction and only used the default +25 color noise reduction. (BTW, the light inside was yellow, and I decided to retain that hue.)
Here is another sample shot taken at ISO 100, pushed +5EV in post:
 |
| original shot at ISO 100 |
 |
| +5EV in postprocessing |
DPReview's new exposure latitude widget doesn't have the NX500 yet, though it has the NX1, which performs about the same as the Nikon D5500, better than the other samples from cameras with APS-C sensors or smaller.
Separate from its dynamic range and latitude, the NX500 is also nearly ISO-invariant. This means that a shot at ISO 100, pushed in postprocessing, looks almost identical to a shot taken at an equivalent higher ISO, within limits. This is possible due to the sensor's low noise floor, probably because of the copper process.
The benefit of ISO invariance is that in high contrast scenes, you can preserve highlight detail better and reduce noise in highlights. You can shoot at the base ISO, capturing the highlight detail, then push only the shadows (which leaves the highlights at the lower ISO). Here is a sample (not a good photo, but it demonstrates the point). The first shot was taken at ISO 2000. The bright scene outside the tent is blown and has no detail.


Here is a second shot which was taken at ISO 100, then pushed +4.3EV in post. It retains the detail in the outside scene. Moreover, the amount of noise is about the same as the shot taken at ISO 2000, which means that underexposing the shot incurred no noise penalty (compared to shooting at the "correct" exposure of ISO 2000):
 |
| original shot at ISO 100 |
 |
| pushed +4.3EV, with highlights recovered |
 |
| 1:1 crop |
Again, the NX500 isn't in DPR's ISO invariance widget yet but you can check out how the NX1 performs. You can examine the difference between a shot at ISO 3200, versus a shot at ISO 100 pushed 5 stops. For the NX1, the shot at ISO 100 pushed 5 stops has very slightly more luminance and chroma noise compared to the shot at ISO 3200. Compared to the Nikon D5500, the NX1 has slightly less deterioration.
The NX500's ISO invariance has limits. If I push the shot more than 5EV, the deterioration becomes more apparent, especially in shadows. Second, this invariance only works at the base ISO. If a shot is taken at higher ISOs to begin with, then pushing it in post shows greater deterioration.
Sharpness
The NX500 and NX1's sensor has a resolution of 28mp, the highest among APS-C sensors at the moment. It also helps that the NX500, like the NX1, has an electronic first curtain shutter option, which helps increase sharpness by avoiding shutter shock.
Sharpness is also of course highly dependent on the lens. However, it is worth noting that Samsung's lenses hold their own against its competitors.
 |
| 50-150, 20 2.8, 30 f/2, and 16-50 kit lens |
Most of the samples from this review are from the 16-50 pancake kit zoom, which is noticeably sharper than Sony's 16-50 pancake kit zoom. Here is a sample from the 30 f/2:
Here is a 1:1 crop (you can even see the texture of her skin):
One open question as to sharpness is whether the NX500 has an anti-aliasing filter. The NX1 has no AA filter, but I have not seen any direct confirmation by Samsung of whether the NX500 likewise has no anti-aliasing filter.
 |
| 30 f/2 @ f/4, 1/1000, ISO 100 |
Here is a 1:1 crop (you can even see the texture of her skin):
 |
| 1:1 crop |
One open question as to sharpness is whether the NX500 has an anti-aliasing filter. The NX1 has no AA filter, but I have not seen any direct confirmation by Samsung of whether the NX500 likewise has no anti-aliasing filter.
Postprocessing workflow
Lightroom 5.7 and earlier versions of Lightroom don't have support for NX500 raw files. Instead, you had to use Samsung's DNG converter. To install the converter, you connect the camera to a computer via USB, from which you can install the Samsung DNG converter. Once the raw is converted to DNG, you can import DNG to your editor.
This had been the importing workflow I had been using:
1. Insert SD card into computer, copy all the files into a "holding" folder.
2. Use Samsung DNG Converter to convert all the .SRW raw files from the holding folder into DNG, save the DNG files into the same holding folder. Check the box to open the folder when done.
3. After converting all raw into DNG, delete all the .SRW files in the holding folder.
4. Open Lightroom, select the holding folder, and copy all the files (JPG and DNG) into my external drive.
5. Copy any movies from the holding folder into my external drive. (Lightroom doesn't seem to accept the NX500's videos.)
6. Delete the contents of the holding folder.
Fortunately, Lightroom 6 has just been released and has support for the NX500 raw files. Moreover, it appears that the LR6 raw conversion is on par with conversions by Samsung's DNG Converter.
In Lightroom 5.7, there was a noticeable difference between Samsung DNG Converter and Lightroom's native raw conversion. Below are 1:1 crops from a raw shot from the NX1. The one on the left is the Lightroom conversion. The one on the right is from the Samsung DNG Converter, which appears sharper and has less aberration (look at the fringes of the window frame).
In Lightroom 6, it is harder to distinguish the LR6 raw conversion and the one by Samsung DNG Converter. In the crops below, the left one is Lightroom 6, and the right one is from Samsung DNG Converter. The Samsung DNG Converter looks like it has slightly higher contrast, but nothing that can't be easily replicated with very minor adjustments.
FLASH
The NX500 has no built-in flash but has a standard ISO hotshoe. The package comes with a small external flash (SEF8A).
The SEF8A is TTL only (no manual mode). The flash exposure compensation (FEC) range is +/- 2EV. There is a flash exposure lock, but it can only be used if it is assigned to the AEL button.
The NX500 does not have a built-in commander capability. To use a commander, you need a commander-capable flash.

The sync speed is 1/200. I have been able to use the NX500 with 3rd party flashes and flash accessories (e.g. Yongnuo YN560III and YN560TX) with no problems. If you exceed the sync speed, the flash simply will not fire.
Lightroom 5.7 and earlier versions of Lightroom don't have support for NX500 raw files. Instead, you had to use Samsung's DNG converter. To install the converter, you connect the camera to a computer via USB, from which you can install the Samsung DNG converter. Once the raw is converted to DNG, you can import DNG to your editor.
This had been the importing workflow I had been using:
1. Insert SD card into computer, copy all the files into a "holding" folder.
2. Use Samsung DNG Converter to convert all the .SRW raw files from the holding folder into DNG, save the DNG files into the same holding folder. Check the box to open the folder when done.
3. After converting all raw into DNG, delete all the .SRW files in the holding folder.
4. Open Lightroom, select the holding folder, and copy all the files (JPG and DNG) into my external drive.
5. Copy any movies from the holding folder into my external drive. (Lightroom doesn't seem to accept the NX500's videos.)
6. Delete the contents of the holding folder.
Fortunately, Lightroom 6 has just been released and has support for the NX500 raw files. Moreover, it appears that the LR6 raw conversion is on par with conversions by Samsung's DNG Converter.
In Lightroom 5.7, there was a noticeable difference between Samsung DNG Converter and Lightroom's native raw conversion. Below are 1:1 crops from a raw shot from the NX1. The one on the left is the Lightroom conversion. The one on the right is from the Samsung DNG Converter, which appears sharper and has less aberration (look at the fringes of the window frame).
 |
| Lightroom 5.7 (left) vs. DNG from Samsung DNG Converter (right) |
In Lightroom 6, it is harder to distinguish the LR6 raw conversion and the one by Samsung DNG Converter. In the crops below, the left one is Lightroom 6, and the right one is from Samsung DNG Converter. The Samsung DNG Converter looks like it has slightly higher contrast, but nothing that can't be easily replicated with very minor adjustments.
 |
| Lightroom 6 (left) vs. DNG from Samsung DNG Converter (right) |
FLASH
The NX500 has no built-in flash but has a standard ISO hotshoe. The package comes with a small external flash (SEF8A).
The SEF8A is TTL only (no manual mode). The flash exposure compensation (FEC) range is +/- 2EV. There is a flash exposure lock, but it can only be used if it is assigned to the AEL button.
The NX500 does not have a built-in commander capability. To use a commander, you need a commander-capable flash.
The sync speed is 1/200. I have been able to use the NX500 with 3rd party flashes and flash accessories (e.g. Yongnuo YN560III and YN560TX) with no problems. If you exceed the sync speed, the flash simply will not fire.
VIDEO
Video features
There is no movie mode on the exposure dial. To record, you simply press the record button on the corner of the thumb grip. Alternatively, the Custom button can be assigned to Movie Standby. When Movie Standby is pressed, the display shows the video's aspect ratio.
The video has full manual control. You can control aperture or shutter speed or both in real time, with Auto ISO. However, the rotation of the command dial is audible in the video.
There is unfortunately no microphone input. You can control the microphone level, and there is an option to activate a wind cut.
The touchscreen works while recording the video. You can tap the screen to change the focus to any subject. Unfortunately tapping the screen also risks moving the camera, and there is no apparent way to change focus via the directional pad.
AF Responsiveness and AF shift speed are both customizable. AF Responsiveness allows you to specify whether the autofocus is persistent (will maintain focus on a subject even if something passes by in between the camera and the subject) or responsive (the camera attempts to focus immediately on whatever is in front of the camera). AF shift speed controls how quickly the focus changes. You can select a slow AF shift speed for cinematic effect.

4k
One of the features that has been touted for the NX500 is its ability to record 4k video without the need for an external recorder. There are currently only a few cameras that offer this feature, and even fewer at this price point. Unfortunately, the NX500's 4k video mode has limited usefulness because it is cropped 1:1 from the sensor, which is about a 2x crop -- a 16mm lens looks similar to a ~32mm lens.
Another reason the 4k is difficult to use is because it will record only to H.265, a video codec that is highly efficient but still very new, and is unsupported by most nonlinear editors. Samsung does include a software to convert H.265 to H.264.
Finally, at the time of this writing, not a lot of people have 4k TVs.
For me, the primary use for the 4k video is to extract frame grabs to use as stills. The NX500 makes it pretty easy to do that. On playback, you can pause the video, and advance it almost frame by frame, then save a frame as a JPEG. Here is a sample frame grab (composited, of course):

CONCLUSION
Wrapping up this review, here are what I think are the NX500's major strengths and weaknesses:
Strengths
Overall, in my opinion the Samsung NX500 is an excellent camera. In my next post, I will do a head-to-head comparison with the Sony a6000. Update: comparison is here.

SUGGESTIONS FOR SAMSUNG

Wrapping up this review, here are what I think are the NX500's major strengths and weaknesses:
Strengths
- excellent high ISO
- excellent dynamic range and latitude
- ISO invariant
- very good colors
- Lenses are cheap, pretty good, with good selection
- touchscreen interface works very well
- very good autofocus except in low light
- very good auto white balance
- No EVF
- MF "point" cannot be moved.
- AF performance in low light is slower than some competitors (Firmware v. 1.10 improved the low light autofocus speed; backlight autofocus accuracy is no longer an issue)
- DOF preview is not in realtime. (Workaround available.)
- 4k video is heavily cropped
- When using video or continuous burst, maximum ISO is limited to 6400.
- Raw buffer is only about
6 shots18 shots (after firmware v 1.10) - JPEG has too much noise reduction, noise reduction below ISO 6400 cannot be disabled.
Overall, in my opinion the Samsung NX500 is an excellent camera. In my next post, I will do a head-to-head comparison with the Sony a6000. Update: comparison is here.
SUGGESTIONS FOR SAMSUNG
- Expand the raw buffer if possible (e.g. when shooting raw only with normal compression)
- Allow an option to view depth of field in real time (similar to Movie Standby)
- Allow the manual focus point to be moved.
- Allow an option to focus on the nearest object rather than the highest-contrast object
- Remove the ISO 6400 limit for continuous burst and video.
- Add a customizable option to AEL button to allow switching to MF mode in one button press. This should work both as focus lock and focus peaking.
- When manual focus is selected, always show Focus Peaking. Should not have to turn the focus ring.
- Make the Fn menu customizable.
- Allow magnification (separate from MF assist).
- For Multi AF mode, enable different shapes, e.g. rectangular (horizontal or vertical).
- Custom setting should include OIS mode, Framing Mode.
- Allow deleting by date.
- Allow digital zoom for video
- Please undo the 4k video crop
- Enable fully electronic shutter as an option (for silence)
- Allow raw images to be captured (in the camera) when shooting with Remote Viewfinder
RESOURCES
DPReview has a pretty active forum for Samsung NX
Menu Troubleshooting - If options are grayed out and you're wondering why.
Recommended Settings for NX500
Download the free Samsung NX app to see the lenses available, together with samples. The app also shows the available accessories, and includes guides.
If you found this review useful and would like to buy, please consider purchasing through our Amazon affiliate link. I will donate all proceeds to a 501(c)(3) charity, Food for the Poor, Inc.

No comments:
Post a Comment
Thanks for your comment. It will be published as soon as we get a chance to review it, sorry for that, but we get lots of spam with malicious links.