My wife needed new passport photos. It's much more convenient and economical to have passport photos taken at a store somewhere like Costco. On the other hand, by taking the shots myself, my wife could get as many shots as she wants to her satisfaction.
I have posted about DIY Passport Photos previously. On this occasion, instead of a quick two-light setup like I did last time, I tried a slightly more elaborate setup just for fun (and practice).
TRIGGER
If I had several wireless flashes, I could have controlled all my flashes remotely with the popup flash using Nikon Advanced Wireless Lighting. However, I only have two such flashes at the moment, therefore I decided to trigger the flashes using a combination of the Radiopopper JrX Studio and optical triggering.
LIGHTING SETUP
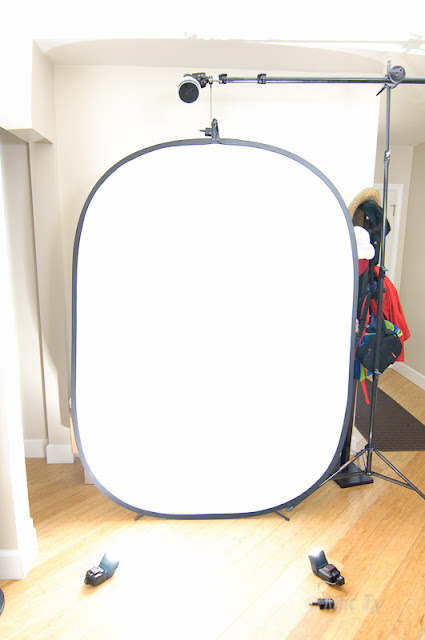
For my background, I used the Fotodiox 5 ft x 7 ft popup background, the same one I used in my recent portrait session. I illuminated the background with two speedlights aimed diagonally at the background. Having two speedlights instead of one has a couple of benefits. First of all, each speedlight individually will use less power, allowing quicker recycling. Second, if aimed properly, each speedlight can fill in any shadows produced by the other speedlight, making the light on the backgound as even as possible. I aimed the lights diagonally (similar to an "x" pattern) so that the light on the background would be more even instead of having a gradient due to the inverse square law.
The speedlights for the background were a Nikon SB-26 and a Nikon SB-24. The SB-24 was controlled and triggered by a Radiopopper JrX. The SB-26 was triggered optically with its built-in slave.
I also added a hair light (visible in the shot above). For my hair light, I used an SB-80 controlled and triggered by a Radiopopper JrX with a honeycomb grid (to avoid flare). The flash was mounted using the CowboyStudio boom. However, instead of attaching the boom to its included stand, I attached it to a Linco 8408 8 foot-lightstand. I noticed that the weight of the boom and flash was enough to cause the sturdy light stand to bend slightly (it's not barrel distortion).
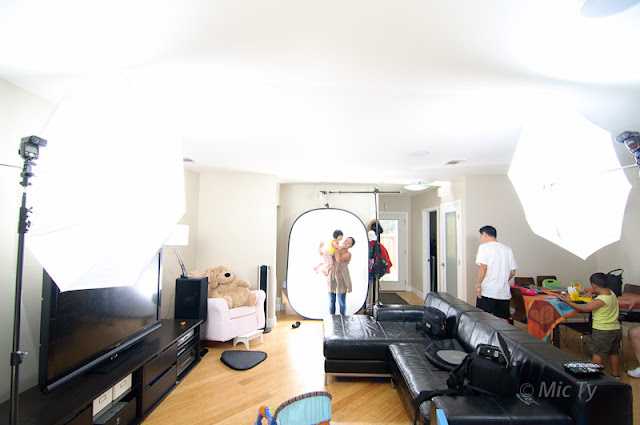
For my key light, I used two umbrellas, one umbrella on each side of the subject, aimed at around 45 degrees. This was the setup my co-author mshafik suggested, and is actually the setup that is also suggested on the Department of State website. Shadows from the left umbrella would be cast on the right but would be filled in by the right umbrella, and vice-versa, thus producing a very evenly-lit photo.
I used a Nikon SB-800 with a 60-inch shoot-through umbrella, and a Nikon SB-800 with the 42-inch Lastolite Trifold shoot-through umbrella. I chose shoot-through umbrellas because their light is less directional than a beauty dish, softbox or reflective umbrella, plus I would get some bounce off the ceiling, walls and floor, making the light as soft and as even as possible. For absolutley minimal shadows I would have placed the umbrellas at camera height. However, I placed it higher than that just for the slightest bit of modeling.
Both flashes were mounted on Linco 8310 lightstands with a Frio coldshoe on the cowboystudio D adapter for the 60-inch umbrella, and my old umbrella adapter (also with a Frio coldshoe) for the trifold umbrella (because the 8mm trifold shaft is too wide for the D adapter). Both flashes were triggered optically with the Nikon SB-800s on SU-4 mode. It would have been nice to have more Radiopopper JrX Studios to control the SB-800s but I only have two JrX Studio receivers, which I already used for the hair light and one of the background lights. I didn't use the JrX for the key lights because I was going to be shooting near the key lights anyway, so it wouldn't be difficult to adjust their power by pressing the buttons.
Here's how the whole setup looked:
EXPOSURE
Because the subjects were stationary in a fairly controlled environment, I chose to use manual flash exposure instead of TTL. Using manual flash in these circumstances would give more consistent results than using TTL.
First, I decided on the balance of flash and ambient. In this case, for maximum control and sharpness, I decided all the light would be from the flash. Using only flash as my light source allows me to have full control over the intensity, quality and direction of the light. In addition, the effective shutter speed would be the flash duration, which is very brief (even at maximum power, it never gets slower than 1/800). The high effective shutter speed would help increase image sharpness (by minimizing blur from camera shake and subject movement).
To use flash as my only light source I had to minimize the ambient by setting the shutter speed to the sync speed (1/200 for the Nikon D90). For maximum image quality, I set the ISO to the base ISO (for the Nikon D90, 200). For adequate depth of field, I initially selected an aperture of f/4.0. At these settings, the ambient was underexposed by around 3 stops (though not completely gone).

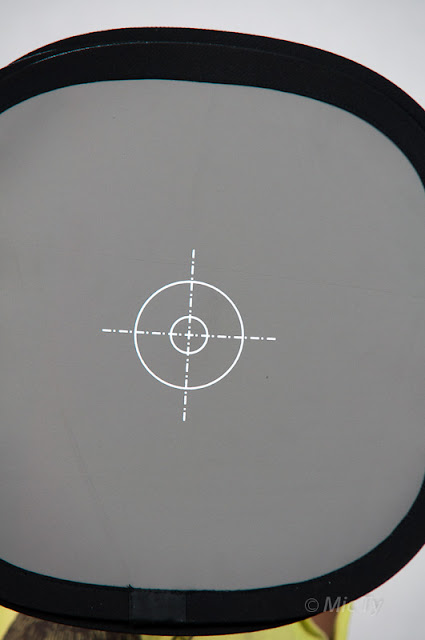
To set the flash exposure, I would have liked to use the CyberCommander's flashmeter. However, I need to have the CyberCommander sent to Paul Buff for a minor repair. To help set my exposure, I used the Fotodiox Tri-Fold Reflector, a multipurpose reflector. The Tri-Fold Reflector can be used to set focus or white balance, or be used as a gray card, or to set a white point and/or a black point. On the reverse is a silver reflector which can be used as fill for portraits.
I asked my son to help me hold the gray card side of the reflector. I then took a shot with the gray card filling up most of the frame. By doing so, I could see where the gray of the gray card was showing up on the histogram.

Originally I had the aperture at f/4.0. With the flash power settings I had chosen, the histogram of the gray card was showing that the gray was to the right of the midpoint, implying overexposure. To reduce exposure, I could either power down the flashes, move the flashes further away, decrease the ISO or narrow the aperture. Moving the flashes further away was not a good option for me because of lack of space. Plus, although the falloff would be more even due to the inverse square law, the farther the umbrellas, the smaller their apparent size would be, and the harder the light would be. Decreasing the ISO was not a good idea because I was already using base ISO (further decreasing the ISO would be similar to overexposing the image). Between powering down the flashes or narrowing the aperture, I decided to narrow the aperture so I could increase the depth of field and get into the sharper aperture of the lens. It would also further reduce the ambient. I adjusted the aperture until the histogram of the gray card shot was showing most of the pixels to be in the middle of the histogram, which was f/5.6.
To make sure the exposure would be correct, I had to maintain the flash-to-subject distance, so I asked my subjects to stand exactly where my son had stood for the gray card shots (next to the sofa).
COMPOSITION
Because the intended result was a headshot (i.e., I was not trying to capture the background), I needed a long lens and chose the Sigma 50-150.
I started about 8 feet or so from the subject, and my focal length was initially about 70mm. I changed this throughout the shooting session.
Pop quiz: let's say upon taking a shot, I found that the subject's nose looked too big or the face looks too narrow. Do I: a) use a shorter focal length; b) use a longer focal length; or c) none of the above. The answer is 'c'. Perspective distortion is controlled by the distance from the camera to the subject, not the focal length. If the subject's nose looks too big or the face looks too narrow, I am standing too close and need to move backward. This is why the Department of State's website suggests standing at least 4 feet away from the subject. Standing too far might not be good either -- it can make the subject's face look wider (which may or may not be better, depending on the subject's face).
You probably know about the rule of thirds. It's just a guideline not a law but I shoot more or less according to that most of the time. But when shooting passport photos, I have to remember instead to put the subject close to the center because passport photos (in the US) have specific requirements about the amount of space above and below the head, and rules about the permissible size of the head.
In this first shot (of my father-in-law), I incorrectly took the shot with the head too high in the frame. I later found that there was not enough space above his head, so I had to create that space in post-processing.
This was a better way to frame the subject:
In fact I could have put the face even closer to the middle.
BTW, in the US, the required photo is square therefore it doesn't matter if you take the shot in landscape or portrait orientation. However, if I use portrait orientation it's easier for me to estimate if I have enough space around the head. As a rule of thumb, I frame the shot so that I capture a small area beyond the shoulders. You'll see later on that for the US passport requirements, that's about right.
Just for fun, my wife also wanted to take an impromptu shot with our daughter. The flat lighting for a passport photo is not what I would use for a portrait like this, but it was just a casual shot anyway.
In this first shot (of my father-in-law), I incorrectly took the shot with the head too high in the frame. I later found that there was not enough space above his head, so I had to create that space in post-processing.
 |
| wrong framing for passports |
This was a better way to frame the subject:
 |
| better framing for passports |
BTW, in the US, the required photo is square therefore it doesn't matter if you take the shot in landscape or portrait orientation. However, if I use portrait orientation it's easier for me to estimate if I have enough space around the head. As a rule of thumb, I frame the shot so that I capture a small area beyond the shoulders. You'll see later on that for the US passport requirements, that's about right.
Just for fun, my wife also wanted to take an impromptu shot with our daughter. The flat lighting for a passport photo is not what I would use for a portrait like this, but it was just a casual shot anyway.

POST PROCESSING
When postprocessing for passport photos, you have to be a bit careful. The exposure, brightness (gamma) and contrast all have to be neutral.
To confirm the exposure, I looked at the shot of the gray card (which is supposed to be middle gray). To my surprise, the pixels were to the left of middle in Lightroom (this taught me not to trust the D90's histogram). To fix this, I hit the 'auto' exposure adjustment in Lightroom. Normally I don't trust auto exposure but in this case, the auto exposure would adjust the image so that it would be approximately middle gray, which is exactly what I wanted. Turned out that this required a +0.85 ev adjustment (so the original f/4.0 aperture would have been close to correct).
I also adjusted white balance, which was easy. All I had to do was use the white balance dropper on the gray card. I then applied that exposure and white balance settings of the gray card shot to the rest of the shots in the session by syncing the shots, and just for good measure, using the 'match total exposures' command. Because I shot in manual mode and was using manual flash, the adjustments that work for the gray card shot would also work for all the other shots in the session.
After the white balance and exposure adjustments, I edited the catchlights. I don't like how there are two white dots on the iris (makes it seem like the subject has two pupils or something). I also corrected skin blemishes.
I then exported the image as a JPEG to use an online cropping tool to get the correct size. Previously I used epassportphoto.com. Now the Department of State has its own cropping tool, and it's free (though somewhat unfortunately named).
To use the tool, you just hit a button to upload your shot, then you position the image, dragging the image and zooming in and out so that the crown of the head to the bottom of the chin fits within the permissible range. Then you click the crop button and save the image.

The resulting image will be a 600x600 jpeg.

Unfortunately it's not easy to print this out as such (photo labs probably won't print 2 inch x 2 inch photos). (That's one advantage of ePassportPhoto.com - the resulting cropped image is ready to print at 4x6.)
Instead, what I had to do was to make a collage so that it could be printed on the more standard 4 x 6 inches. First, I opened the cropped photo in Photoshop Elements. I selected all of the image, then added a border by clicking on the Edit menu and selecting Stroke (Outline) Selection... I chose an outline size of 1 pixel (choose "inside" instead of center or outside). This added a very thin border around the photo.
I then resized the canvas to 1800 pixels x 1200 pixels. Then I selected the photo and pasted copies side by side 3 photos wide and 2 photos tall.


I then ordered a print of the photos on 4x6.
As I said, it's a lot of trouble for passport photos. But at least the subjects will hopefully be happier with their photo. :)
No comments:
Post a Comment
Thanks for your comment. It will be published as soon as we get a chance to review it, sorry for that, but we get lots of spam with malicious links.