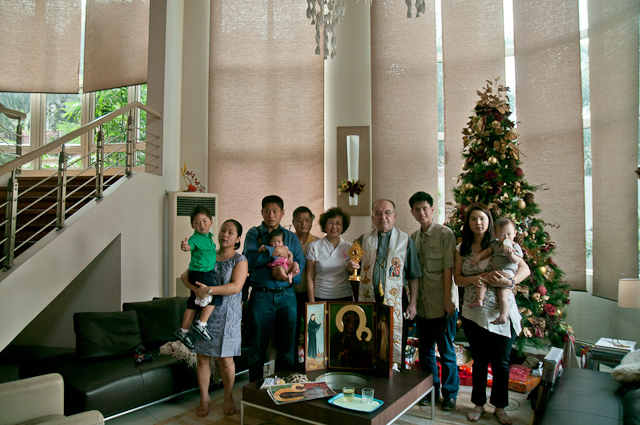
At a blessing of my parents' house, my non-photographer aunt took the shot above (that's me in blue). The original shot looked like this:

It wasn't her fault. I let her use my camera, and I had intended to avoid completely blowing out the windows by balancing the outside ambient with flash. I had turned the flash on but I was demanding a lot from the flash - rear bouncing to a wall and ceiling that is about 35 feet high (not to mention the horizontal distance), and the flash didn't recycle in time. The one shot where the flash did recycle in time wasn't exactly the decisive moment:

Fortunately the shots were taken in raw format, giving me a fighting chance to rescue the images.
ACTIVE D-LIGHTING
Active D-Lighting is a function in some Nikon cameras and in ViewNX. It tries to recover highlights and at the same time lift shadows. I personally don't often use Active D-Lighting. I notice that on the D300, when Active D-Lighting is "on," there is more noise in the shadows. In addition, I find that applying Active D-lighting tends to make the image look flat.
I applied Active D-Lighting to the shot above and got this:

You'll see that a common theme in these recovery techniques is that I needed to brought back some of the color and punch. I did this by increasing vibrance and clarity (aka local tone mapping or local contrast) in Lightroom. I also needed to do significant white balance correction so that the image wouldn't look too bluish.

VIEWNX2 SHADOW PROTECTION
In ViewNX2, there is a function called shadow protection, which is the complement of highlight recovery. It attempts to recover areas that would otherwise be deep in shadow.
Applying it to the original image, I got this:

Increasing vibrance and clarity, and adjusting white balance, I got this:

EXPOSURE
In Lightroom, both exposure and brightness appear to brighten the image, but they have different effects. Increasing exposure tends to brighten highlights much faster than does brightness, which tends to affect midtones primarily. Below, I applied a +2 exposure to the original image, as well as vibrance, clarity and white balance correction.

Before I could get a satisfactory tone on the subjects, the highlights were already at the limit of blowing out. As a result, most of the midtones remained in shadow and the image looks very contrasty. This is not necessarily bad. Sometimes, that's the effect I'm after. Not in this photo though.
BRIGHTNESS
As mentioned above, brightness also lightens an image but mostly affects midtones. Increasing brightness (to Lightroom's limit of +150), vibrance, and clarity, and correcting white balance, I got this:

FILL LIGHT
Some postprocessing apps also have an effect called fill light. In Lightroom, fill light lifts shadow areas while maintaining the black point.
Compared to brightness, more of the pixels that were in shadow were moved to the midtones, yet at the same time, there are more pixels that remain in the leftmost portion of the histogram, making the image appear to have more contrast than the version with the brightness adjustment. For this particular image, I like this effect best of all. However, that's not always the case and I usually try different adjustments or combinations depending on the effect I'm after.
No comments:
Post a Comment
Thanks for your comment. It will be published as soon as we get a chance to review it, sorry for that, but we get lots of spam with malicious links.