To give our crib the best chance of being sold I wanted to use good (or at least above average) lighting on the photo. I imagined a slight spotlight type effect on the crib. Here's how I did the shot.
1. Ambient: the room was lit by a table lamp with a compact fluorescent type bulb. Because the CFL has a different color from that of flash, and because I wanted to play with my new toy (YN-560), I chose to eliminate ambient altogether. I chose the base ISO (200) and set the shutter speed to sync speed (1/250). If I had only one flash, I would have used the ambient as fill. For my aperture, I wanted a decent depth of field, so I chose f/5.6. (In retrospect perhaps I should have chosen a shallow DOF just to attract attention, even though it's less informative...)
2. Key/Main light: to get the spotlight effect, I zoomed the flash to 105mm and asked my wife to hold it up high from camera right. One of the few times when my wife will agree to act as a lightstand.
I still haven't figured out how to sync the YN-560 when using the Nikon commander mode, so I used the regular optical sync on the YN-560, the SU-4 mode on the SB-800, and used manual mode on all flashes (manual mode won't have preflashes).
I just chimped the power. I could tell you it was 1/32 but that doesn't really mean anything (the amount of power needed depends on the aperture, the ISO, the distance of the flash to the subject, the guide number of the flash, the zoom of the flash (which affects the guide number), plus your intended use for the flash). I just adjusted the power to the point where it looked right. On my first try the flash was too strong, so I just estimated the amount of overexposure and got to where I needed to be.
First try:

Adjusted:

3. Fill light: To reduce the highlight-shadow contrast (this is for babies after all, not axe murderers), I added fill. Fill light should generally be soft, so I used bounced light. I placed the SB-800 on a changing table on camera left and aimed it to the ceiling. Again I chimped the power. This one is the one I liked:
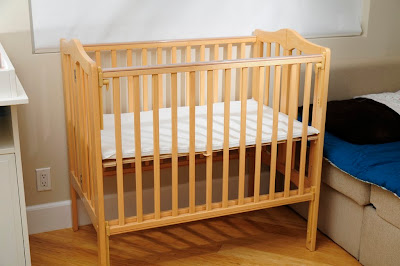
However, I thought it would be too subtle for buyers to notice the lighting, so I increased the highlight-shadow contrast a bit by reducing the fill 1 stop:

Note: the way I did the shot is not the conventional way. The conventional way is to add fill light first then the key. However, I've gotten used to doing the key first (perhaps because of instant gratification).
My wife also asked me to take a shot of the bite marks on the crib (from our son, now almost 3 years old). If I wanted to get the maximum texture out of it, I would have used hard light and aimed it across the scratch. But of course I wanted to put the crib in the best light, as it were, so I used soft light. As with the previous shot, I 'deleted' the ambient light. Then I set the SB-800 on top of a nearby table and again aimed it at the ceiling.

The shot looked ok to me but I wanted a low contrast look, again to de-emphasize the scratches, so I added light in the shadow.

To further reduce contrast, I reduced the bounced light 1 stop and used the popup to add light. A pop-up flash is on-axis and is ineffective for showing texture. Perfect for this job :)
Bounced light reduced 1 stop...

... then popup flash added.

No comments:
Post a Comment
Thanks for your comment. It will be published as soon as we get a chance to review it, sorry for that, but we get lots of spam with malicious links.